

MCU SDK Application Manual
1. Overview
This document guides developers on using the MCU SDK low-code approach to integrate Ubases IoT modules. Add the MCU SDK directly into your MCU project to implement product requirements such as air purifiers. The MCU SDK already implements serial protocol communication, including product info registration, remote control, and device status reporting. Use this guide to quickly learn the MCU SDK and development workflow.
1.1 Glossary
| Term | Description |
|---|---|
| MCU | Microcontroller — the device control chip that runs all application logic. |
| Low-code | Programs that support automated configuration and integrate required features with minimal code. Example: MCU SDK (automated configuration and low-code serial protocol integration). |
| MCU SDK | Integrates the serial communication protocol so developers can add the SDK to MCU project code. Call the corresponding low-code APIs to communicate with the module and the cloud. |
| RAM | On-chip MCU memory used for data during program execution. |
| ROM | Flash memory on the MCU chip used to store the program. |
1.2 Hardware resource requirements
When adding MCU SDK code to an MCU project, reserve sufficient resources for the SDK. If MCU resources are insufficient, implement the serial protocol yourself using the Serial Protocol Document.
RAM at least: 2 KB
ROM at least: 2 KB
After adding the MCU SDK to your project, read the following sections for API usage and how to implement product features with the SDK.
1.3 MCU SDK file description
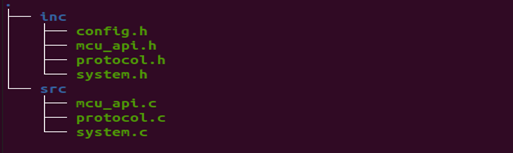
- MCU SDK directory structure
- File description
| File | Description | Modifiable |
|---|---|---|
| config.h | Configures product info, MCU firmware version, log printing, and Thing Model data. | Yes |
| mcu_api.h | Declares MCU-callable functions. | No |
| mcu_api.c | Defines MCU-callable functions for module UART communication and related business features. | No |
| protocol.h | Declares MCU-callable functions that provide data the MCU needs. | Yes |
| protocol.c | Implements or adapts Thing Model data handling. Some functions must be completed by the developer. | Yes |
| system.h | Declares all encapsulated serial protocol functions. | No |
| system.c | Defines all serial protocol handling functions. | No |
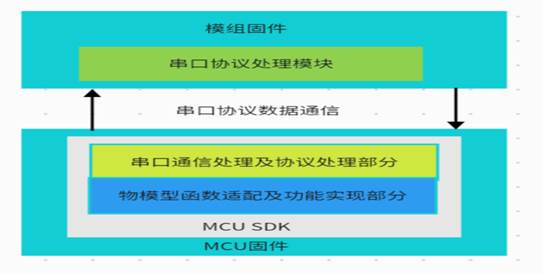
1.4 System architecture
2. Key API description
This chapter describes key MCU SDK APIs and how to call them. Learn how to initialize the MCU SDK and how the MCU exchanges data with the module. Coverage: MCU SDK configuration, receiving UART data, and sending UART data.
2.1 MCU SDK configuration functions
UartProtocolInit()
- Initializes the MCU SDK: configures the receive buffer and related state
- Must be called immediately after MCU startup so UART data can be received and processed
- Declared in mcu_api.h
UartProcessPro()
Polling handler that validates whether buffer data matches the protocol format
Must be called in a loop at 100–200 ms intervals
Declared in mcu_api.h
2.2 MCU SDK data receive functions
UartRevOneByte()
- UART receive function that stores serial data in the buffer
- When the MCU receives UART data as a byte stream, use this function to place bytes into the MCU SDK buffer
- Declared in mcu_api.h
UartRevStream()
UART receive function that stores serial data in the buffer
When the MCU receives UART data via a buffer, use this function to move that data into the MCU SDK buffer
Declared in mcu_api.h
Notes:
When using MCU SDK receive APIs, choose either UartRevOneByte or UartRevStream based on how the MCU handles UART data—use only one.
Before handling UART data, configure the UART buffer size in config.h. The MCU SDK default buffer size is 1 KB.
2.3 MCU SDK send/handling functions
UartWriteData()
UART send function; developers must adapt the send interface for their MCU
Called by other MCU SDK functions to send data to the module
Function name is defined in protocol.c and declared in protocol.h; implement the UART send adaptation
UartReportBoolTypeData() and UartSynReportBoolTypeData()
Report bool-type data from MCU to module
UartReportBoolTypeData is asynchronous; the module does not reply. Use when report frequency is low.
UartSynReportBoolTypeData is synchronous; the module returns processing status. Prefer for frequent short-interval reports for stability.
Declared in mcu_api.h
UartReportValueTypeData() and UartSynReportValueTypeData()
Report integer-type data from MCU to module
UartReportValueTypeData is asynchronous; the module does not reply. Use when report frequency is low.
UartSynReportValueTypeData is synchronous; the module returns processing status. Prefer for frequent short-interval reports for stability.
Declared in mcu_api.h
UartReportStringTypeData() and UartSynReportStringTypeData()
Report string-type data from MCU to module
UartReportStringTypeData is asynchronous; the module does not reply. Use when report frequency is low.
UartSynReportStringTypeData is synchronous; the module returns processing status. Prefer for frequent short-interval reports for stability.
Declared in mcu_api.h
UartReportEnumTypeData() and UartSynReportEnumTypeData()
Report enum-type data from MCU to module
UartReportEnumTypeData is asynchronous; the module does not reply. Use when report frequency is low.
UartSynReportEnumTypeData is synchronous; the module returns processing status. Prefer for frequent short-interval reports for stability.
Declared in mcu_api.h
PacketAllTypeData() and UartReportAllTypeData()
PacketAllTypeData packs all data types into a data buffer. Call UartReportAllTypeData to flush/send and clear the buffer.
UartReportAllTypeData sends buffered data via the UART send function and clears the buffer.
Declared in mcu_api.h
Whenever you pack with PacketAllTypeData, you must call UartReportAllTypeData to process the data.
3. MCU SDK application
3.1 Porting the MCU SDK
3.1.1 Porting MCU SDK files
In the MCU project, complete peripheral initialization (UART, timers, GPIO, etc.).
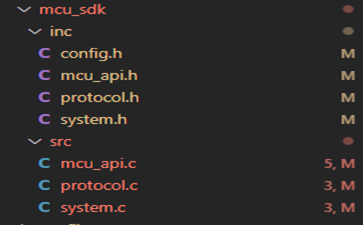
Add the MCU SDK
.cand.hfiles to the project. Structure after adding:
Call UartProtocolInit during project initialization.
Call UartProcessPro in the project
whileloop or a timer ISR for continuous polling.Place either UartRevOneByte or UartRevStream in the UART receive interrupt or receive path.
After these steps, the MCU SDK is fully ported and can perform basic module testing. Product feature testing requires the remaining steps below.
3.1.2 Modifying MCU SDK files
- Per product features, implement the control functions defined in protocol.c.
For an air purifier project, complete actions for functions such as:
ControlSwitchState: power switch control
ControlModeState: mode setting
ControlSpeedState: fan speed setting
……
ControlFilterResetState: filter reset
3.2 MCU SDK information configuration
3.2.1 Product information
After creating a product on the Ubases IoT platform, you obtain a product ID and product flag. After the MCU sends them to the module over the UART protocol, the module uses them to construct the hotspot name and BLE advertising name in device provisioning mode. The Product Key is also required for MQTT topic subscription and product activation.
Write the product ID and product flag in config.h of the MCU SDK, for example:

- Notes:
- Do not rename the PRODUCT_ID and PRODUCT_FLAG macros in config.h; only change their values.
3.2.2 MCU software version
The MCU software version is used by the module to decide whether MCU firmware needs OTA.
The version is defined in system.h of the MCU SDK, for example:

- Notes:
- a. Do not rename the MCU_SOFTWARE_VER macro in system.h; only change the version value.
- b. MCU OTA for this version is not yet supported.
3.3 Device provisioning
3.3.1 MCU resets the module's network configuration
After the MCU establishes a heartbeat connection with the module, it can send a network reset command to make the module enter device provisioning mode.
Call UartReportResetState in the MCU SDK to send the reset command and enter device provisioning mode.
You can also send the following UART command to enter device provisioning mode:
5a a5 10 04 00 00 13After the module enters device provisioning mode, use the Ubases IoT App to provision it:
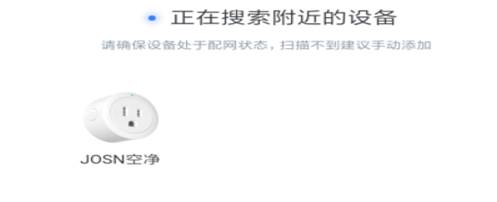
In the Ubases IoT App, tap Add Device to search. As shown:

If the module is already in device provisioning mode, it appears in the search results.

Tap the device icon to start device provisioning.
Select Wi-Fi and enter the password, then tap Next; the App provisions the device.
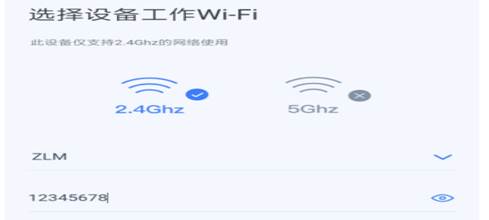
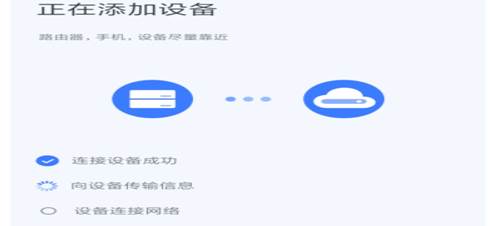
- Notes:
The module supports two device provisioning methods: AP and BLE. By default, both are enabled when the module enters device provisioning mode.
UartReportResetState is declared in mcu_api.h.
If the MCU has not established a connection with the module, UartReportResetState has no effect.
After entering device provisioning mode, the module reports its selected provisioning method to the MCU through network status commands and continues reporting connection status during provisioning.
3.3.2 MCU specifies the device provisioning method
Selecting a device provisioning method is essentially the same as resetting the network; only the command differs.
After the heartbeat connection is established, the MCU can send a command to enter device provisioning mode.
Call UartReportWifiConfig in the MCU SDK:
- Parameter 0: enter BLE provisioning mode
- Parameter 1: enter AP provisioning mode
You can also send the following UART commands:
- Enter BLE provisioning mode:
5a a5 10 05 00 01 00 15Enter AP provisioning mode:
5a a5 10 05 00 01 01 16
After the module enters device provisioning mode, use the Ubases IoT App. See section 3.3.1 for the App workflow.
Notes:
- Specifying a single mode is not yet enforced; the module still enters AP+BLE coexistence when this command is sent.
- UartReportWifiConfig is declared in mcu_api.h.
3.3.3 MCU specifies router connection
To test module Wi-Fi connectivity, use the Wi-Fi functional test command.
In the MCU SDK, call UartReqConnectWifi to send specified router credentials. The module connects on its own and actively reports network status to the MCU.
Notes:
- UartReqConnectWifi is declared in mcu_api.h.
4. Appendix
After the MCU establishes a heartbeat connection, the module actively reports its network status. If the module has never been provisioned or connected to a router, it automatically enters device provisioning mode after initialization.
If the module was previously provisioned through the App or connected to a specified router, it reconnects to that router on the next boot instead of entering device provisioning mode. To provision it again, see section 3.3.
In device provisioning mode, the module enables both the AP hotspot and BLE advertising. If the Ubases IoT App cannot find the device, search for the module hotspot on the phone or use a BLE test tool to check the advertising name. The advertising name format is:
axy_ProductFlag-ProductID_p1_MAC