

iOS Certificate Configuration
1. Create iOS Certificates and Provisioning Profiles
Prerequisites
You have registered an Apple Developer account and enrolled in the Apple Developer Program: https://developer.apple.com/cn/support/enrollment/. This is required to publish an app on the App Store.
A Mac computer for creating certificates.
Create an App ID
- Sign in at https://developer.apple.com/account/, select Identifiers. On the legacy page, first select Certificates, Identifiers & Profiles.
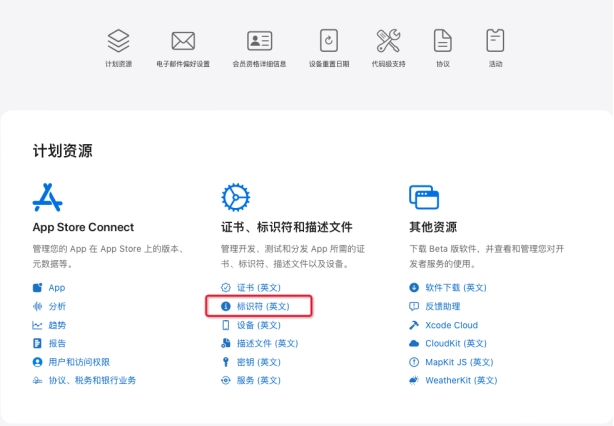
Note:
Clicking any link under Certificates, Identifiers & Profiles opens the Certificates, Identifiers & Profiles page.
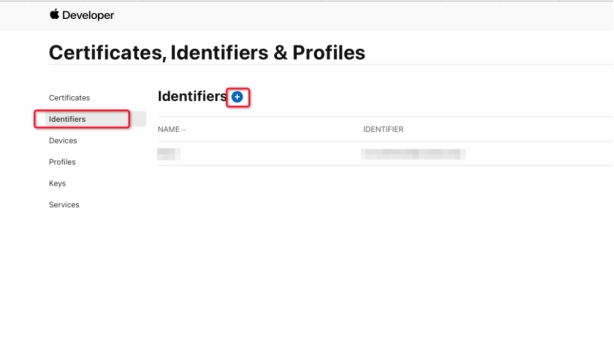
- Select Identifiers, then click +.
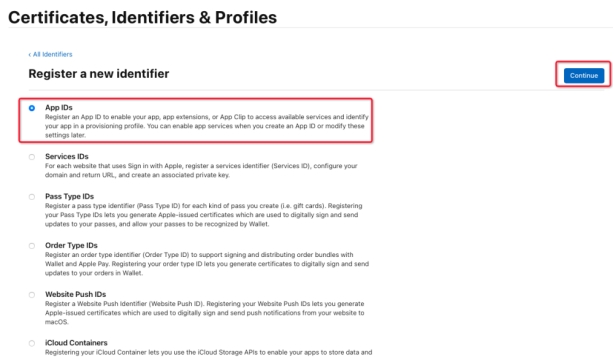
- Select App IDs, then click Continue.
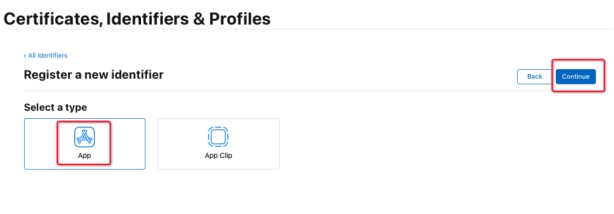
- Select App, then click Continue.
- In Description, enter a description such as your app’s English name. Under Bundle ID, select Explicit and enter your app package name.
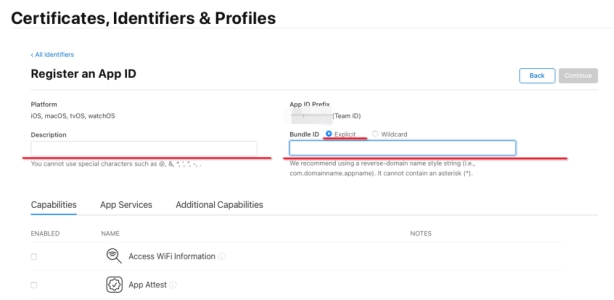
In the Capabilities list, check the following:
· Access WiFi Information
· Associated Domains
· Hotspot
· Maps
· Push Notifications
· Sign In with Apple、Enable as a primary App ID (do not check if you do not use third-party login)
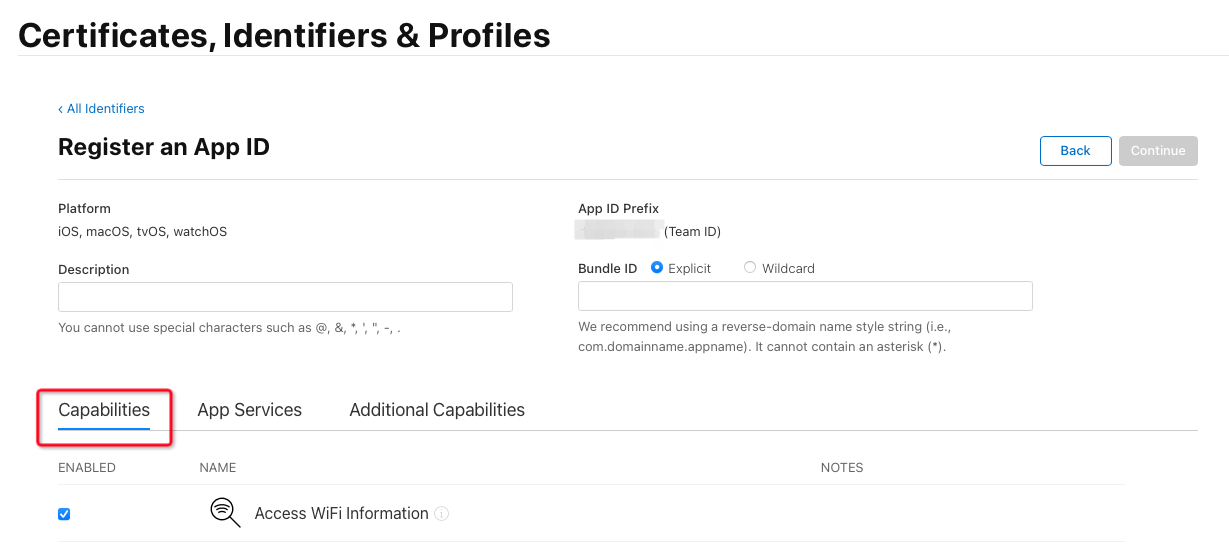





Note:
· Per App Store review requirements, if your app enables third-party login (for example WeChat Login), you must enable Sign In with Apple. Otherwise, the app may fail review.
· If your app includes other services, enable the additional capabilities as needed.
- Click Continue. After confirming the information, click Register.
If the system shows “An App ID with Identifier ‘com.xxx.xxx’ is not available. Please enter a different string.”, the package name is taken. Click Back, return to the previous step, and change the package name.
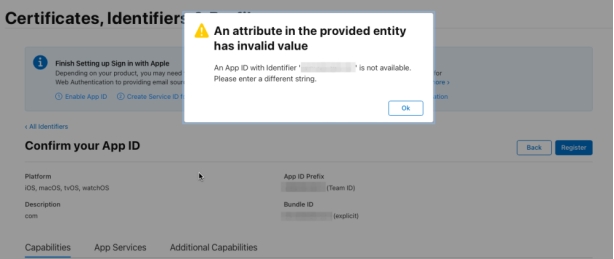
- If there are no errors and the newly created App ID appears in the list, the App ID was created successfully.
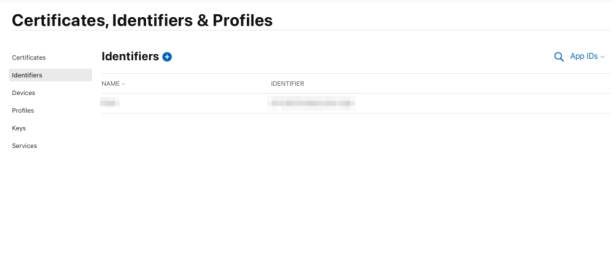
Tip:
To modify the App ID—for example to enable or disable Sign In with Apple—click the App ID in the list to open the details page, make changes, then click Save.
Create a CSR File (.certSigningRequest)
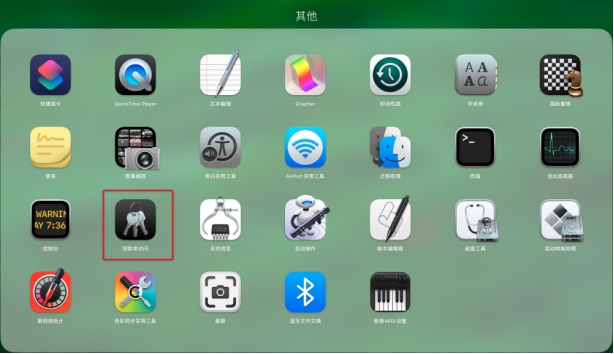
- Open the macOS Keychain Access app
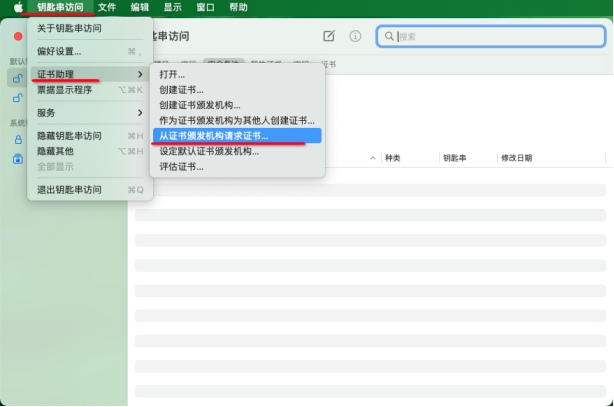
- From the menu bar at the top of the screen, choose Keychain Access > Certificate Assistant > Request a Certificate From a Certificate Authority.
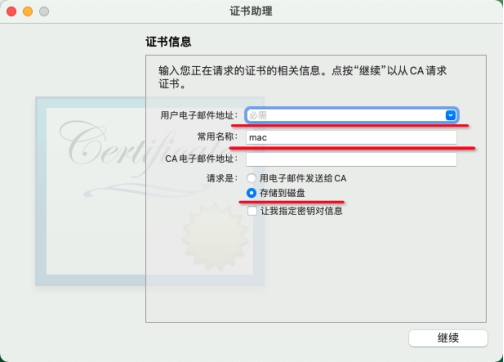
- Enter your email in User Email Address, your name in Common Name, select Saved to disk, then click Continue.
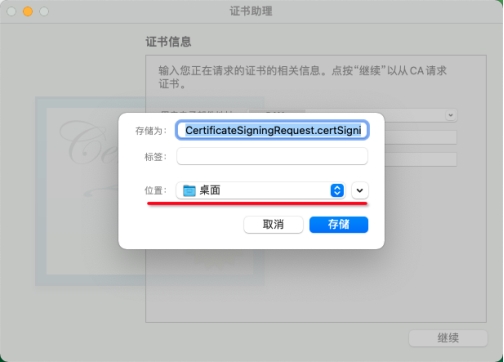
- Save the CertificateSigningRequest.certSigningRequest file to a familiar local location to finish creating the CSR.
Create an Apple Distribution Certificate (.p12)
Note:
If your account has multiple apps, you can use the same distribution certificate. Do not create it multiple times—that causes unnecessary trouble.
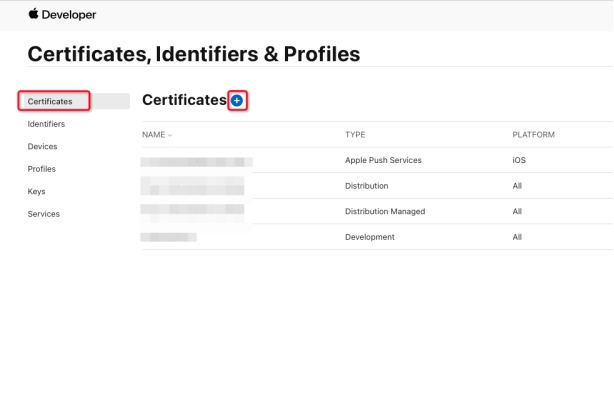
- Open the Certificates, Identifiers & Profiles page, select Certificates, then click +.
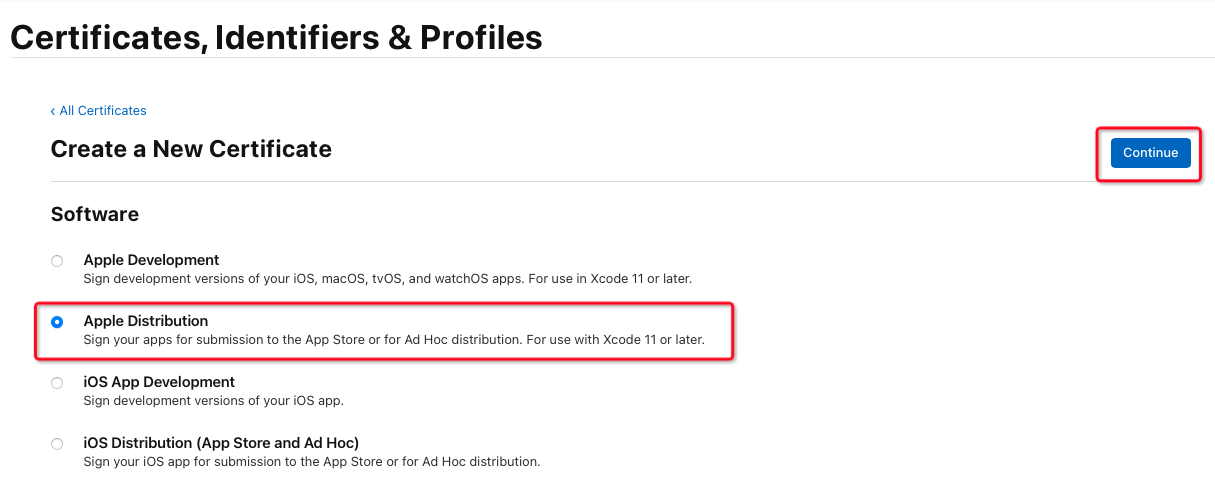
- Select Apple Distribution, then click Continue.
Note:
If you cannot select it because the certificate limit is exceeded, go back and delete unused certificates. Deleting certificates does not affect apps already published. Certificates are only used when building and uploading apps.
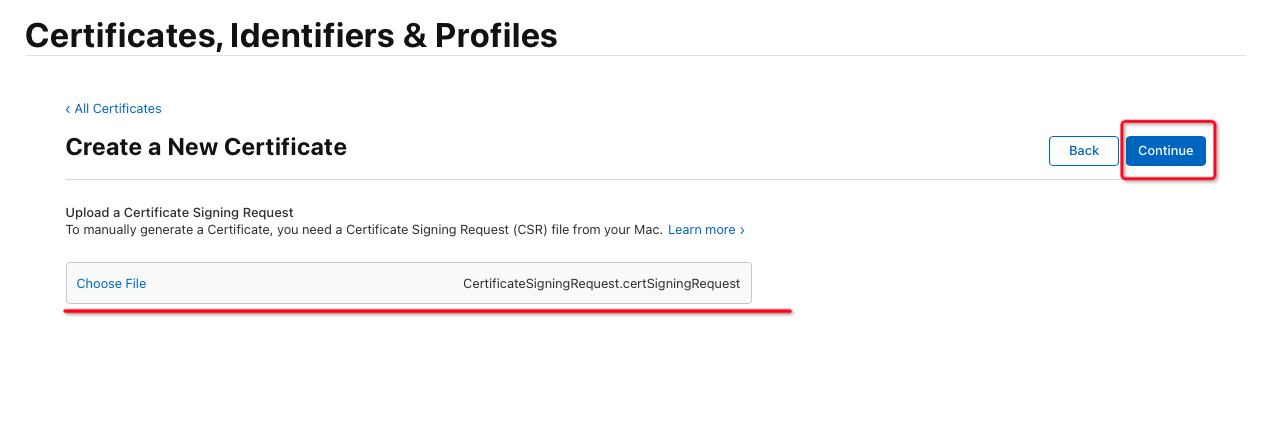
- Click Choose File, select the CSR file you just created, then click Continue.
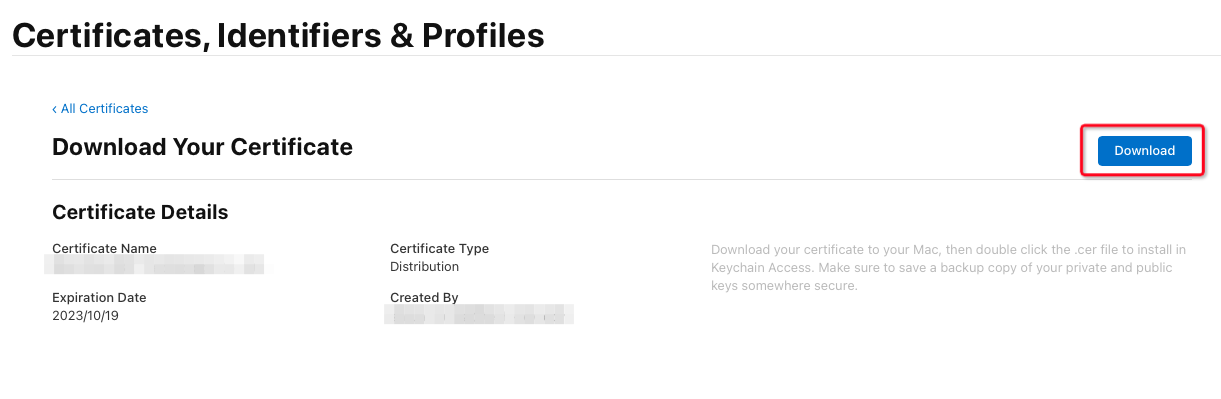
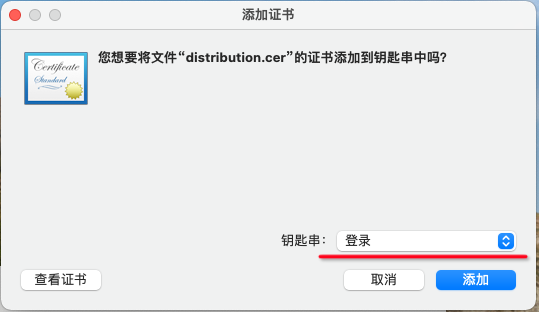
- Click Download to download the distribution.cer file. Double-click it to import it into Keychain.
Note:
o The .cer file must be imported into Keychain before you can export a .p12 file. Continue with the next step.
o Remember the Expiration Date—you will use it later to identify this certificate when creating provisioning profiles (.mobileprovision).
If a dialog appears when double-clicking, select login under Keychain; otherwise ignore it.
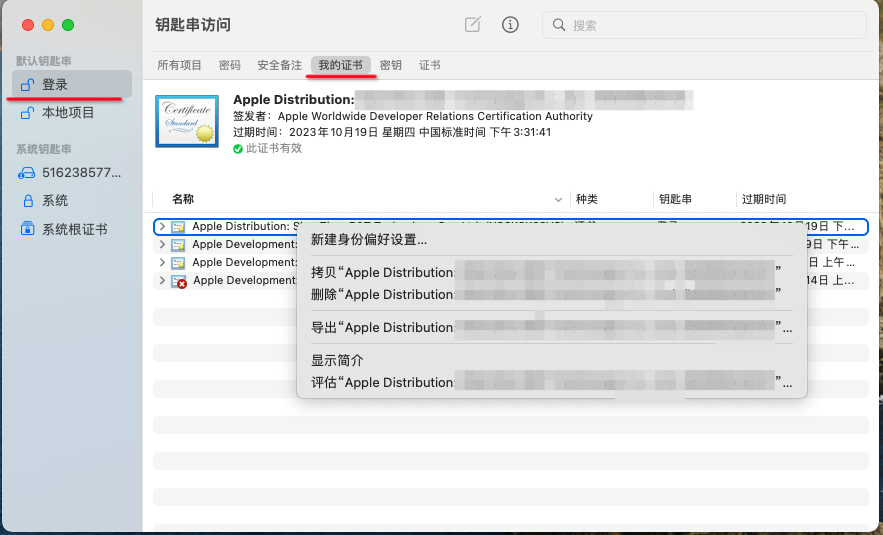
- Open Keychain Access, select login under Default Keychains, select My Certificates under Category (if the certificate is missing, try Certificates), find the imported certificate, right-click, and choose Export.
Note:
o The certificate name looks like: Apple Distribution: xxxxxx Co., Ltd. (X8XXXXXX)
o It starts with Apple Distribution:, followed by the company or individual name on the Apple Developer account, ending with (team ID)
o You can find the team ID at the top right after signing in to the developer account:
Or above the Bundle ID field in step 5 of Create an App ID.
o If it is not under My Certificates, check the Certificates list.

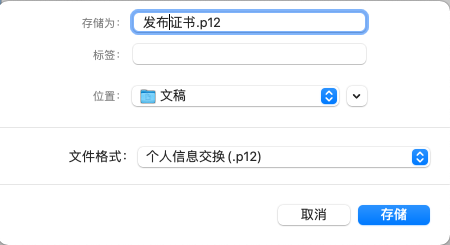
- Set Save As to distribution.p12, file format to Personal Information Exchange (.p12), choose a familiar location, then click Save.
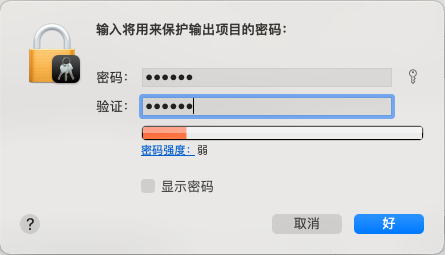
- Enter a password and record it—you will need it when uploading to the Ubases IoT development platform. Click OK to save the distribution certificate.
Note:
After this step, you can right-click and delete this certificate in Keychain Access.
Create an APNs Push Certificate (.p12)
Unlike the distribution certificate, an APNs push certificate is specific to one app. If your account contains multiple apps, create a separate push certificate for each app.
- Open the Certificates, Identifiers & Profiles page, select Certificates, then click +.
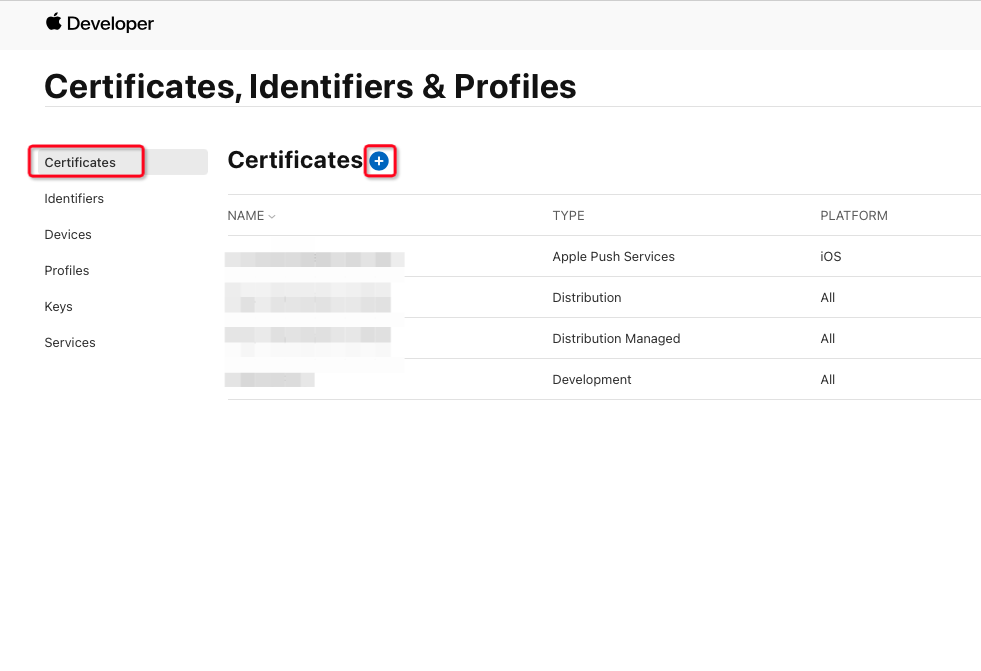
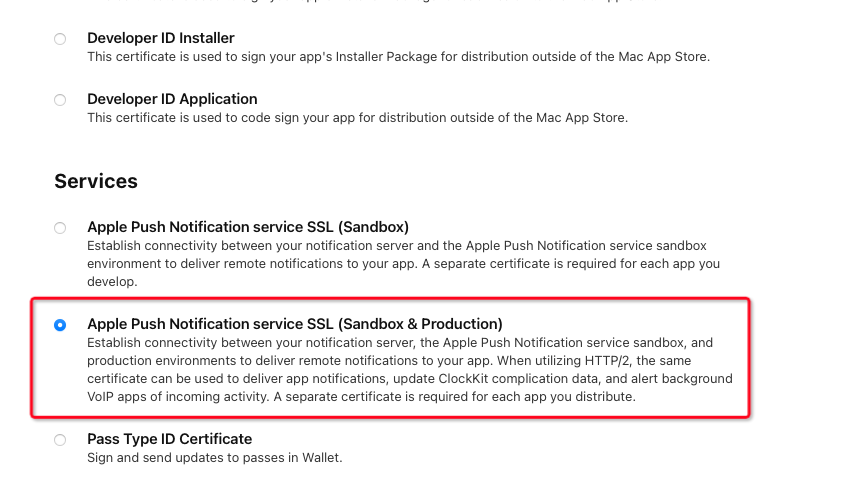
- Select Apple Push Notification service SSL (Sandbox & Production), then click Continue.
Scroll down on the page if needed.
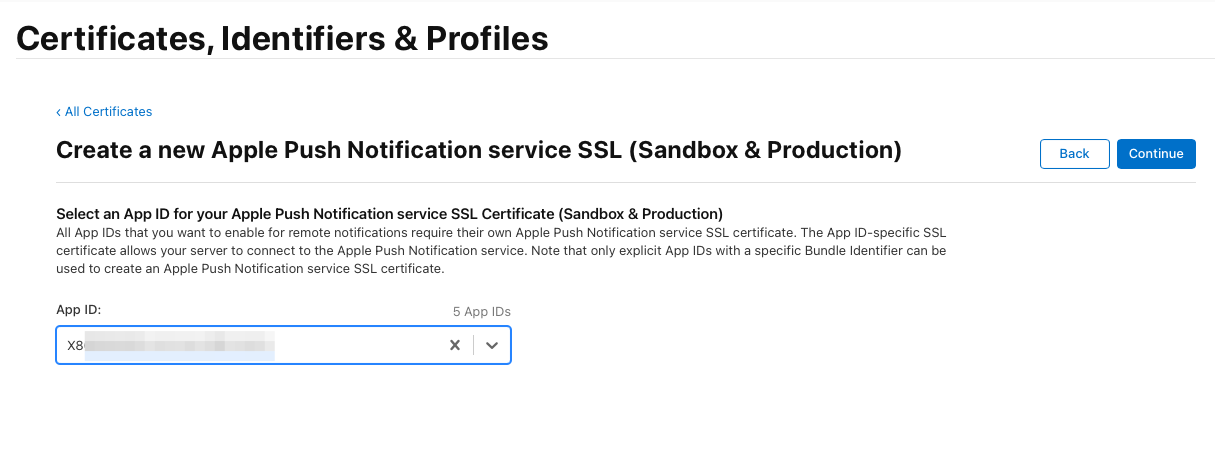
- Under App ID, select the app package name, then click Continue.
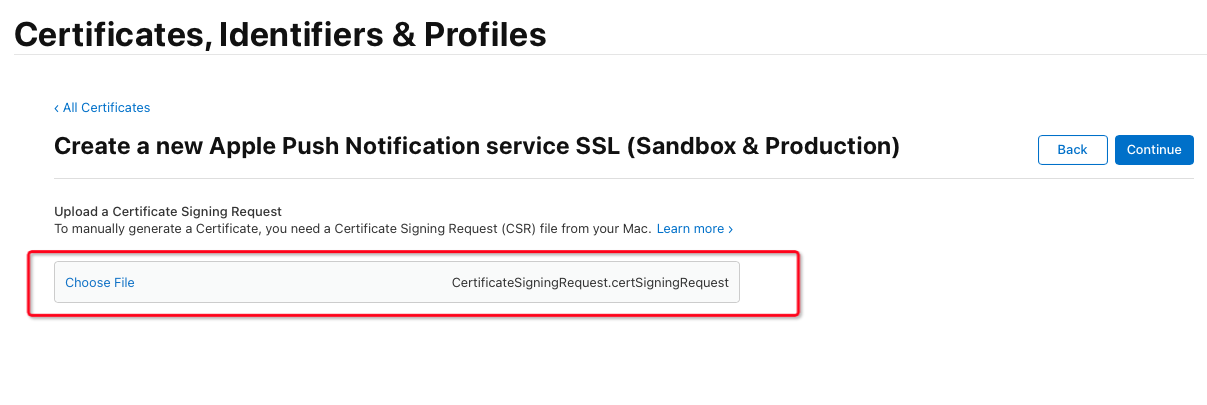
- Click Choose File, select the CSR file you created earlier, then click Continue.
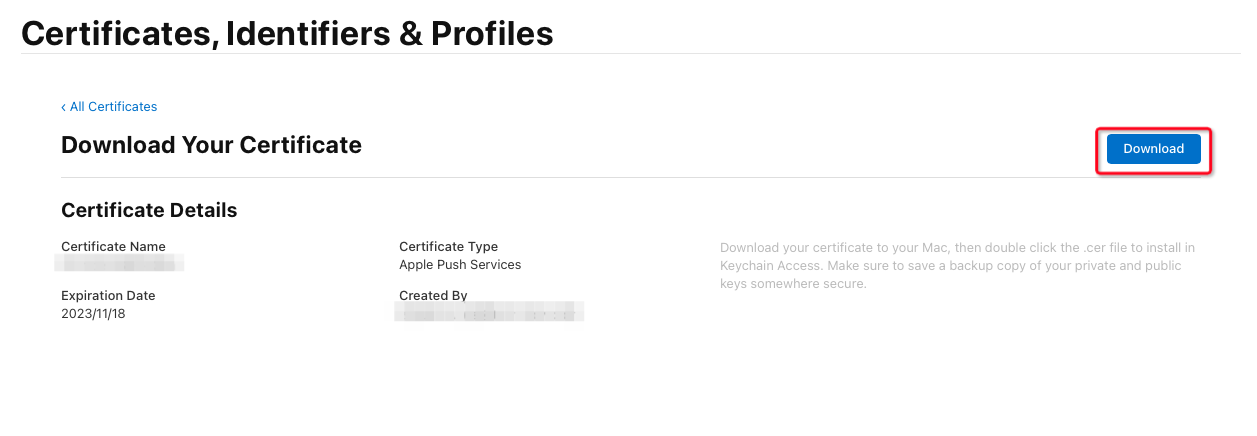
- Click Download to download the aps.cer file. Double-click it to import it into Keychain.
Note:
The .cer file must be imported into Keychain before you can export a .p12 file. Continue with the next step.
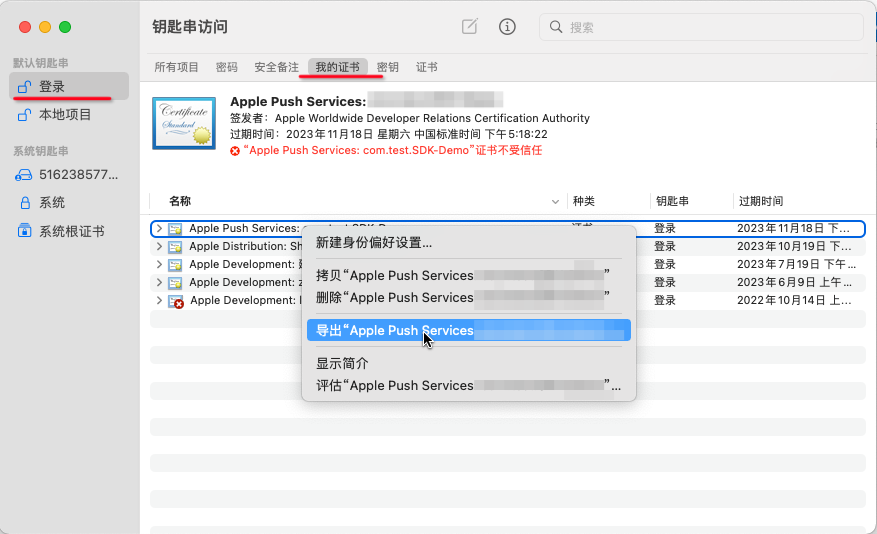
- Open Keychain Access, select login under Default Keychains, select My Certificates under Category (if missing, try Certificates), find the imported certificate, right-click, and choose Export.
Note:
o The certificate name looks like: Apple Push Services: xxx.xxx.xxx
o It starts with Apple Push Services: and ends with the package name (Bundle ID)
o If it is not under My Certificates, check the Certificates list.
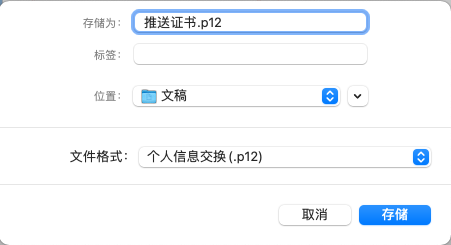
- Set Save As to push.p12, file format to Personal Information Exchange (.p12), choose a familiar location, then click Save.
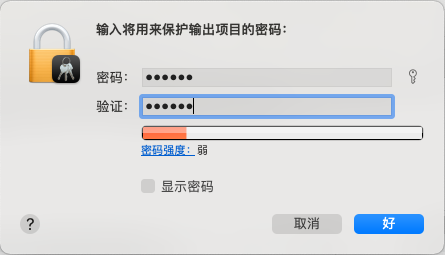
- Enter a password and record it—you will need it when uploading to the Ubases IoT development platform. Click OK to save the push certificate.
Note:
After this step, you can right-click and delete this certificate in Keychain Access.
Create a Provisioning Profile (.mobileprovision)
Note:
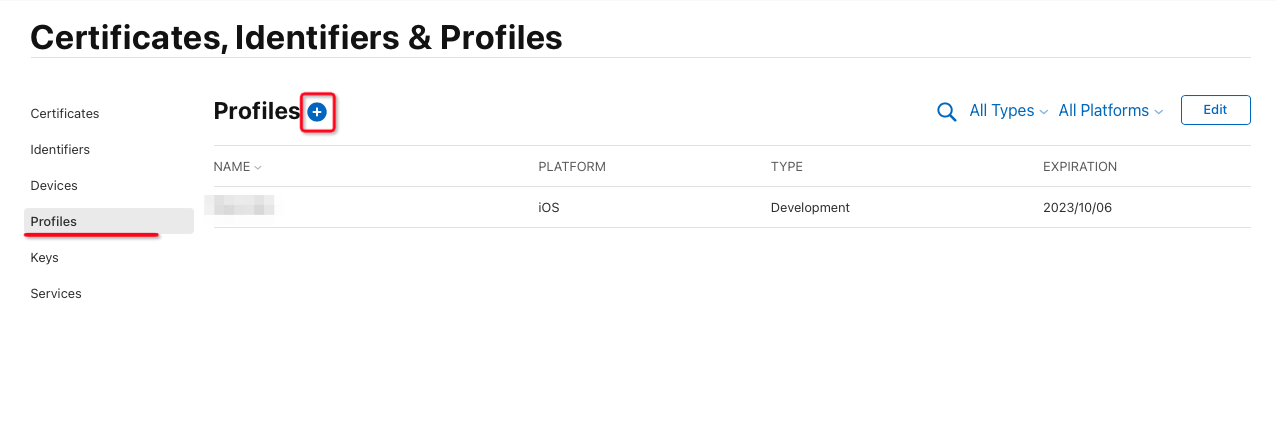
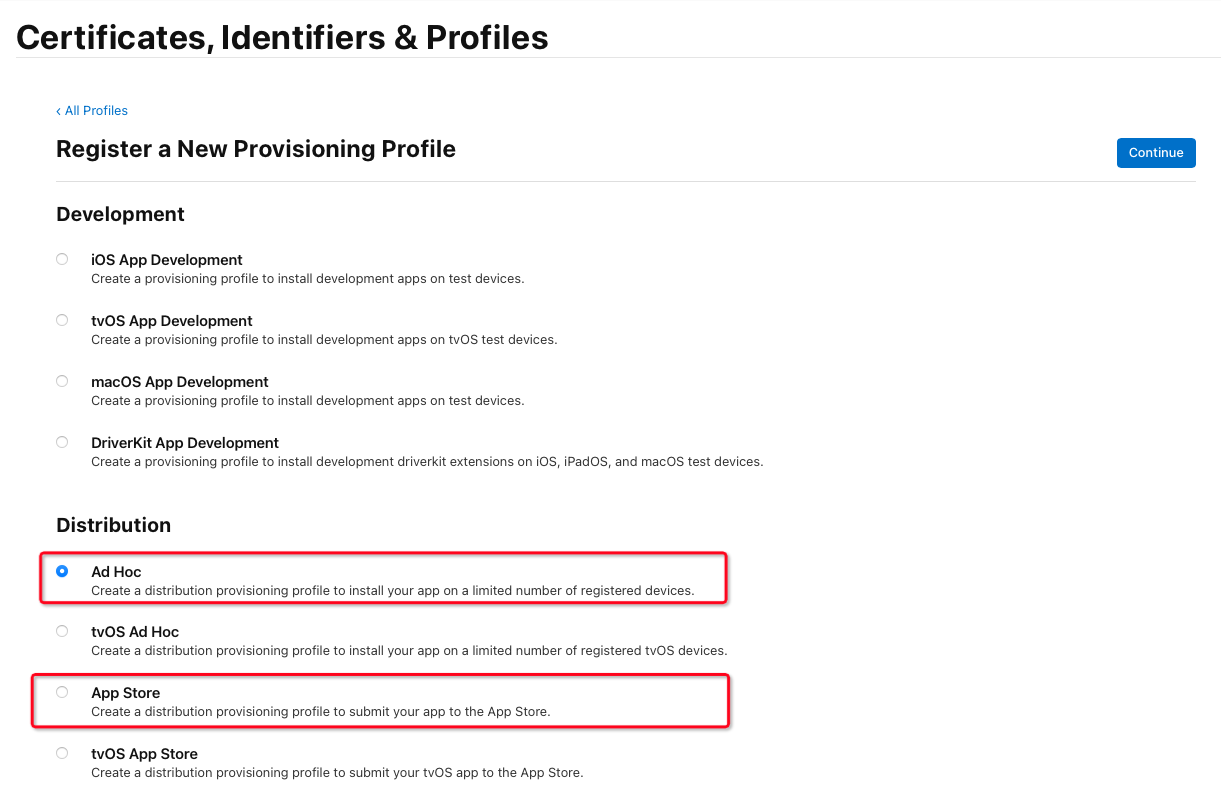
There are two provisioning profile types: Ad Hoc and App Store. Ad Hoc profiles are used for test builds, while App Store profiles are used for builds uploaded to App Store Connect. Create both types.
- Open the Certificates, Identifiers & Profiles page, select Profiles, then click +.
- Select Ad Hoc (or App Store), then click Continue.
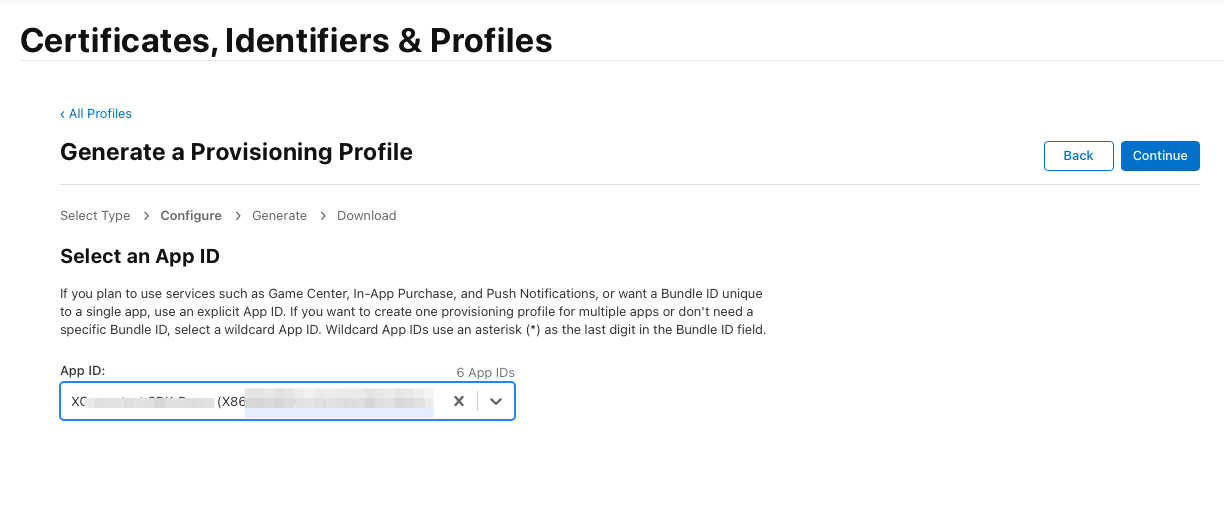
- Select the app package name (Bundle ID), then click Continue.
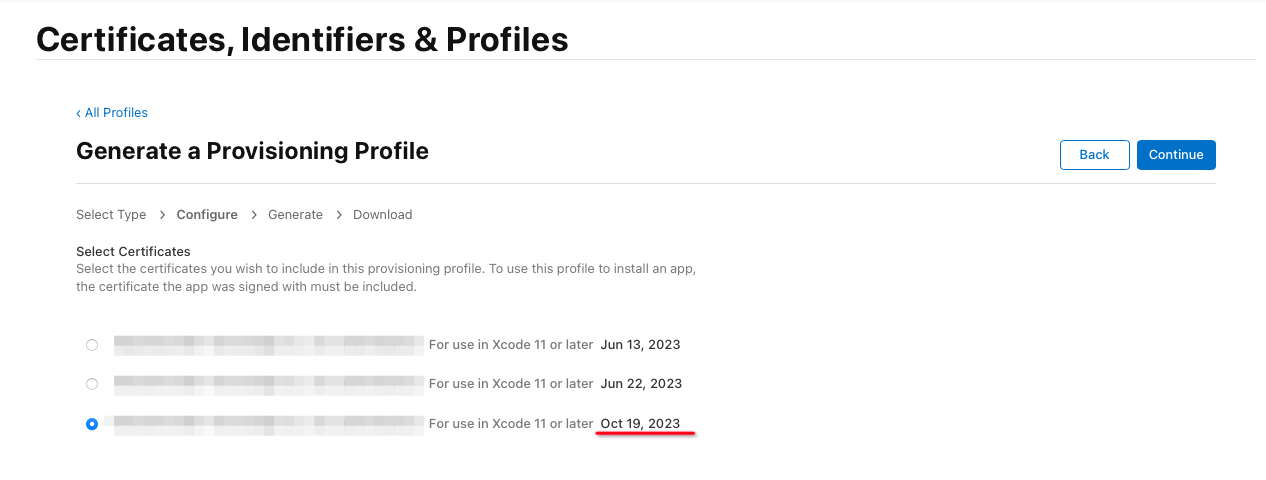
- Select the distribution certificate you created earlier, then click Continue.
Note:
If multiple certificates appear, distinguish them by Expiration Date. Certificates are valid for 1 year. If you cannot tell them apart, return to the certificate list, delete extras, and restart this step. Choosing the wrong certificate will cause build failures.
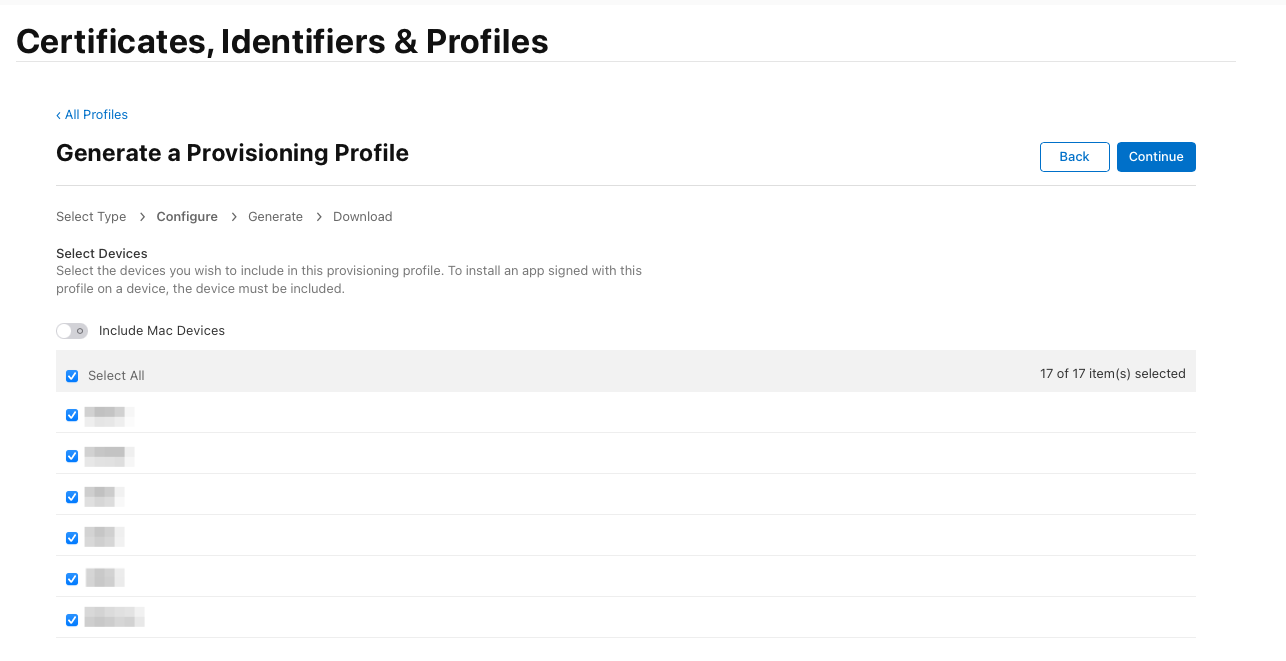
- Select Select All, then click Continue.
Note:
o Devices under Select All can install the test app. To add devices, see: Add an iOS Device UDID to Your Apple Developer Account
o This step appears only for Ad Hoc profiles, not App Store profiles.
o Only checked devices can install the test build via Safari on the iPhone.
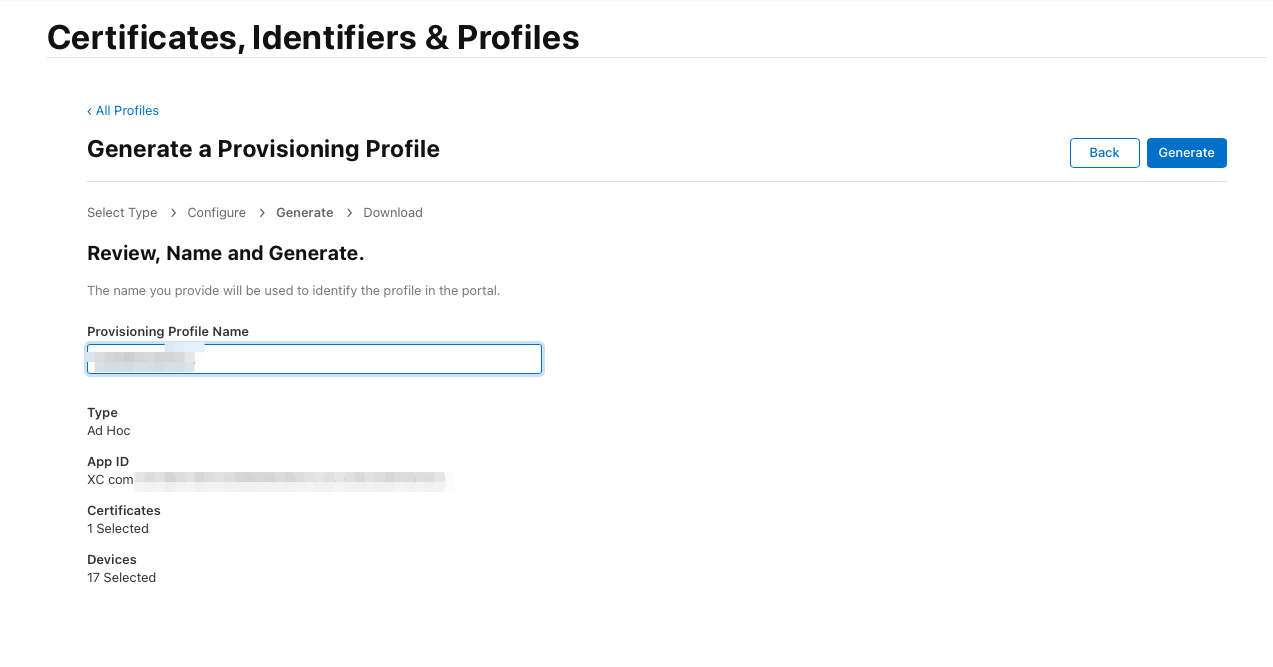
- Under Provisioning Profile Name, enter AppName_AdHoc (or AppStore), for example facebook_AdHoc or facebook_AppStore, then click Generate.
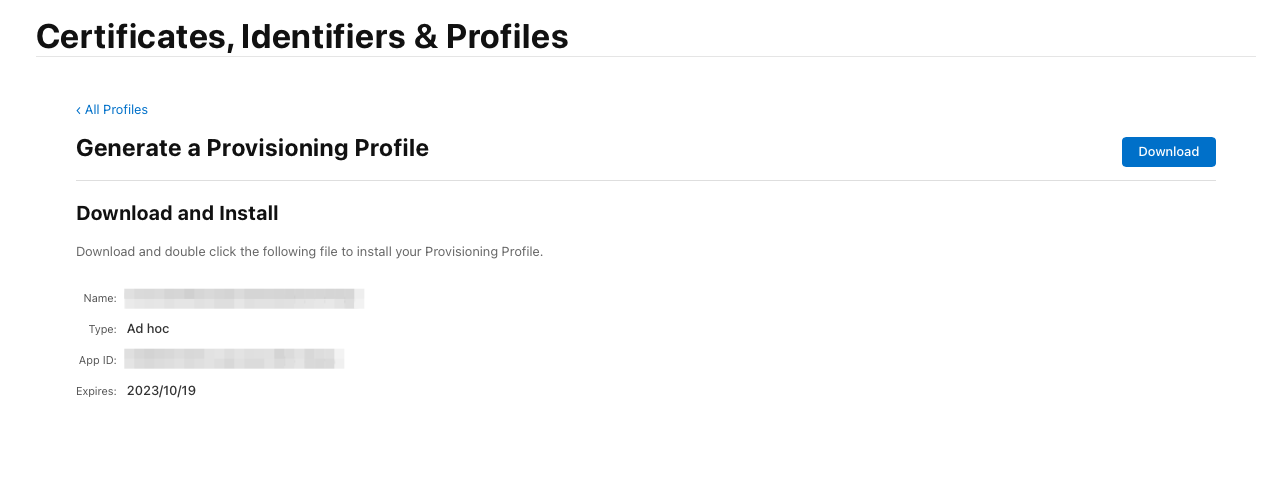
- Click Download to download the profile and finish creating it.
Upload Certificates and Provisioning Profiles to the Ubases IoT Development Platform
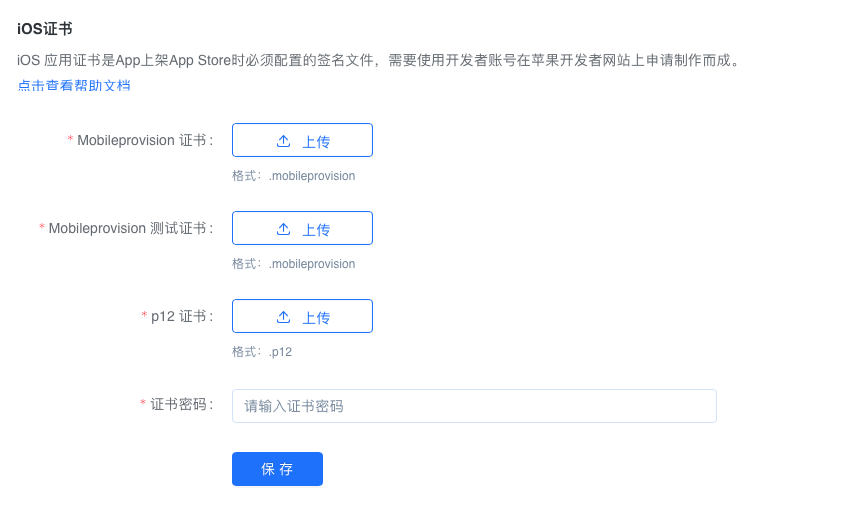
- Sign in to the Ubases IoT development platform > App Development > OEM App Development > Store Listing Essentials > iOS Certificates.
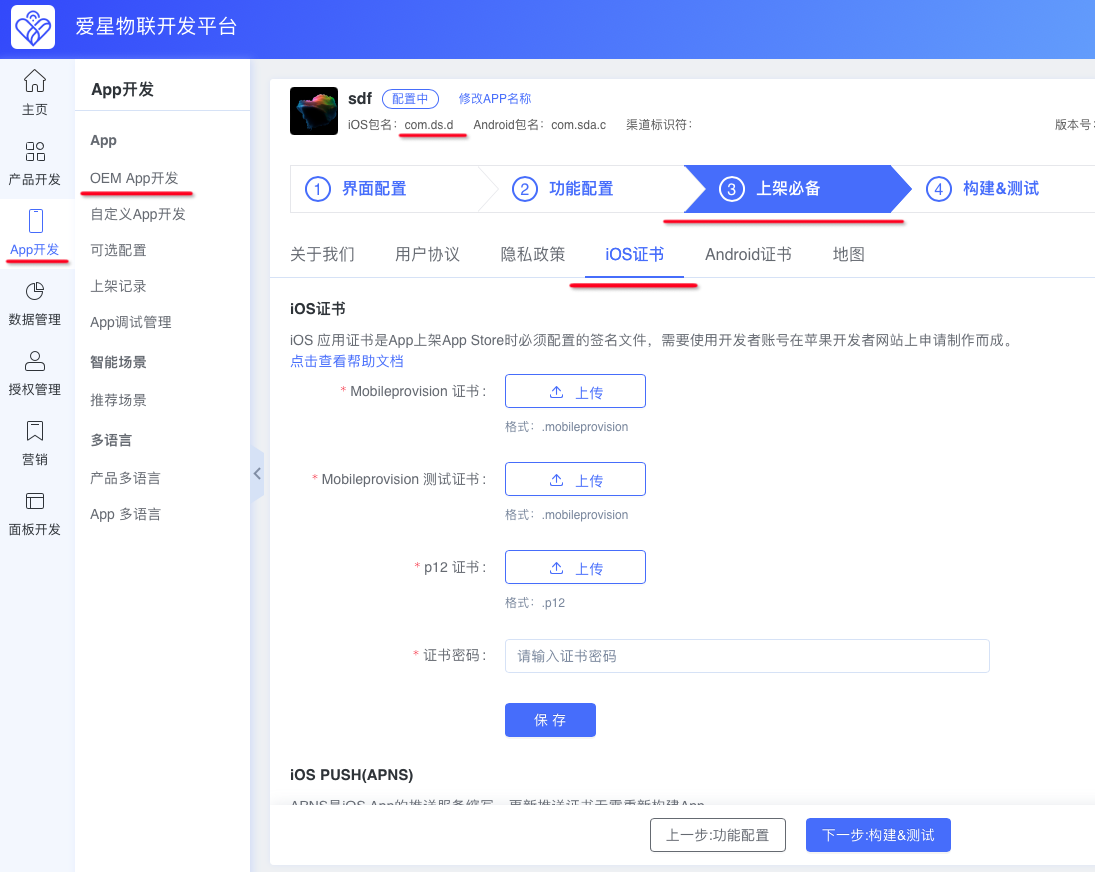
- Under iOS Certificates, upload the distribution certificate, its password, and the provisioning profiles, then click Save.
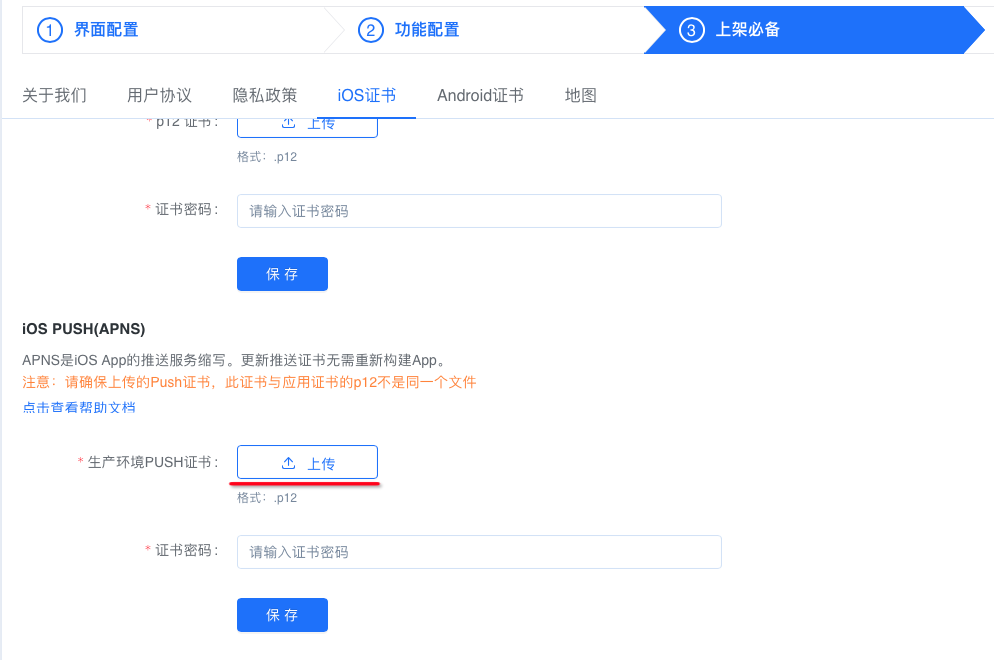
- Under iOS PUSH (APNs), upload the APNs push certificate and its password, then click Save.
Notes
· After uploading the app certificate, rebuild the App for it to take effect.
· APNs push certificates are valid for one year. After a certificate expires, push notifications stop working. Create and upload a new certificate; you do not need to rebuild the App. Before expiry, do not delete the push certificate from Certificates, Identifiers & Profiles.
· Your Apple Developer Program membership must be renewed annually. If it expires, the App may become unavailable on the App Store until the membership is renewed.
· Since April 2020, apps that use third-party login must also include Sign in with Apple to be published on the App Store. For details, see Guidelines Update on Sign in with Apple.
· If Sign in with Apple on the App shows registration incomplete, sign in to Apple Developer again, reopen the App ID, uncheck then recheck Sign In with Apple under Capabilities (save once after unchecking), then save again.
2. Add an iOS Device UDID to Your Apple Developer Account
How to Obtain a UDID
1. Using the Music app on macOS
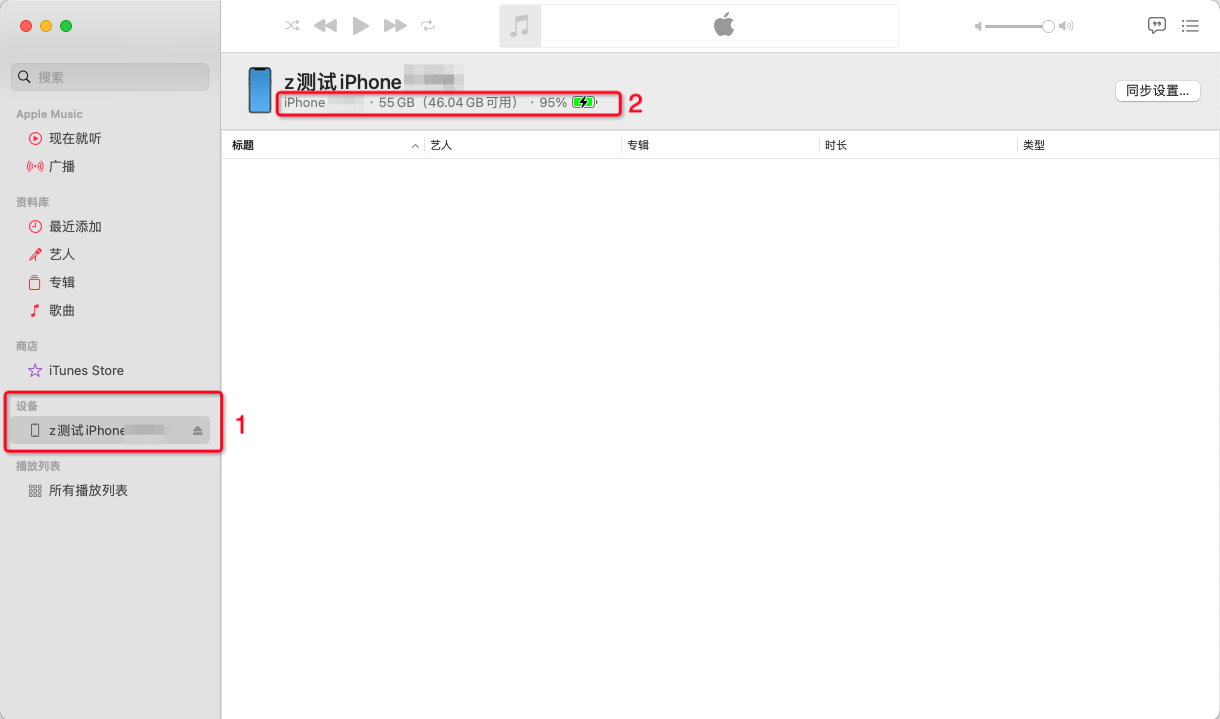
- Connect the phone to the Mac, open Music, select your phone under Devices (red box 1), then click the text in red box 2.
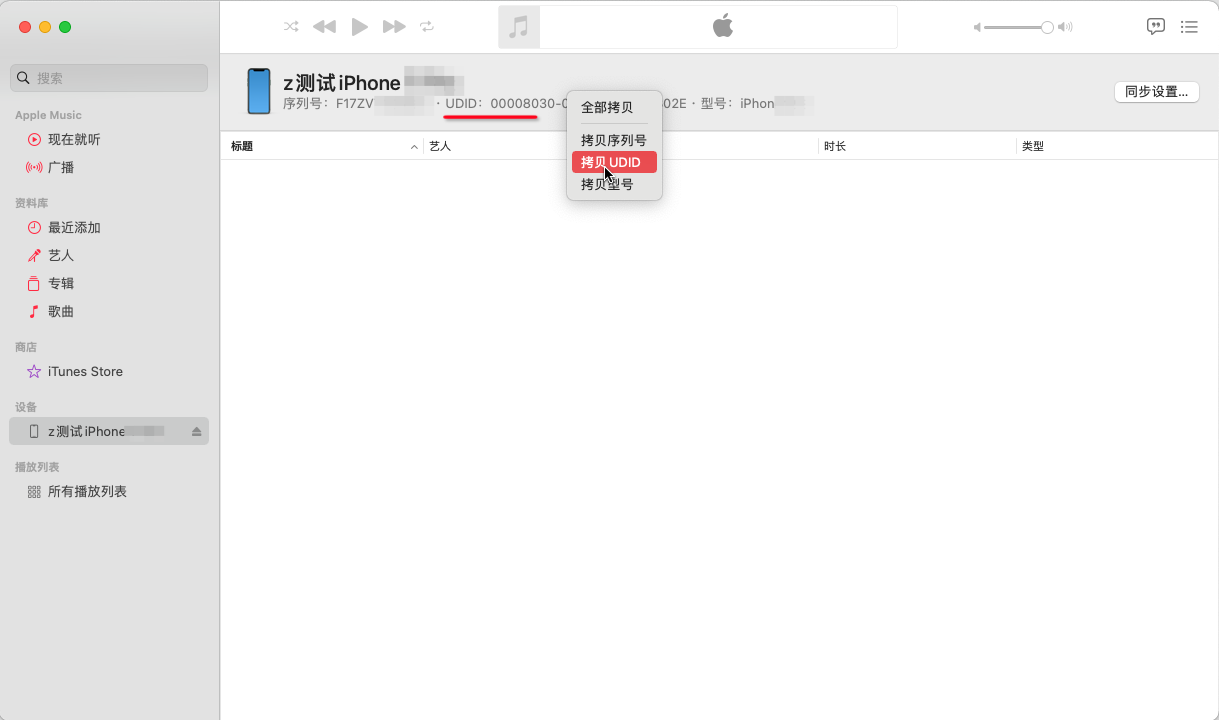
- If it does not appear, click several times until UDID shows. Right-click the UDID label and choose Copy UDID.
2. Using iTunes
- Connect the phone to the computer, open iTunes, select Summary, then click the Serial Number label
- The UDID is displayed
- Right-click to copy
3. Using the third-party tool iTools
- Connect the phone to the computer, open iTools, then click More.
- Device Identifier is the phone UDID—click to copy
4. Using the third-party tool PP Assistant
- Connect the phone to the computer, open PP Assistant. Device Identifier is the UDID—copy it.
5. Using Xcode
- Connect the phone to the computer and click the device to show details
- In the expanded device list, click the option to add a simulator
- In the dialog, Identifier is the phone UDID—copy it.
6. Using the Pgyer UDID page

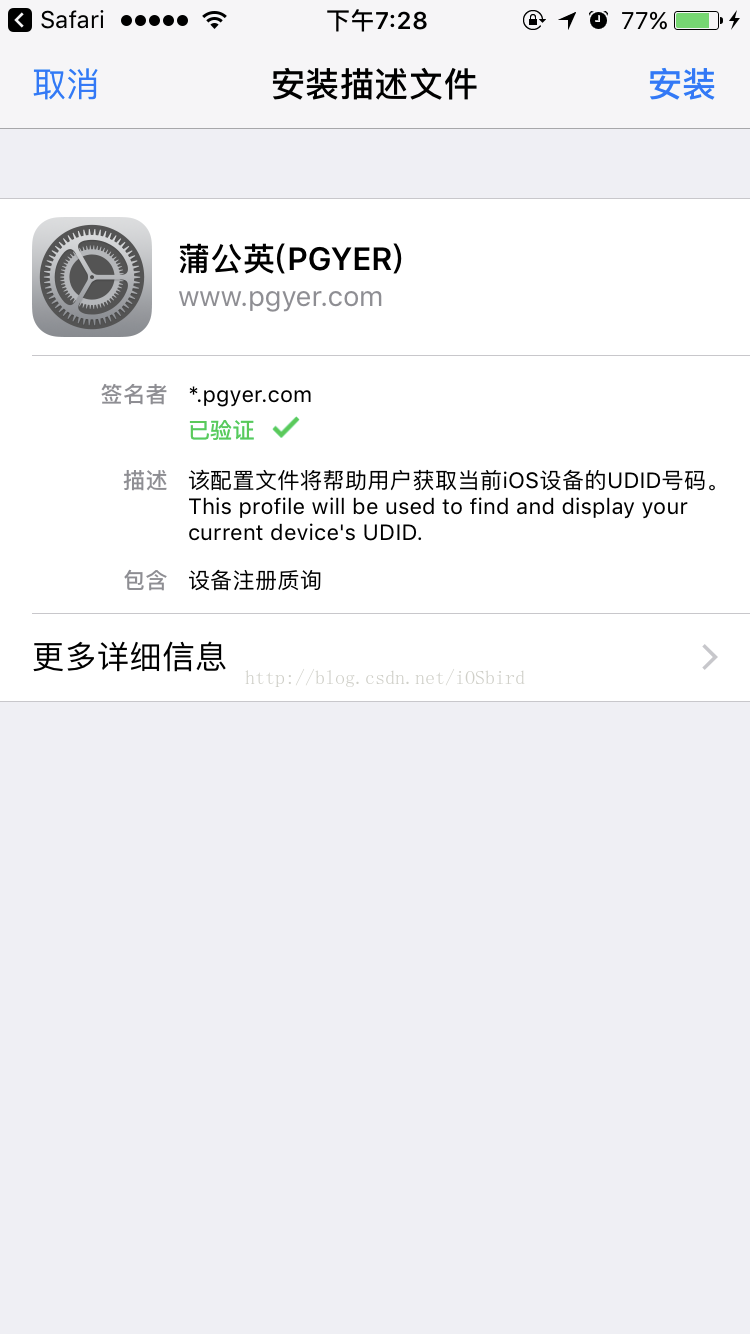
- Use the scanner in the iPhone Control Center, or open https://www.pgyer.com/udid in Safari. On the page that appears, tap the green Get UDID button.
- Tap Install in the upper right.
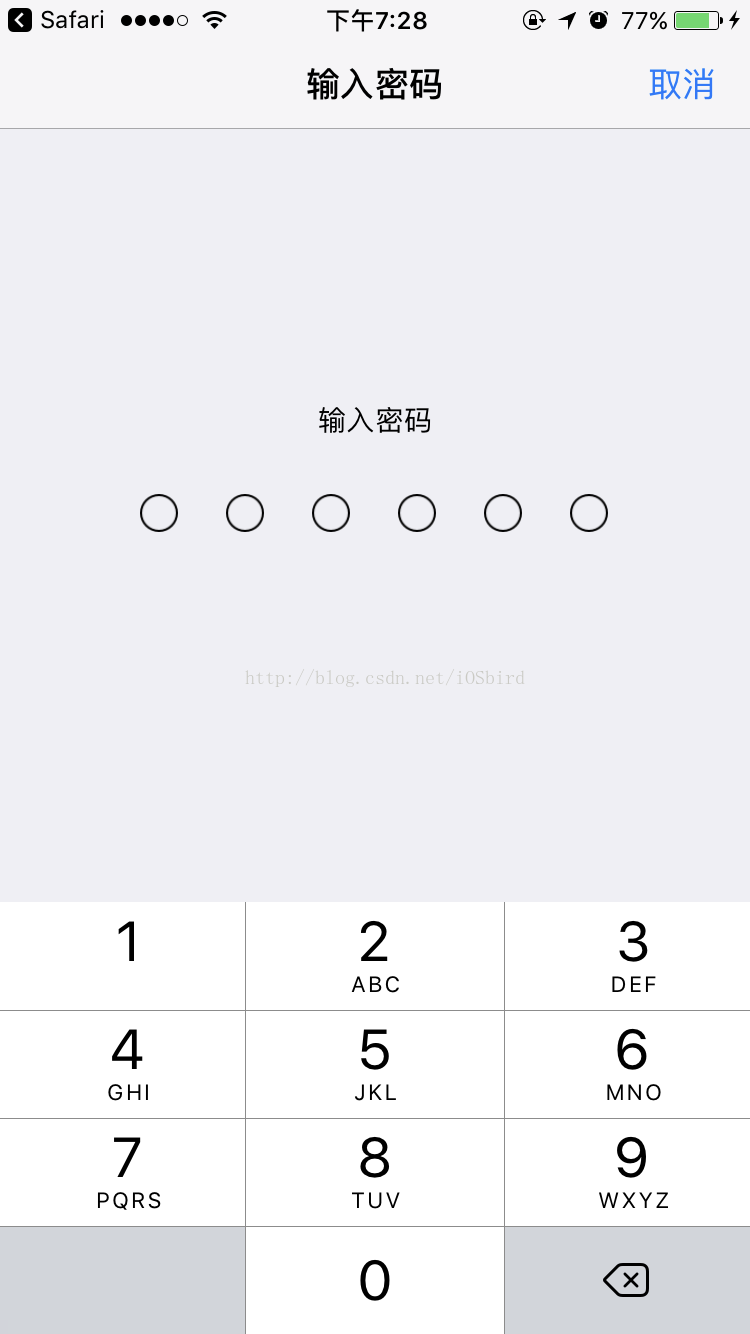
- Enter the phone passcode
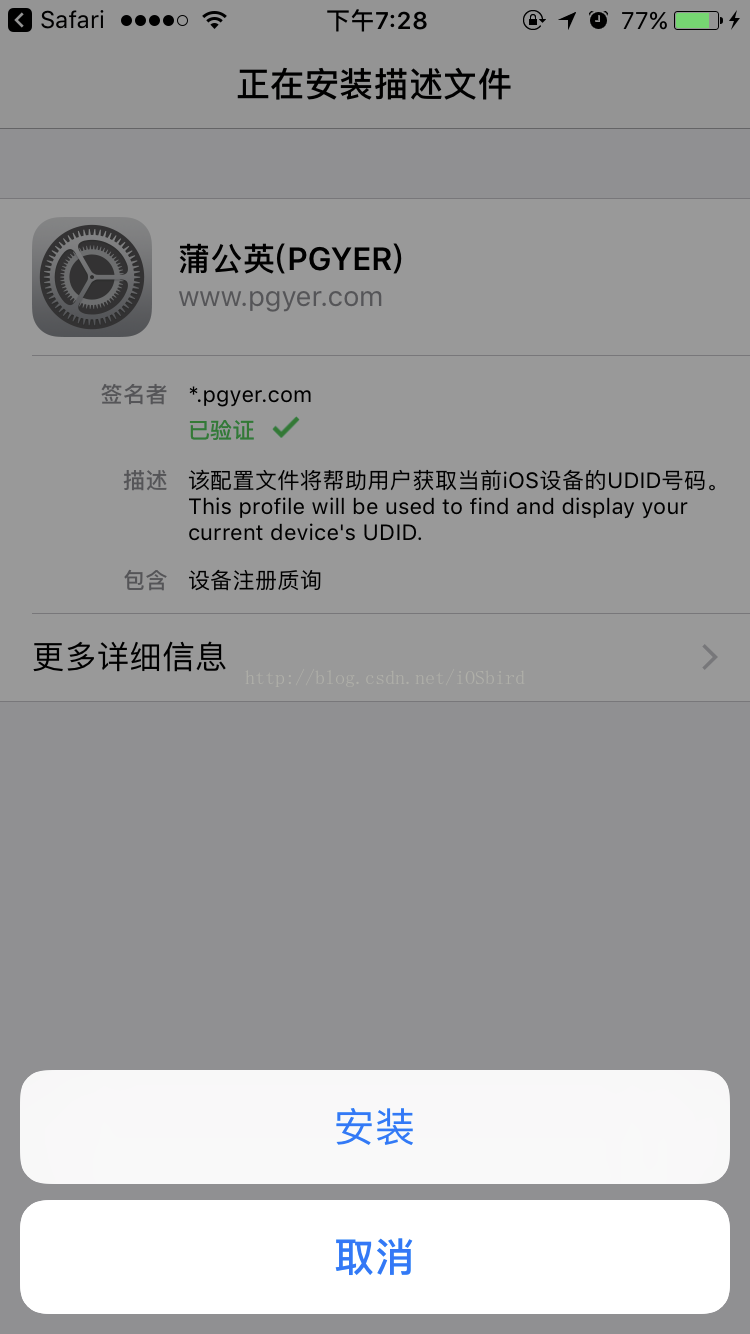
- Tap Install
- You are redirected to a page where the long string is the UDID.
- Long-press the string to copy and send it to developers, or enter an email address in the form to send it.
Add the UDID to Apple Developer
Prerequisites
You already have an Apple Developer account and have joined the Apple Developer Program: https://developer.apple.com/cn/support/enrollment/
Steps
- Sign in at https://developer.apple.com/account/, select Devices. On the legacy page, first select Certificates, Identifiers & Profiles.
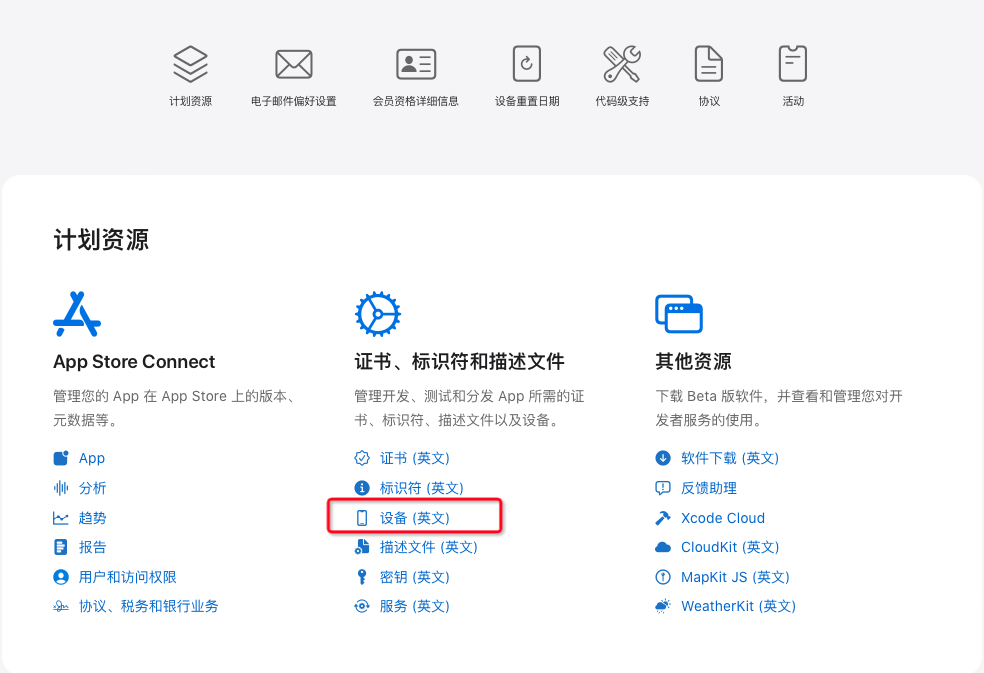
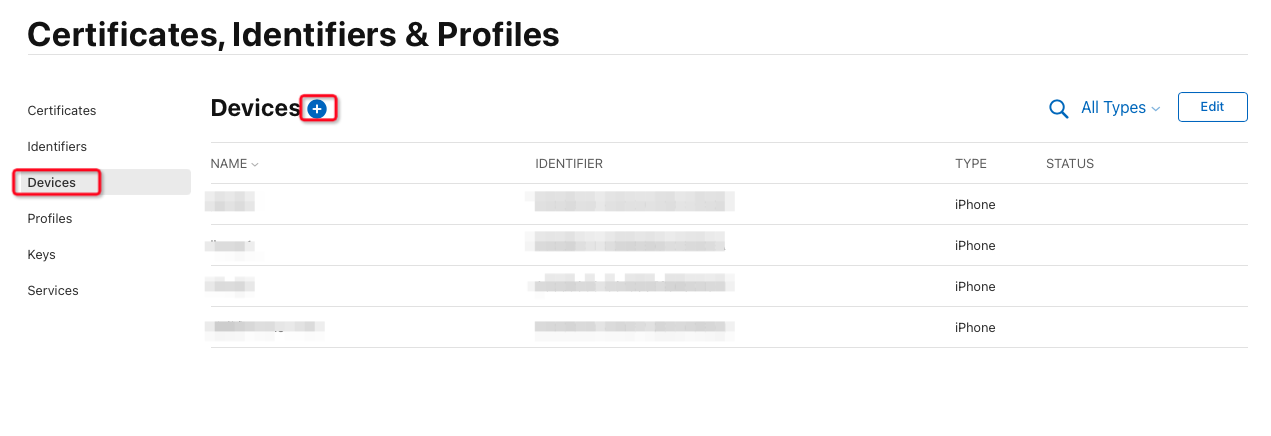
- Select Devices, then click +.
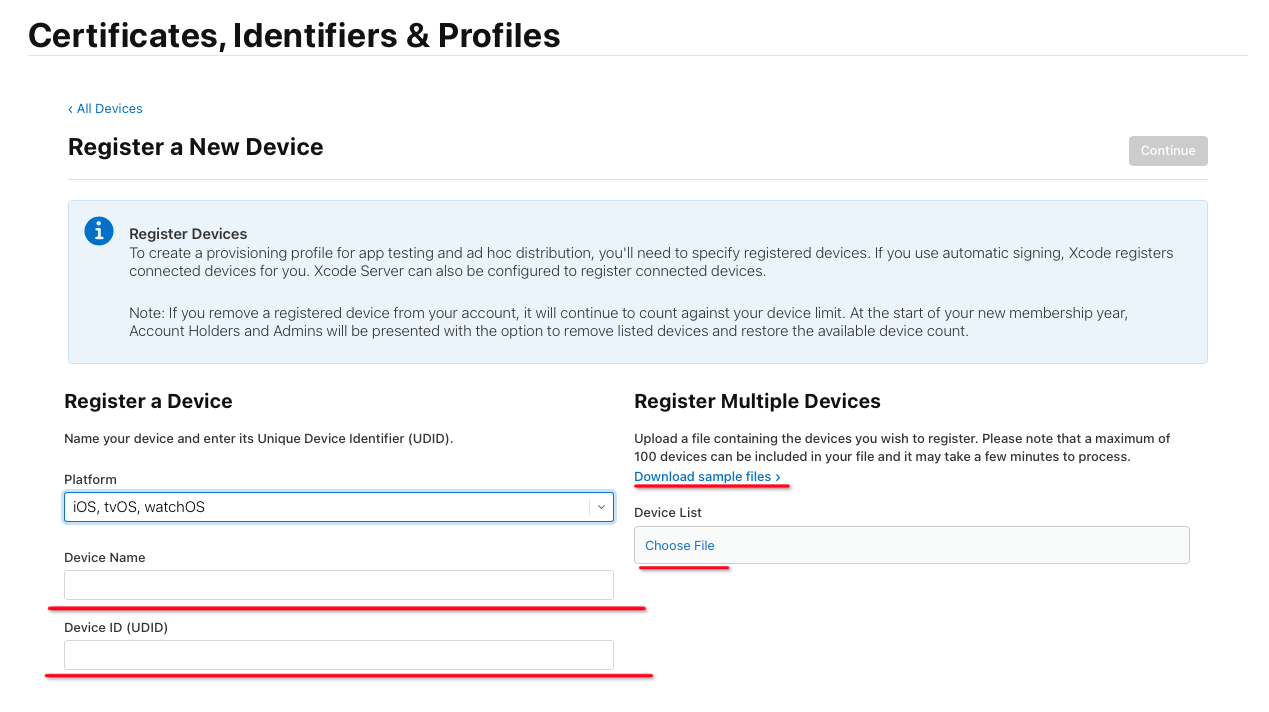
- To add one UDID, enter a unique name under Device Name, enter the UDID under Device ID (UDID), then click Continue. To add many UDIDs, click Download sample files, open one of the templates, fill in Device Name and UDID for each device, remove the sample rows, save, click Choose File, select your file, then click Continue.
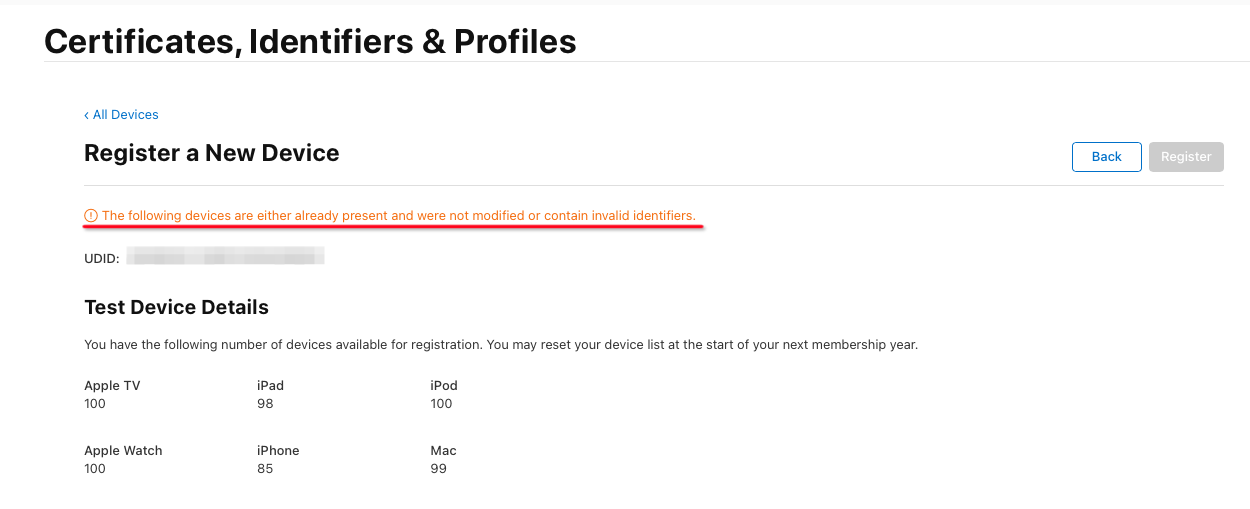
- If you see “The following devices are either already present and were not modified or contain invalid identifiers.”, the UDID was already added—no need to add it again. Otherwise continue.
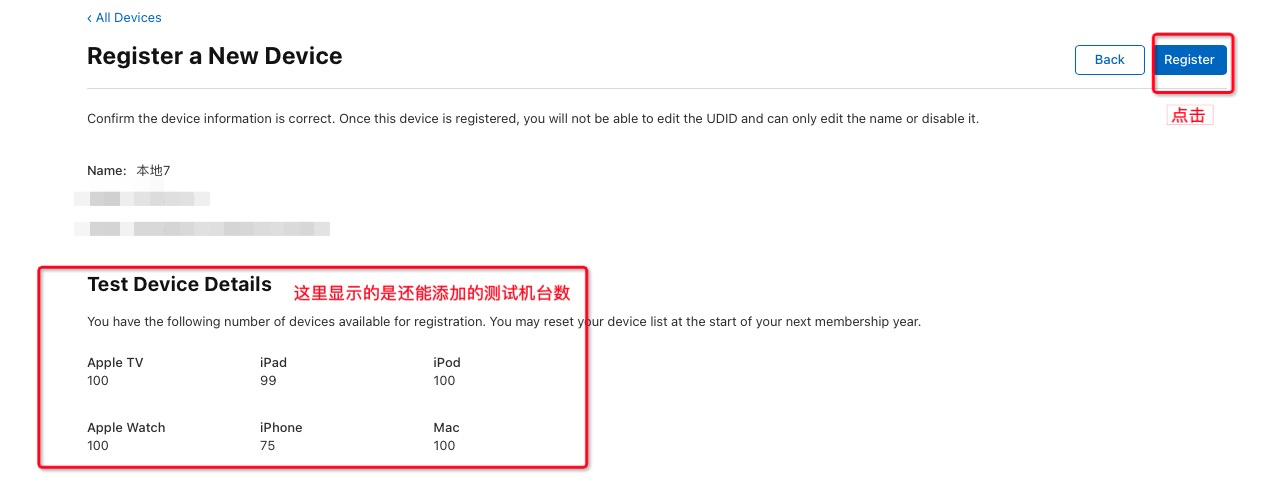
- Click Register.
- Click Done to finish adding the UDID.

- Recreate the Ad Hoc provisioning profile (.mobileprovision), upload it to the corresponding app on the Ubases IoT development platform, and rebuild the App. Only then can phones with this UDID install the test build via Safari. For creating Ad Hoc profiles, see: Create iOS Certificates.