

Development Process
Front-End Integration Process (Web)
The Ubases IoT web front end uses Ant Design Pro of Vue, ES2015+, Vue.js, Vuex, Vue Router, AntV G2, and Ant Design Vue. Familiarity with these technologies is recommended before you begin.
1. Environment Setup
- Install and configure Node.js. Node.js official site
- Install Git. Git official site
2. Editor Setup
- Front-end editor. Visual Studio Code is recommended. VS Code official site
3. Installation
Clone the latest code from the GitHub repository:
$ git clone 项目地址
$ cd 项目名
Project directory structure:
├─ babel.config.js                    # Babel的配置文件
├─ config                             # 主题配置
├─ jsconfig.json                      # 项目目录配置
├─ package.json                       # 项目配置项与依赖
├─ postcss.config.js                  # CSS转换配置
├─ public                             # 公共目录
├─ src
│  ├─ api                             # Api ajax 等
│  ├─ App.vue                         # Vue 模板入口
│  ├─ assets                          # 本地静态资源
│  ├─ components                      # 业务通用组件
│  ├─ config                          # 项目基础配置
│  ├─ core                            # 项目引导
│  ├─ global.less                     # 全局样式
│  ├─ layouts                         # 布局文件
│  ├─ locales                         # 国际化资源
│  ├─ main.js                         # Vue 入口 JS
│  ├─ mixins                          # 混入文件
│  ├─ mock                            # mock接口
│  ├─ permission.js                   # 路由守卫(路由权限控制)
│  ├─ router                          # Vue-Router
│  ├─ store                           # Vuex状态管理
│  ├─ utils                           # 工具库
│  └─ views                           # 业务页面入口和常用模板
└─ vue.config.js                      # 环境配置文件
4. Local Development
- Install dependencies.
$ npm installIf your network connection is slow, you can use cnpm instead of npm.
- Start the project.
$ npm run serveAfter startup, open a browser and visit http://localhost:8000 to see the local project page.
You can then modify the code to implement your business requirements.
Front-End Integration Process (H5)
The Ubases IoT H5 front end uses ES2015+, Vue.js 2.x, Vuex, Vue Router, Vue Axios, Vant 2, and AntV G2. Familiarity with these technologies is recommended before you begin.
1. Environment Setup
- Install and configure Node.js. Node.js official site
- Install Git. Git official site
2. Editor Setup
- Front-end editor. Visual Studio Code is recommended. VS Code official site
3. Installation
Clone the latest code from the GitHub repository:
$ git clone 项目地址
$ cd 项目名
Project directory structure:
├─ dist                              # 打包后目录
├─ node_modules                      # 依赖包目录
├─ babel.config.js                   # babel配置文件
├─ jsconfig.json                     # 项目目录配置
├─ package.json                      # 项目配置项与依赖
├─ postcss.config.js                 # 自适应规则配置文件
├─ public                            # 静态资源目录
├─ src                               # 源码目录
│  ├─ api                            # 访问第三方JS封装
│  ├─ App.vue                        # 根组件
│  ├─ components                     # 组件目录
│  ├─ config                         # 全局配置目录
│  ├─ directives                     # 指令目录
│  ├─ lang                           # 国际化目录
│  ├─ main.js                        # 入口js
│  ├─ mixins                         # 混入目录
│  ├─ mock                           # 接口模拟目录
│  ├─ router                         # 路由目录
│  ├─ store                          # Vuex状态管理
│  ├─ styles                         # 样式目录
│  ├─ util                           # 工具包目录
│  └─ views                          # 视图组件目录
└─ vue.config.js                     # 环境配置文件
4. Local Development
The project contains the iot-app-h5 and iot-app-h5-panel directories. The iot-app-h5-panel directory contains multiple control panel types. Install dependencies and start each control panel separately.
- Install dependencies.
$ npm installIf your network connection is slow, you can use cnpm instead of npm.
- Start the project.
$ npm run serveAfter startup, open a browser and visit http://localhost:8080 to see the local project page.
You can then modify the code to implement your business requirements.
Backend Integration Process
The Ubases IoT cloud platform backend uses a microservice architecture and exposes app APIs and cloud platform APIs. If a project only requires device status monitoring and control without complex business logic, backend integration and customization are generally unnecessary; follow the guide to configure the platform instead. If the existing platform does not meet the project's requirements, developers can create custom APIs and microservices that follow the prescribed rules and interfaces, then integrate them with the IoT cloud platform to support their business.

Based on the diagram above, the backend integration process is roughly as follows:
Obtain backend source code, study the documentation, and become familiar with functional modules
Evaluate new or modified features and identify involved databases and modules
Design microservice feature logic and APIs
Develop microservice business logic and API interfaces
Integrate and test the app, web front end, devices, and backend
App Integration Process
This section assumes that you are familiar with Android or iOS app development.
The Ubases IoT Android and iOS apps are built with the Cordova hybrid framework.
You can add features through third-party Cordova plugins or custom plugins. For instructions, see the Cordova documentation. For available plugins, see https://cordova.apache.org/plugins/
Development Environment
Our Android and iOS projects currently use Node.js version v14.19.2. Download and install the package for your system and configure environment variables.
After installing Node.js, also install the Cordova CLI.
Android Project Development
This is our Cordova Android project directory:
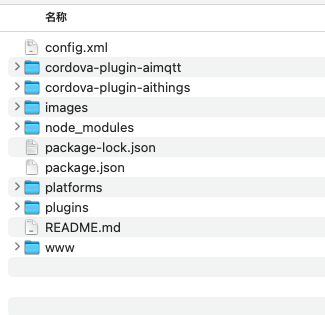
Open a command prompt, change to this directory, and use Cordova to add the required plugins. Node.js and the Cordova CLI must already be installed.
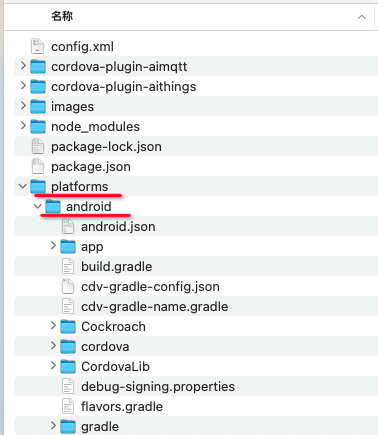
For Android development, import the platforms > android directory into Android Studio.
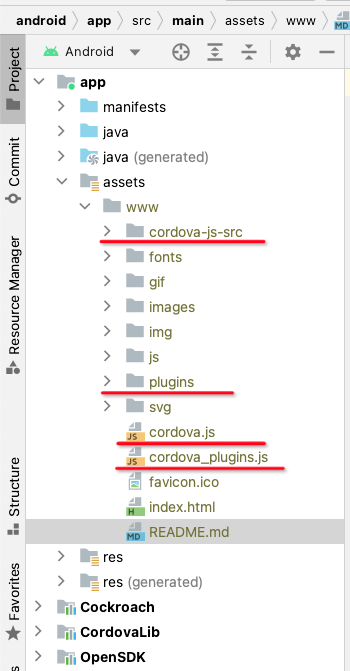
After opening the project in Android Studio, you can see H5 code under app > assets > www in the left project tree. Except for cordova_plugins.js, cordova-js-src, cordova.js, and plugins, everything else is H5 files—you can replace them with code from your front-end team.
cordova-plugin-aithings is this project’s custom plugin. To add features on top of the existing ones, extend this custom plugin as follows:
- Open the project in Android Studio. In the
executemethod of classcs.boantong.common.util.AithingsImpl, add acaseblock and implement your feature there.
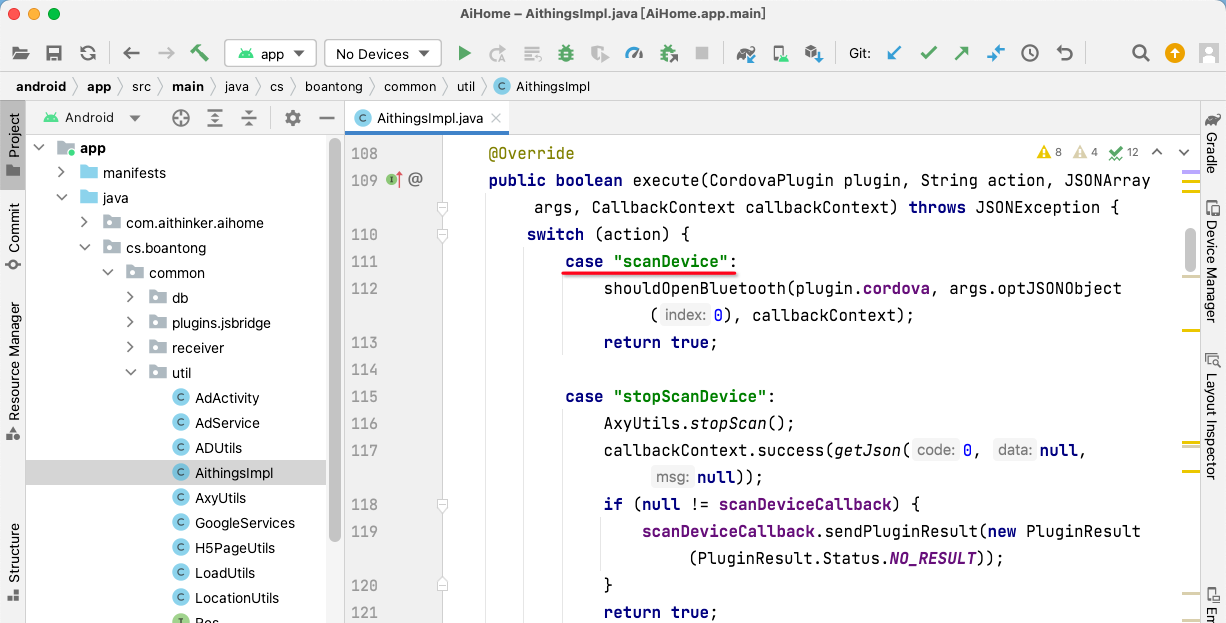
plugin: the plugin object used to access the context and related objects
args: values passed by the H5 layer; the value may be a primitive type or a JSON object
callbackContext.success: returns a result to the H5 layer
callbackContext.sendPluginResult: returns a custom result
getJson: builds a standard JSON response
If execution takes too long, use the async thread pool: plugin.cordova.getThreadPool(), and return results to H5 asynchronously.
- The string after
caseis the method name in thecordova-plugin-aithingsplugin JS code.
Steps to add a method in the JS code:
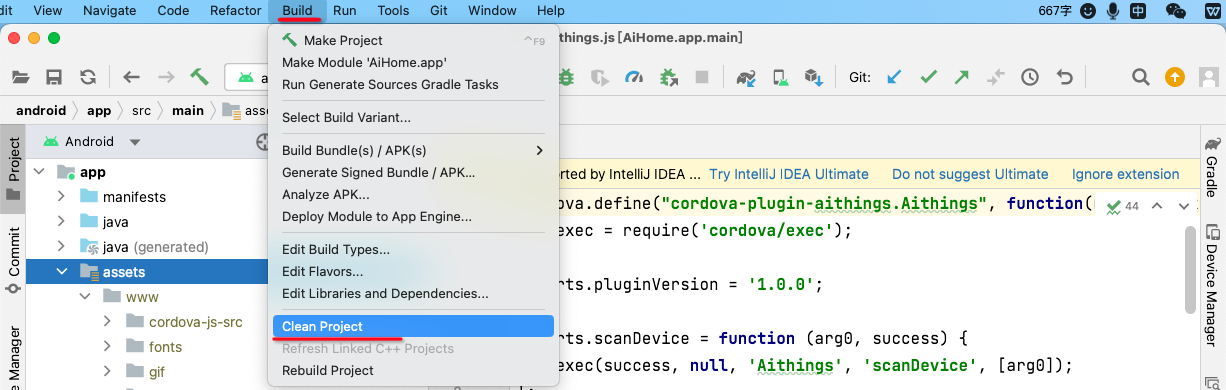
First clean the project with Android Studio’s Clean Project.
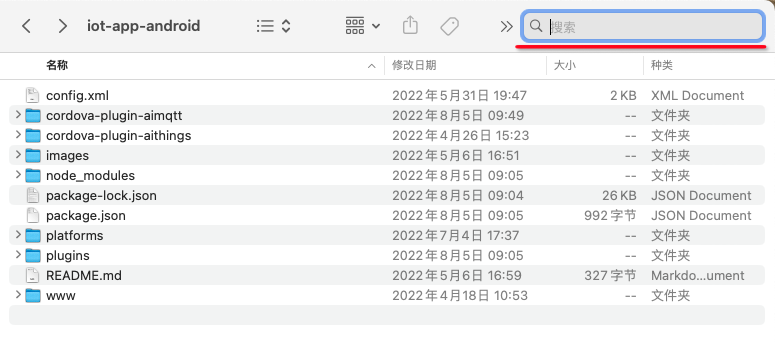
Search for the aithings.js file under the Cordova Android project directory. Search only the current directory and its subdirectories; otherwise you may find files from other directories.
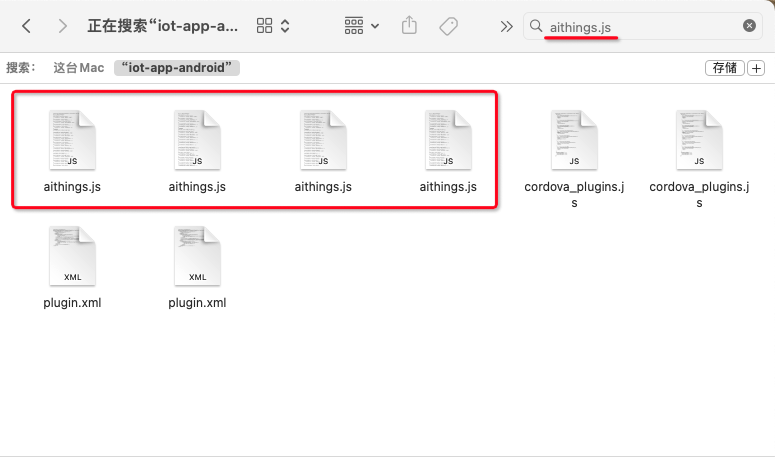
You will typically find about 4 files—open all of them in an editor. Note: if you did not Clean Project earlier, you may get more results.
At the end of each file, add the JS method.
JS method to add:
// 这是固定写法,两个 "scanDevice" 字符串都要替换成上面您 case 后面的字符串,其他的不动
exports.scanDevice = function (arg0, success) {
    exec(success, null, 'Aithings', 'scanDevice', [arg0]);
};

// 当JS不需要传值给原生的时候可以去掉 arg0
exports.scanDevice = function (success) { //
    exec(success, null, 'Aithings', 'scanDevice', []);
};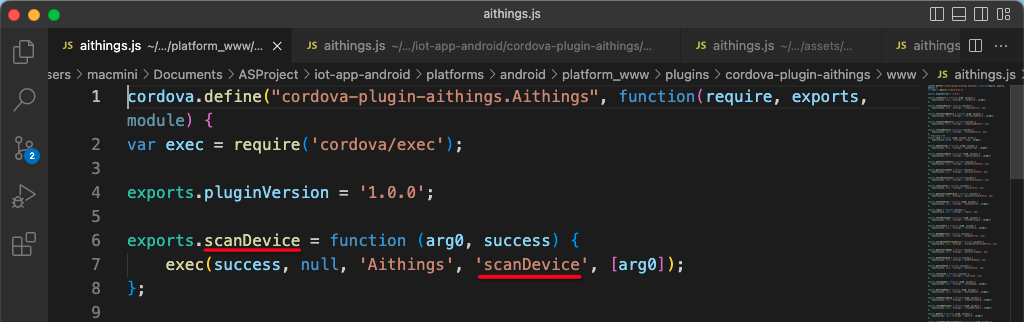
If the file ends with });, place the JS method inside that block.

After these steps, you have exposed a native feature for H5 to call. For how H5 calls it, see the API documentation.
If you want to change the Android main package name, after changing it, search the entire Cordova Android project directory for the same string as the main package name and update all occurrences.
To learn more, search for “custom Cordova plugin”. For Cordova usage, see the official documentation
iOS Project Development
This is our Cordova iOS project directory:
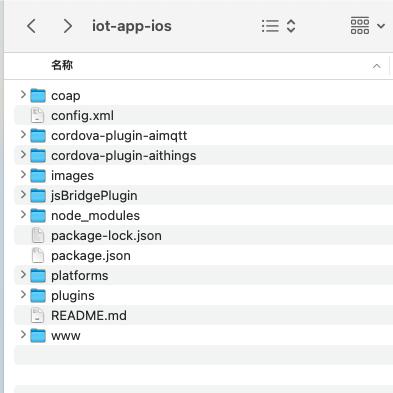
Open a terminal, switch to this directory, and use cordova to add plugins you need. Prerequisite: Node.js and Cordova CLI are installed.
Double-click AiHome.xcworkspace under platforms > ios to open Xcode for iOS development.
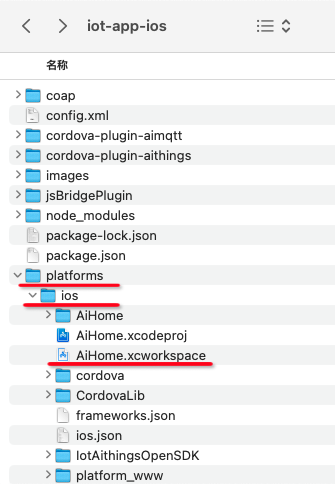
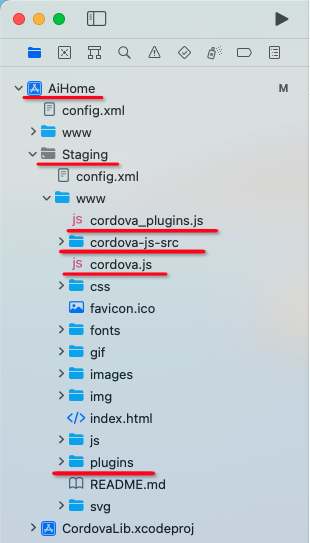
After opening the project with AiHome.xcworkspace, you can see H5 code under AiHome > Staging > www in the left project tree. Except for cordova_plugins.js, cordova-js-src, cordova.js, and plugins, everything else is H5 files—you can replace them with code from your front-end team.
cordova-plugin-aithings is this project’s custom plugin. To add features on top of the existing ones, extend this custom plugin as follows:
- Open
AiHome.xcworkspace. InCDVAithings.munderClasses > Utils, add a method and implement your feature there.
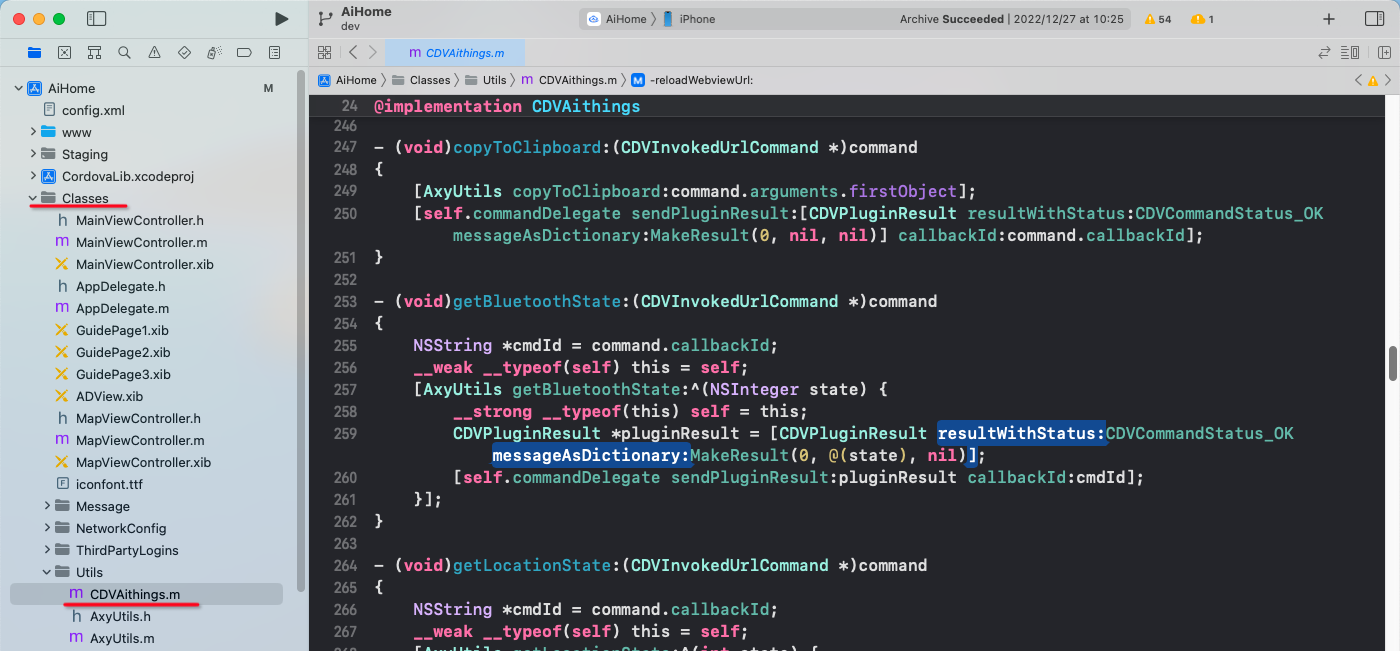
Standard method:
// 必须使用 void 返回值、 (CDVInvokedUrlCommand *)command 作为参数,这里的方法名您自定义
- (void)copyToClipboard:(CDVInvokedUrlCommand *)command
{
	// command.arguments.firstObject 是H5端传递的参数,是可以被JSON序列化的类型。
	NSString *arg = command.arguments.firstObject
    // [self.commandDelegate sendPluginResult:] 是返回结果给H5端
	// CDVPluginResult 用来包装结果;MakeResult用来标准化结果值,返回的结果必须能被JSON序列化
    [self.commandDelegate sendPluginResult:[CDVPluginResult resultWithStatus:CDVCommandStatus_OK messageAsDictionary:MakeResult(0, nil, nil)] callbackId:command.callbackId];

	// 这是一个异步线程,如果执行时间太长,可以放到异步执行,可以在异步中返回结果给H5端
	[self.commandDelegate runInBackground:^{
    }];
}- The method name above is also the method name in the
cordova-plugin-aithingsplugin JS code—copy it into the JS code.
Steps to add a method in the JS code:
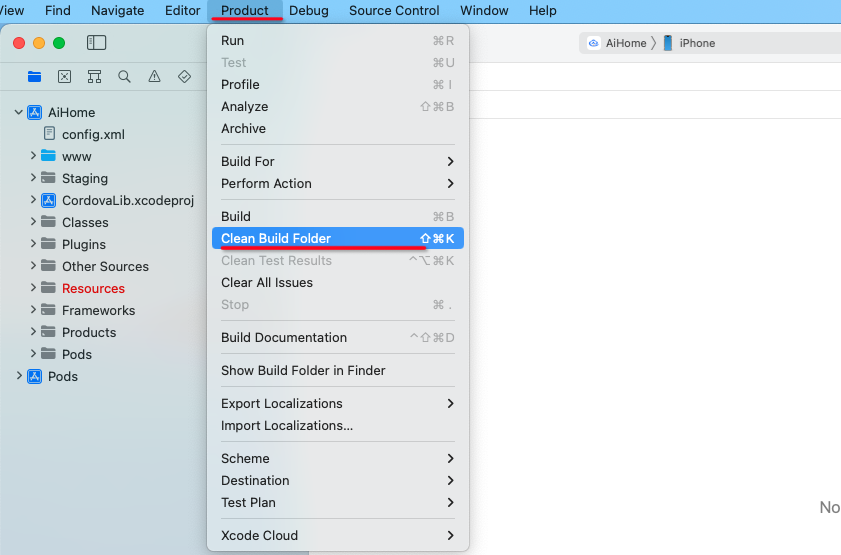
First clean the project in Xcode via Product > Clean Build Folder.
The remaining steps are identical to the Android steps above—refer to the Android section.
After these steps, you have exposed a native feature for H5 to call. For how H5 calls it, see the API documentation.
If you want to change the iOS Bundle Identifier, search the entire Cordova iOS project directory for the same string as the Bundle Identifier and update all occurrences.
To learn more, search for “custom Cordova plugin”. For Cordova usage, see the official documentation.