

⚠️ 产品声明 / Product Disclaimer
非量产产品,仅供工程验证,不承诺符合 RoHS。 Non-mass-production product; for engineering verification only. RoHS compliance is not guaranteed.
Overview
This chapter builds on the environment prepared in Software Setup (Windows): build the official base project directly in VSCode, complete your first build, and flash it to the development board with ST-Link.
Inside the base project directory DOCS_TEST1, do one configuration step first, then build (either method works).
💡 Tip (required, one time only): by default the official base project only produces
9Mod_MCPBorad.elf, but flashing needs a.bin. Append the following to the top-level fileC:\Users\YourName\DOCS_TEST1\CMakeLists.txtin the project root directory (the same directory as9Mod_MCPBorad.ioc) — CubeMX will not regenerate this file, so it is safe to edit:
# Generate .bin and .hex files after build
add_custom_command(TARGET ${CMAKE_PROJECT_NAME} POST_BUILD
    COMMAND ${CMAKE_OBJCOPY} -O binary $<TARGET_FILE:${CMAKE_PROJECT_NAME}> ${CMAKE_PROJECT_NAME}.bin
    COMMAND ${CMAKE_OBJCOPY} -O ihex $<TARGET_FILE:${CMAKE_PROJECT_NAME}> ${CMAKE_PROJECT_NAME}.hex
    COMMENT "Generating .bin and .hex files"
)
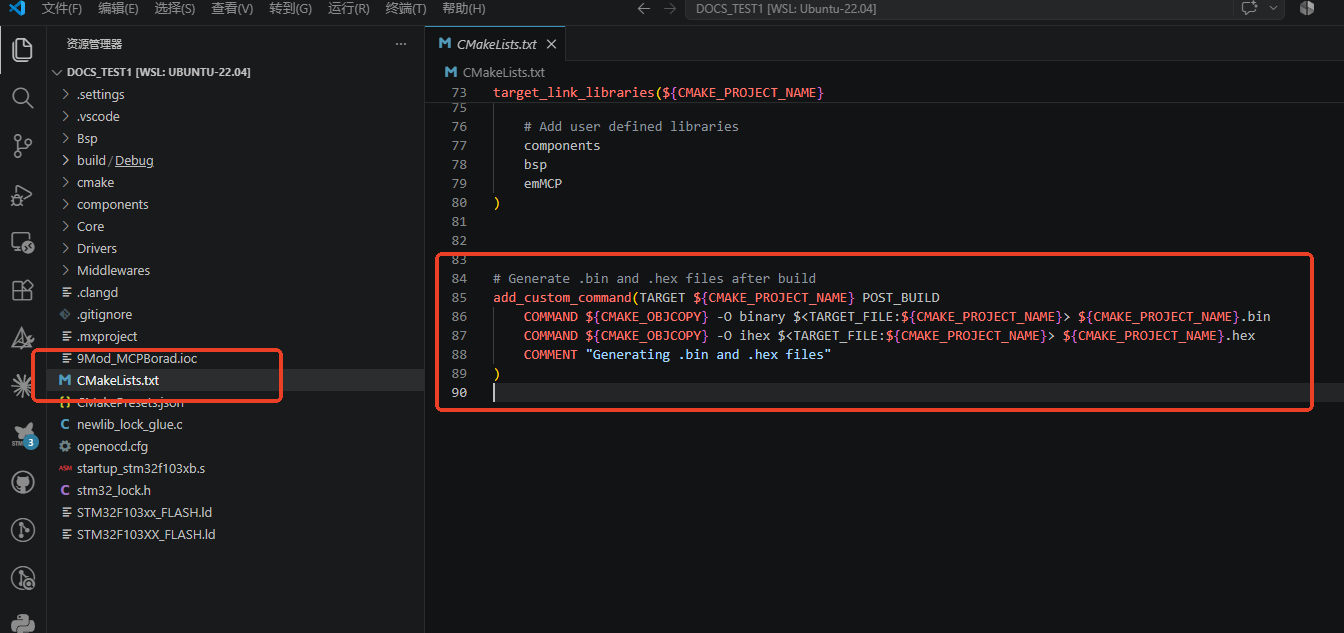
Save the file and every build from then on will automatically generate 9Mod_MCPBorad.bin.
Inside the base project directory DOCS_TEST1 there are two ways to build:
Method 1: build from the VSCode CMake extension GUI (recommended)
-
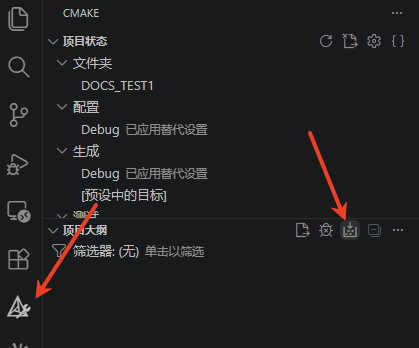
Click the CMake icon in the VSCode Activity Bar on the left (the CMake Tools extension).
-
In the CMake panel in the sidebar, set the build preset to Debug (you can also switch it by clicking the CMake area on the bottom status bar).

-
Click the Build button and wait for the build to finish; the output panel reports success.
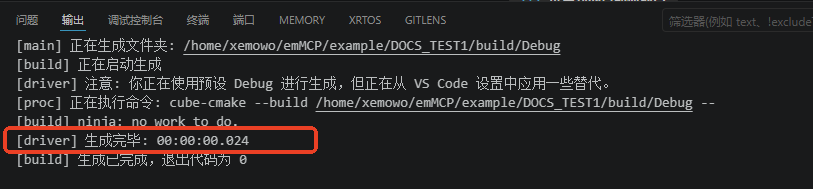
Method 2: build from the command line (run it in PowerShell; the commands are the same as in the Linux version)
# 1. Configure: read CMakePresets.json and generate the Ninja build scripts
cmake --preset Debug

# 2. Build: compile and link several hundred source files into the final firmware
cmake --build build/Debug
Example of a successful build output (the number of lines varies by environment):
[xx/xx] Linking C executable 9Mod_MCPBorad.elf
Memory region         Used Size  Region Size  %age Used
         RAM:       16xxx B        20 KB     xx%
       FLASH:       98xxx B       128 KB     xx%
Check the artifacts:
dir build\Debug
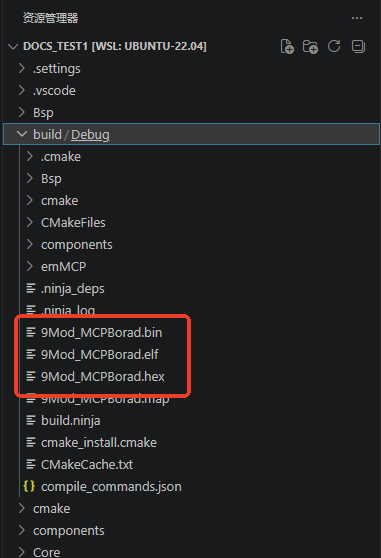
Check the artifacts:
build/Debug/should contain three files —9Mod_MCPBorad.elf,9Mod_MCPBorad.binand9Mod_MCPBorad.hex(.bin/.hex are generated automatically by POST_BUILD).
The artifact names come from
set(CMAKE_PROJECT_NAME 9Mod_MCPBorad)inCMakeLists.txt; every command in this tutorial is written for that artifact name.
Wiring: the ST-Link connects to the development board over SWD, as follows:
| ST-Link | Development Board | Description |
|---|---|---|
| SWDIO | PA13 | Data line |
| SWCLK | PA14 | Clock line |
| GND | GND | Common ground |
| 3.3V | 3.3V (optional) | Can be left unconnected when the board is self-powered |
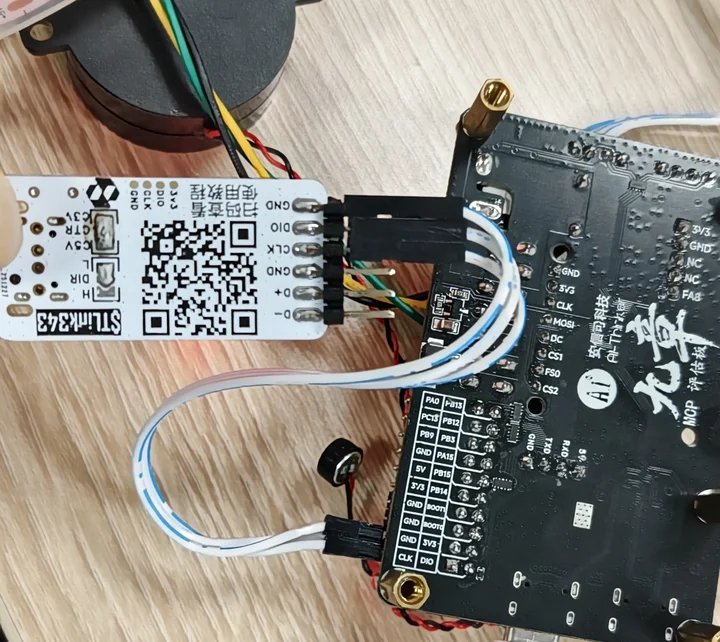
Confirm Windows detects the ST-Link (direct connection on Windows — no mapping needed)
On Windows the ST-Link is detected as soon as you plug it in (OpenOCD accesses it directly; no mapping of any kind is needed):
- Plug the ST-Link’s USB cable into the computer (with the board wired up as in the table above).
- Open Device Manager (
Win+X→ Device Manager); you should see an STLink dongle device. - A yellow exclamation mark means the driver is not installed properly: install STM32 ST-LINK Utility, or get the ST-Link driver from the ST website.
Flash (VSCode Cortex-Debug GUI — the extension is already installed)
-
Create
.vscode/launch.jsonin the project root directory (contents below):{ "version": "0.2.0", "configurations": [ { "name": "烧录并调试 STM32F103 (OpenOCD)", "cwd": "${workspaceFolder}", "executable": "${workspaceFolder}/build/Debug/9Mod_MCPBorad.elf", "request": "launch", "type": "cortex-debug", "servertype": "openocd", "configFiles": ["interface/stlink.cfg", "target/stm32f1x.cfg"], "device": "STM32F103CB", "gdbPath": "arm-none-eabi-gdb", "toolchainPrefix": "arm-none-eabi", "runToEntryPoint": "main" } ] }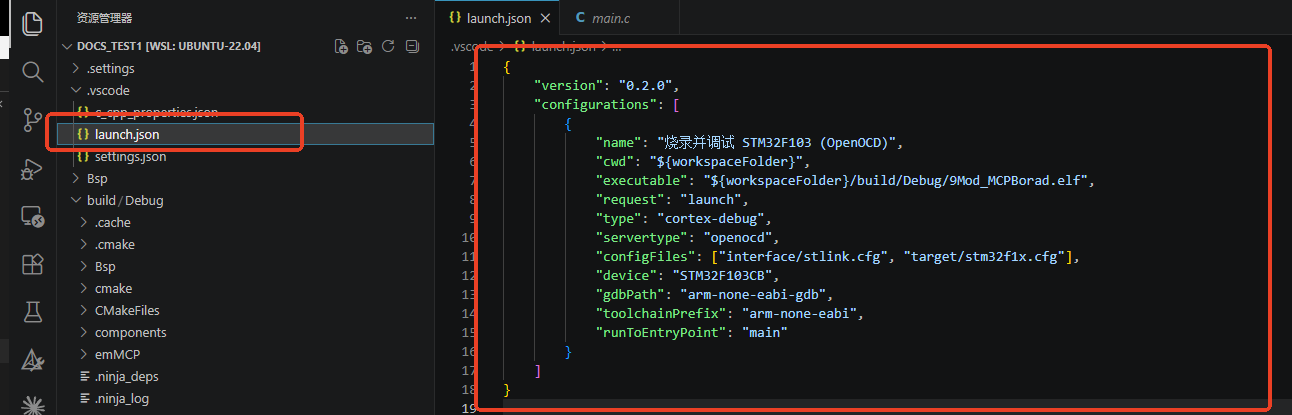
-
In the VSCode bottom bar (status bar), click the “烧录并调试 STM32F103 (OpenOCD)” button (“Flash & Debug STM32F103 (OpenOCD)”) → OpenOCD starts automatically, connects to the ST-Link and writes the firmware into the chip.
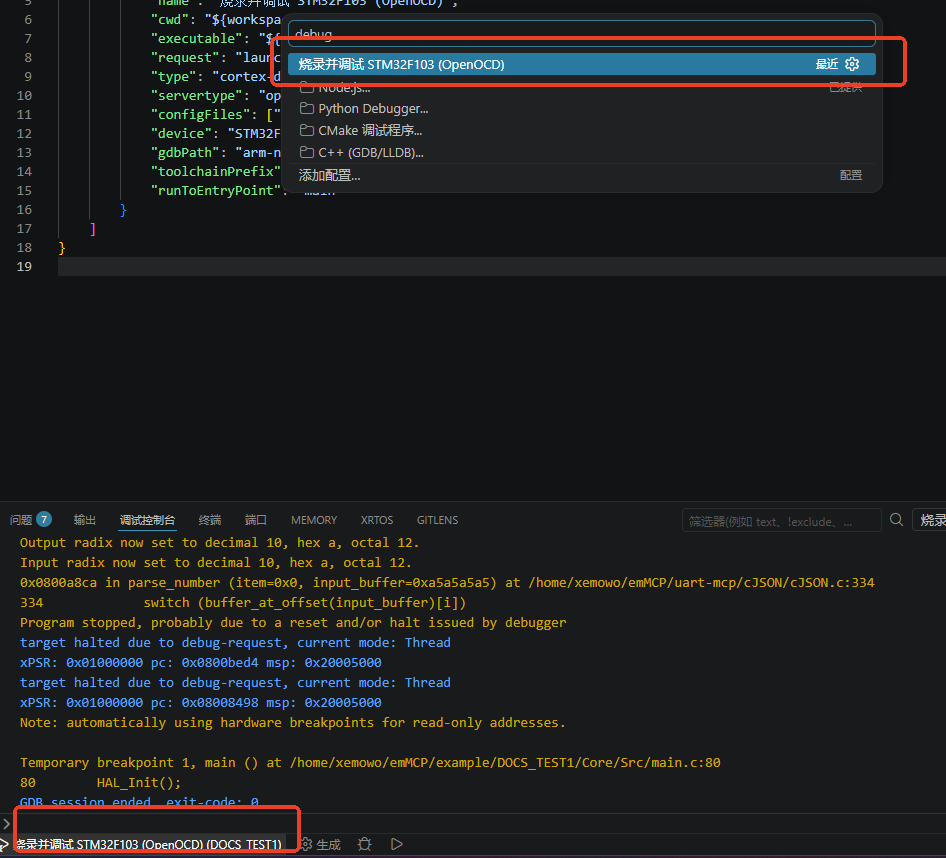
-
When flashing finishes the program stops at
main(); click Continue in the debug toolbar to run it. You can also set breakpoints in the code before starting, to debug live.
After flashing, the board runs the firmware: the OLED shows the welcome page and the LED strip plays a gradient animation (features are added step by step in later chapters).
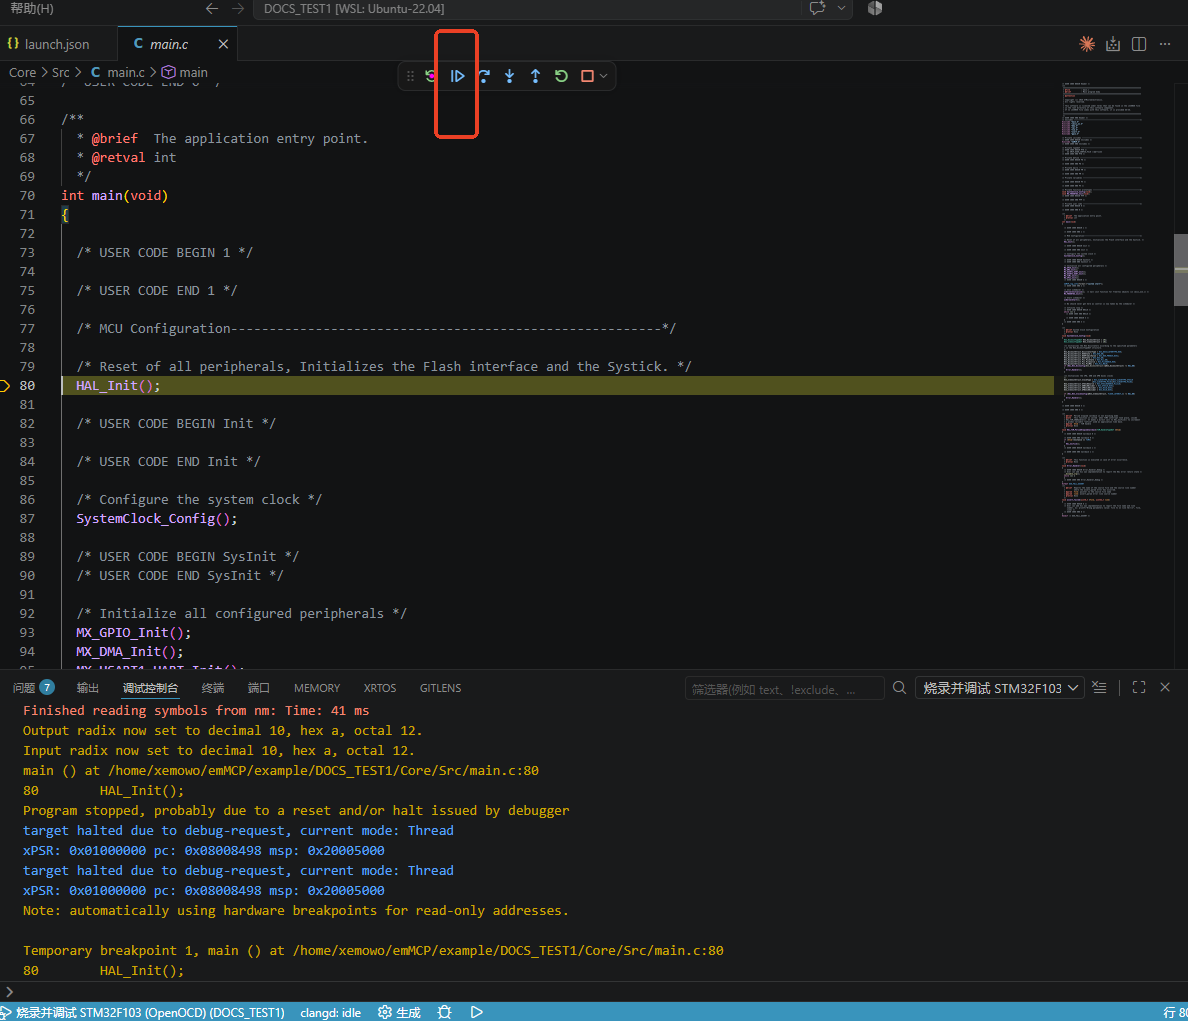
-
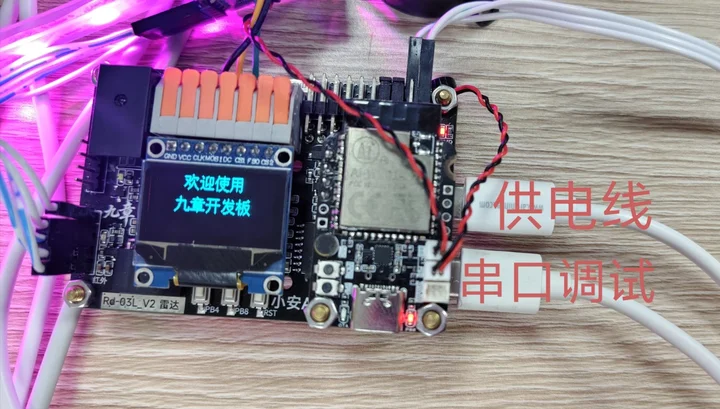
Check the screen: the OLED should display two lines, “欢迎使用” (“Welcome”) and “九章开发板” (“Jiuzhang Development Board”) — the welcome page of the official base project.
-
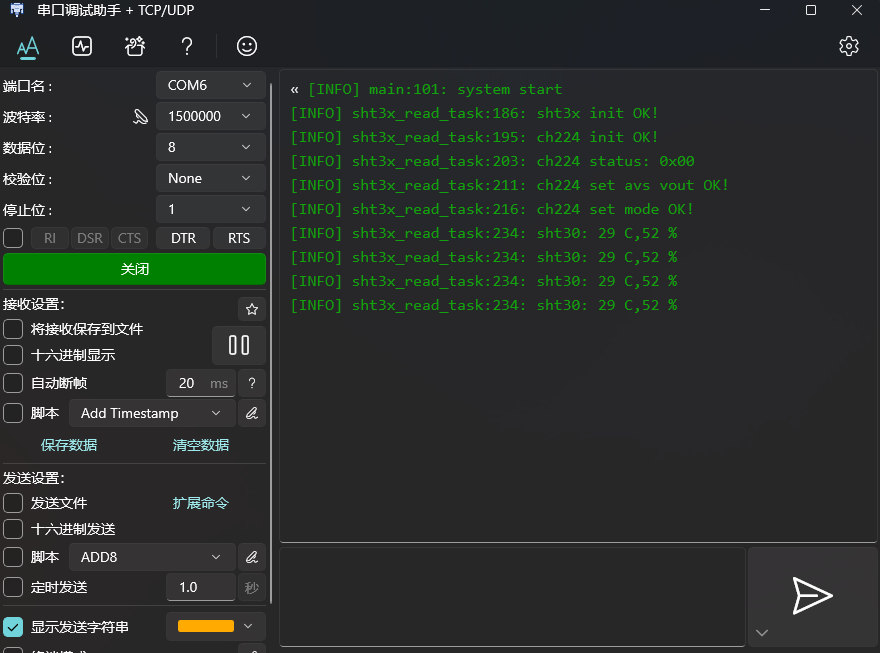
Check the serial log: connect the serial assistant (SSCOM/XCOM, installed in step ⑦ of Software Setup) to the COM port that the USB cable maps to (the USART1 debug port) at 1500000 baud; you should see temperature and humidity logs refreshed once per second:
[INFO] sht3x_read_task:234: sht30: 29 C,52 %The temperature and humidity values change with the environment. Seeing this log means the firmware is running normally and the SHT30 sensor is communicating correctly.
-
You will also see initialization logs on the serial port:
[INFO] emMCP init done,[INFO] sht3x init OK!,[INFO] ch224 init OK!and so on.
If all of the above looks right, the download succeeded and the development board is running the base firmware.
Build Error Troubleshooting
| Error | Cause | Solution |
|---|---|---|
arm-none-eabi-gcc: not found | Cross-compiler not installed or not on PATH | Re-run xpack's install.bat (as administrator), or reinstall the official ARM .exe, then reopen PowerShell |
CMake Error: Could not find ninja | Ninja not installed or not on PATH | Download ninja-win.zip, extract it and add the directory to the system PATH (see step ③ of Software Setup) |
No CMAKE_C_COMPILER could be found | Toolchain file not taking effect | Make sure you run cmake in the project root directory and that CMakePresets.json exists |
cannot find -lc and similar link errors | newlib linking problem | Make sure newlib_lock_glue.c is in the project root directory |
| Stubborn build cache issues | Corrupted cache | Run Remove-Item -Recurse build, then cmake --preset Debug && cmake --build build/Debug again |
FAQ & Troubleshooting
🔧 cmake --preset Debug reports it is not an internal or external command
Cause: CMake was not added to PATH
Fix: tick "Add CMake to the system PATH" during installation; reopen PowerShell after installing
🔧 arm-none-eabi-gcc --version command not found
Cause: the compiler was not added to PATH
Fix: re-run xpack's install.bat (as administrator); or tick "Add path" when installing the official ARM .exe; then reopen PowerShell
🔧 ninja --version command not found
Cause: Ninja was not added to PATH
Fix: add the directory containing ninja.exe to the system Path environment variable (see step ③ of Software Setup)
🔧 Cloning the official repository is slow / fails
Cause: unstable network
Fix: retry; or git clone --depth 1 https://github.com/Ai-Thinker-AIoT/emMCP.git (fetches only the latest revision)
🔧 Running cmake --preset Debug outside the project directory errors out
Cause: the preset file lives in the project root directory
Fix: run cd C:\Users\YourName\DOCS_TEST1 first
🔧 Build error No CMAKE_C_COMPILER
Cause: the cross-compiler is not installed or not on PATH
Fix: reinstall/re-run the xpack compiler's install.bat, then reopen PowerShell
🔧 The first build takes a long time
Cause: a full build of several hundred files
Fix: this is normal; later incremental builds take only a few seconds
🔧 Rebuilding after changing the code
Cause: —
Fix: just run cmake --build build/Debug (no need to configure again)
🔧 The artifact name is not your own project name
Cause: CMAKE_PROJECT_NAME is not what you expect
Fix: the base project artifact is named 9Mod_MCPBorad.bin; to rename it, change set(CMAKE_PROJECT_NAME ...) in CMakeLists.txt and run cmake --preset Debug again
🔧 Antivirus deletes the build artifacts
Cause: a false positive from Windows Defender
Fix: add the project directory to the Windows Defender allow list
🔧 The serial assistant cannot open the COM port
Cause: ① the USB cable is not plugged in ② the CH340 driver is not installed ③ the port is already in use
Fix: ① plug in the USB cable ② confirm in Device Manager that the CH340 is detected ③ close the software occupying the port and open the serial port again
Flashing Tip on Windows
On Windows the ST-Link works as soon as it is plugged in (OpenOCD accesses USB directly) — no mapping of any kind is needed. Before flashing, check in Device Manager that the STLink device shows up correctly.