

⚠️ 产品声明 / Product Disclaimer
非量产产品,仅供工程验证,不承诺符合 RoHS。 Non-mass-production product; for engineering verification only. RoHS compliance is not guaranteed.
Overview
An MCP tool is simply a set of functions the AI can call. The AI calls a tool with a JSON command, the MCU performs the hardware action, and then reports the result back. The official base project registers 0 tools by default (only emMCP initialization and the heartbeat are done).
This chapter registers 4 tools in one go (relay / temperature-humidity / power output / LED strip) and walks the whole flow: "callback function → registration → tool list report (automatic or manual, pick one) → serial test". Chapters 6~9 then put each of these 4 tools into practice (driver + AI control).
🧩 The peripherals on this nine-chapter development board (OLED, temperature/humidity, relay, PD decoy, AI module) are all on board and pre-wired, so the "wiring" sections in the cases are there to help you identify the pins (or as a reference when adding external modules) — you do not need to wire anything yourself. For an overview of the on-board resources, see Product Introduction and Hardware Description.
Protocol reference: Understanding the MCP Protocol
What this step does: figure out which fields an MCP tool is made of — the AI module relies on exactly these fields to “know” your tool, understand what it is for, and decide how to call it.
A tool is just an emMCP_tool_t struct (defined in uart-mcp/emMCP.h):
typedef struct emMCP_tool {
  char *name;                          // Tool name (the AI finds the tool by it)
  char *description;                   // Tool description (the AI understands how to use it by it)
  void (*setRequestHandler)(void *);   // ★ Execute callback: called when the AI requests the tool to act
  void (*checkRequestHandler)(void *); // ★ Query callback: called when the AI asks for the tool's status
  inputSchema_t inputSchema;           // Parameter description (property name / type / description)
  struct emMCP_tool *next;
} emMCP_tool_t;
Parameter properties (each tool has at most MCP_SERVER_TOOL_PROPERTIES_NUM = 6 of them):
t.inputSchema.properties[0].name;        // parameter name, e.g. "state"
t.inputSchema.properties[0].description; // parameter description, e.g. "on打开 / off关闭"
t.inputSchema.properties[0].type;        // type: MCP_SERVER_TOOL_TYPE_STRING/NUMBER/BOOLEAN
Why this matters: once the structure is clear, you will know what goes into each field when you write the callback functions next —
name/descriptionare the “business card” the AI reads,propertiesdescribes the parameters, and the two callbacks are the code that does the actual work.
What this step does: write one pair of callbacks for each of the 4 tools — the set callback is “the code that runs when the AI asks the tool to act” (parse the parameters, drive the hardware, report the result), and the check callback is “the code that runs when the AI asks for the tool’s status” (report the current state). This is the core logic of the tool, and it is what the AI actually calls.
File path: ~/DOCS_TEST1/Core/Src/freertos.c, 3 insertion points in total
Insert point 1: prototype declarations for the 8 callbacks
Where: add them after /* USER CODE BEGIN FunctionPrototypes */ (the callback definitions come after the registration code, so they must be declared first):
/* USER CODE BEGIN FunctionPrototypes */
void ui_show_status(void);                                ← existing code
static void relay_set_handler(void *arg);
static void relay_check_handler(void *arg);
static void sht3x_query_set_handler(void *arg);
static void sht3x_query_check_handler(void *arg);
static void ch224_voltage_set_handler(void *arg);
static void ch224_voltage_check_handler(void *arg);
static void ledstrip_set_handler(void *arg);
static void ledstrip_check_handler(void *arg);
/* USER CODE END FunctionPrototypes */
Insert point 2: global state variables
Where: add it between USER CODE BEGIN Variables and USER CODE END Variables (the LED-strip AI control flag, shared by the animation task and the tool callbacks):
/* USER CODE BEGIN Variables */
double g_temp = 0.0;                                     ← existing code
double g_hum  = 0.0;                                     ← existing code
static volatile bool led_on = false;   // LED strip: AI control flag
/* USER CODE END Variables */
The other state variables (
relay_on,current_vout,led_r/g/b,led_brightness) are declared right where they are used by each tool callback (see Insert point 3) — do not declare them again here.
Insert point 3: the complete callback functions for the 4 tools
Where: add them after /* USER CODE BEGIN Application */ (the official code already implements the receive callback in this section, so just append after it). The complete code below has been verified to compile in DOCS_TEST1:
/* ===== 4 MCP tool callbacks ===== */
static bool relay_on = false;

/* 1. Relay: relay */
static void relay_set_handler(void *arg) {
  cJSON *root = (cJSON *)arg;
  cJSON *state_item = cJSON_GetObjectItem(root, "state");
  if (state_item != NULL && cJSON_IsString(state_item)) {
    const char *s = state_item->valuestring;
    if (strcmp(s, "on") == 0) { relay_on = true; axk_relay_set(ON); log_info("Relay -> ON"); }
    else if (strcmp(s, "off") == 0) { relay_on = false; axk_relay_set(OFF); log_info("Relay -> OFF"); }
    else { emMCP_ResponseValue(emMCP_CTRL_ERROR); return; }
  }
  log_info("[Relay] sending response...");
  emMCP_ResponseValue(emMCP_CTRL_OK);
  log_info("[Relay] response sent");
}
static void relay_check_handler(void *arg) { (void)arg; emMCP_ResponseValue(relay_on ? "on" : "off"); }

/* 2. Temperature/humidity: sht3x */
static void sht3x_query_set_handler(void *arg) {
  (void)arg;
  log_info("[sht3x] query called");
  double temp = 0.0, hum = 0.0;
  if (axk_sht3x_read(0x2c06, &temp, &hum) == 0) {
    char rsp[64];
    snprintf(rsp, sizeof(rsp), "{\"temperature\":%.1f,\"humidity\":%.1f}", temp, hum);
    log_info("[sht3x] read ok: %s", rsp);
    emMCP_ResponseValue(rsp);
  } else {
    log_error("[sht3x] read failed");
    emMCP_ResponseValue(emMCP_CTRL_ERROR);
  }
}
static void sht3x_query_check_handler(void *arg) { sht3x_query_set_handler(arg); }

/* 3. Power output: ch224_voltage */
static float current_vout = 12.2f;
static void ch224_voltage_set_handler(void *arg) {
  cJSON *root = (cJSON *)arg;
  cJSON *v = cJSON_GetObjectItem(root, "voltage");
  if (v != NULL && cJSON_IsNumber(v)) {
    float target = (float)v->valuedouble;
    if (target < 5.0f || target > 20.0f) {
      log_error("[ch224] voltage out of range: %.1f", target);
      emMCP_ResponseValue(emMCP_CTRL_ERROR);
      return;
    }
    /* Dynamic voltage adjust: first write the PPS voltage register (0x53 = target*10), then make sure PPS mode is on (VOUT=0x06) */
    int r1 = axk_ch224_set_pps_vout(target);
    log_info("[ch224] set_pps_vout(%.1f) = %d", target, r1);
    if (r1 == 0) {
      int r2 = axk_ch224_set_mode(AXK_CH224_VOUT_PPS);
      log_info("[ch224] set_mode(PPS) = %d", r2);
      if (r2 == 0) {
        current_vout = target;
        emMCP_ResponseValue(emMCP_CTRL_OK);
      } else emMCP_ResponseValue(emMCP_CTRL_ERROR);
    } else emMCP_ResponseValue(emMCP_CTRL_ERROR);
  } else {
    /* No voltage parameter: query the current voltage */
    char rsp[32];
    snprintf(rsp, sizeof(rsp), "{\"voltage\":%.1f}", current_vout);
    emMCP_ResponseValue(rsp);
  }
}
static void ch224_voltage_check_handler(void *arg) { ch224_voltage_set_handler(arg); }

/* 4. LED strip: ledstrip */
static uint8_t led_r = 255, led_g = 0, led_b = 0;
static uint8_t led_brightness = 50;
static void ledstrip_set_handler(void *arg) {
  cJSON *root = (cJSON *)arg;
  cJSON *mode_item = cJSON_GetObjectItem(root, "mode");
  log_info("[ledstrip] called, mode=%s", mode_item && cJSON_IsString(mode_item) ? mode_item->valuestring : "(null)");
  if (mode_item && cJSON_IsString(mode_item)) {
    const char *m = mode_item->valuestring;
    if (strcmp(m, "on") == 0) {
      led_on = true;
      axk_ws2812_set_all_pixels_color(led_r, led_g, led_b, led_brightness / 100.0f);
    } else if (strcmp(m, "off") == 0) {
      led_on = false;
      axk_ws2812_set_all_pixels_color(0, 0, 0, 0.0f);
    } else if (strcmp(m, "set") == 0) {
      cJSON *r = cJSON_GetObjectItem(root, "r");
      cJSON *g = cJSON_GetObjectItem(root, "g");
      cJSON *b = cJSON_GetObjectItem(root, "b");
      if (r && cJSON_IsNumber(r)) led_r = (uint8_t)r->valueint;
      if (g && cJSON_IsNumber(g)) led_g = (uint8_t)g->valueint;
      if (b && cJSON_IsNumber(b)) led_b = (uint8_t)b->valueint;
      cJSON *br = cJSON_GetObjectItem(root, "brightness");
      if (br && cJSON_IsNumber(br)) led_brightness = (uint8_t)br->valueint;
      log_info("[ledstrip] set: r=%d g=%d b=%d br=%d", led_r, led_g, led_b, led_brightness);
      led_on = true;
      axk_ws2812_set_all_pixels_color(led_r, led_g, led_b, led_brightness / 100.0f);
    } else if (strcmp(m, "query") == 0) {
      char rsp[128];
      snprintf(rsp, sizeof(rsp), "{\"mode\":\"%s\",\"on\":%s,\"r\":%d,\"g\":%d,\"b\":%d,\"brightness\":%d}", "set", led_on ? "true" : "false", led_r, led_g, led_b, led_brightness);
      emMCP_ResponseValue(rsp);
      return;
    } else { emMCP_ResponseValue(emMCP_CTRL_ERROR); return; }
    emMCP_ResponseValue(emMCP_CTRL_OK);
    return;
  }
  emMCP_ResponseValue(emMCP_CTRL_ERROR);
}
static void ledstrip_check_handler(void *arg) { ledstrip_set_handler(arg); }
About the four tool callbacks:
- relay: the
stateparameter (“on”/“off”) controls the PB5 relay;- sht3x: no parameters; reads temperature/humidity and replies with JSON;
- ch224_voltage: the
voltageparameter (5~20) adjusts the power output; without it, queries the current voltage;- ledstrip:
mode(on/off/set/query) +r/g/b/brightnesscontrols the LED strip.
What this step does: pack the callback functions of the 4 tools into emMCP_tool_t structs and register them into emMCP’s tool list — the equivalent of formally registering the four functions “relay, temperature/humidity, power, LED strip” with emMCP. A tool that is not registered can never be called by the AI.
File path: ~/DOCS_TEST1/Core/Src/freertos.c, the StartDefaultTask function
Insert the following registration code after emMCP_Init(&emMCP); (before the for loop) — verified to compile:
/* Register the 4 MCP tools */
  emMCP_tool_t t;

  /* relay */
  memset(&t, 0, sizeof(t));
  t.name = "relay";
  t.description = "继电器控制工具,用于打开/关闭继电器";
  t.inputSchema.properties[0].name = "state";
  t.inputSchema.properties[0].description = "on打开继电器 / off关闭继电器";
  t.inputSchema.properties[0].type = MCP_SERVER_TOOL_TYPE_STRING;
  t.setRequestHandler = relay_set_handler;
  t.checkRequestHandler = relay_check_handler;
  emMCP_AddToolToToolList(&t);

  /* sht3x */
  memset(&t, 0, sizeof(t));
  t.name = "sht3x";
  t.description = "温湿度查询工具,返回当前温度和湿度";
  t.setRequestHandler = sht3x_query_set_handler;
  t.checkRequestHandler = sht3x_query_check_handler;
  emMCP_AddToolToToolList(&t);

  /* ch224_voltage */
  memset(&t, 0, sizeof(t));
  t.name = "ch224_voltage";
  t.description = "电源输出电压调节工具,voltage参数范围5到20伏,不传voltage参数时查询当前电压";
  t.inputSchema.properties[0].name = "voltage";
  t.inputSchema.properties[0].description = "目标电压值5-20伏,查询当前电压时不要传此参数";
  t.inputSchema.properties[0].type = MCP_SERVER_TOOL_TYPE_NUMBER;
  t.setRequestHandler = ch224_voltage_set_handler;
  t.checkRequestHandler = ch224_voltage_check_handler;
  emMCP_AddToolToToolList(&t);

  /* ledstrip */
  memset(&t, 0, sizeof(t));
  t.name = "ledstrip";
  t.description = "WS2812灯带控制工具,RGB颜色(r/g/b:0-255)、可选mode(on/off)、brightness(0-100)";
  t.inputSchema.properties[0].name = "r";
  t.inputSchema.properties[0].description = "红色分量 0-255";
  t.inputSchema.properties[0].type = MCP_SERVER_TOOL_TYPE_NUMBER;
  t.inputSchema.properties[1].name = "g";
  t.inputSchema.properties[1].description = "绿色分量 0-255";
  t.inputSchema.properties[1].type = MCP_SERVER_TOOL_TYPE_NUMBER;
  t.inputSchema.properties[2].name = "b";
  t.inputSchema.properties[2].description = "蓝色分量 0-255";
  t.inputSchema.properties[2].type = MCP_SERVER_TOOL_TYPE_NUMBER;
  t.inputSchema.properties[3].name = "brightness";
  t.inputSchema.properties[3].description = "亮度 0-100";
  t.inputSchema.properties[3].type = MCP_SERVER_TOOL_TYPE_NUMBER;
  t.setRequestHandler = ledstrip_set_handler;
  t.checkRequestHandler = ledstrip_check_handler;
  emMCP_AddToolToToolList(&t);
Registration key points: clear the struct with
memset(&t, 0, sizeof(t))before registering each tool;name/descriptionmust be string constants (the AI still uses them when it calls the tool later);propertiesdescribes the parameters (at most 6).
What this step does: emMCP_AddToolToToolList in step ③ only makes the tools known locally on the MCU; to let the AI module know “which tools the MCU has available and how each one is called”, you still have to send the tool list to the AI module.
Recommended: automatic registration
Call emMCP_RegistrationTools() and the framework automatically wraps the tools you added into mcp-tool JSON and sends it to the AI module:
/* After all 4 tools are registered with AddToolToToolList, add one line: */
emMCP_RegistrationTools();
Prerequisite: do not define EMMCP_MANUAL_TOOLS_ONLY in emMCP_config.h (it is undefined by default).
💡 Because RAM is tight in the example project bundled with this tutorial (92% of 20KB already used), it uses manual JSON registration (
EMMCP_MANUAL_TOOLS_ONLY). To learn the manual way, and a serial debugging method that does not depend on the AI module, see step ⑤ “Manual Registration / Debugging (Fallback)”.
Why this matters: once the AI module receives the tool list, it adds
relayto its own library of callable tools — after that, when you say “turn on the relay”, the AI can find it and call it. Without this step, the AI never knows the MCU has a relay.
When to use it: ① you want to understand manual mcp-tool broadcasting (the manual registration mode of the bundled example project); ② you want to use the serial port to debug the AI module directly / verify tool registration — the fastest verification method during development.
🔌 How to connect (debugging the AI module):
The module’s Type-C port has serial debugging built in — plug a USB cable into the module’s Type-C, connect your serial assistant to the matching COM port (baud rate 115200, tick “send new line”) and you can talk to the module directly; on this serial link you play the MCU role.
First flip the serial switch on the board up (to the module-debug position):
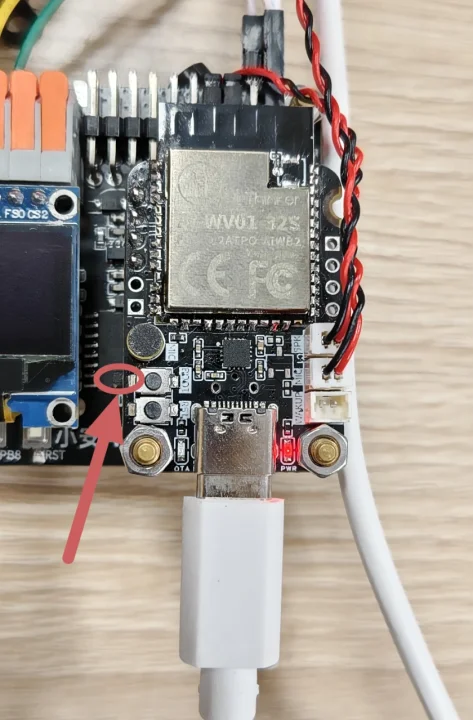
📋 Manual registration command (copy it straight into the serial assistant and send; ⚠️ it must be a single line — no line breaks, no indentation):
mcp-tool {"role":"MCU","msgType":"MCP","data":{"tools":[{"name":"relay","description":"继电器控制,打开/关闭继电器","inputSchema":{"properties":{"state":{"description":"on打开/off关闭","type":"string"}}}},{"name":"sht3x","description":"温湿度查询","inputSchema":{"properties":{"query":{"description":"查询温湿度","type":"string"}}}},{"name":"ch224_voltage","description":"电源输出电压调节,voltage参数范围5到20伏,不传voltage参数时查询当前电压","inputSchema":{"properties":{"voltage":{"description":"目标电压值5-20伏,查询当前电压时不要传此参数","type":"number"}}}},{"name":"ledstrip","description":"WS2812灯带开关、颜色和亮度控制","inputSchema":{"properties":{"mode":{"description":"on打开/off关闭/set设置/query查询状态","type":"string"},"r":{"description":"红色0-255(mode=set)","type":"number"},"g":{"description":"绿色0-255","type":"number"},"b":{"description":"蓝色0-255","type":"number"},"brightness":{"description":"亮度0-100","type":"number"}}}}]}}

⚠️ Automatic registration (step ④) and manual registration are mutually exclusive: in automatic mode do not define
EMMCP_MANUAL_TOOLS_ONLYand do not send the JSON by hand; in manual mode do not callemMCP_RegistrationTools(). Mixing them leads to duplicate registration or the AI failing to recognize the tools.
Manual serial test (control the module’s own devices, verify the serial link):
Right now the module is connected to your serial port (switch up = module-debug position) and is not connected to the STM32’s serial port (the switch must be down to connect to the STM32) — so at this point you cannot control the devices registered on the MCU (the execution side of tools such as the relay and the LED strip lives on the STM32, which is not online). You can only control the module’s own devices, for example setting the volume:
volume-set {"role":"MCU","msgType":"volume","data":70}
Module reply (volume set successfully):
{"role":"AI board","msgType":"volume","data":70,"status":"OK"}

You can also try volume-check (query the volume), wake-up (wake the module) and other built-in module functions.
To really control the devices registered on the MCU (the relay, etc.): flip the switch down (module ↔ STM32 connected), then speak to the module “turn on the relay” — the STM32 executes the tool and the module announces the result; on the serial debug port you will then see the
mcp_settool call sent by the module.
FAQ & Troubleshooting
🔧 The AI finds the tool, but the reply is data:"false"
Cause: parameter parsing or execution failed inside the callback
Fix: check the log_error detail in the USART1 log (1500000); check that the parameter name matches the one used at registration (e.g. state, not Status)
🔧 The tool executes successfully but the AI announces "failure", and the command runs late
Cause: ⚠️ the USART2 interrupt is not ticked (USART2 global interrupt is not checked in the .ioc)
Fix: open the .ioc → USART2 → NVIC Settings → tick "USART2 global interrupt" → regenerate. See the "USART2 Interrupt Configuration" section of STM32 Project Creation
🔧 The value in a query tool's reply is empty ({"temperature":})
Cause: ⚠️ floating-point printf is not linked in (newlib-nano does not support %f)
Fix: add -u _printf_float to the link options in the two CMake toolchain files (see the "Floating-Point printf Link Option" section of the Temperature/Humidity Case)
🔧 Garbled serial logs / dropped bytes
Cause: competing log output from multiple tasks
Fix: give log_printf a static mutex (see the "Log Mutex" section of the Temperature/Humidity Case)
🔧 cJSON_GetObjectItem returns NULL inside the tool callback
Cause: the parameter name/type sent by the AI does not match the registered Schema
Fix: check the registered properties names against the field names read in the callback; print the raw parameters you received with cJSON_PrintUnformatted (this log already exists in the project)
🔧 The AI can't find the 4th tool after it is registered
Cause: the tool count limit is too low
Fix: in emMCP_config.h, MCP_SERVER_TOOL_NUMBLE_MAX defaults to only 3 while this project sets it to 7; when you add a tool remember to +1 and rebuild
🔧 t.name points to a local array, so the AI call crashes or the tool can't be found
Cause: the function returns after registration and the local variable goes out of scope
Fix: name/description must be string constants ("relay") or static/global arrays
🔧 After manual JSON registration (mcp-tool) the AI doesn't recognize any tool
Cause: malformed JSON (missing comma / quote / bracket)
Fix: the format must be mcp-tool {"role":"MCU","msgType":"MCP","data":{"tools":[...]}}, with no trailing comma after the last tool
🔧 Automatic and manual registration mixed together
Cause: enabling both leads to duplicate or conflicting tools
Fix: pick one: in automatic mode comment out EMMCP_MANUAL_TOOLS_ONLY; in manual mode do not call emMCP_RegistrationTools()
🔧 The relay moves when I send the command by hand, but the AI voice says it failed
Cause: the AI's understanding of the tool description is off
Fix: write the description in more natural, explicit language — for example "relay control tool, used to switch the relay on and off"; the AI decides when to call the tool and what to pass based on the description
🔧 The AI can't make sense of a query tool's (check) reply
Cause: the reply format is not standard
Fix: for a simple state, reply with a string ("on"/"off"); for multiple values, reply with a JSON object ({"temperature":26.5}); for booleans use emMCP_CTRL_OK/ERROR
🔧 I changed the tool code but the behavior didn't change
Cause: the project was not rebuilt or reflashed
Fix: cmake --build build/Debug + flash again, then confirm the new firmware version in the serial log
🔧 No response when a command is sent from the serial assistant
Cause: ① TX/RX wired backwards ② "send new line" not ticked ③ wrong baud rate
Fix: TX→PA3, RX→PA2, common GND; tick "send new line"; baud rate 115200
The Fastest Way to Debug a Tool
Every MCP tool can be verified with a single serial command — no need to wait for the AI: {"role":"AI","msgType":"MCP","data":{"name":"your_tool_name","args":{...}}}. Confirm the tool logic with it first, then move on to AI voice; if something goes wrong it is much easier to pinpoint.