

Contributed by Liming Jiangzhi!, organized by Ai-Thinker
Ai-WB2-32S MQTT over TCP
Preface
This post introduces how to use the MQTT-over-TCP demo.
1. Usage Steps
Step 1. Enter the mqtt/tcp Directory
cd ~/Ai-Thinker-WB2/applications/protocols/mqtt/tcp
Step 2. Modify the Content of main.c
gedit ./tcp/main.c

Click to expand full code
c
#
include

<FreeRTOS.h>

#
include

<task.h>

#
include

<stdio.h>

#
include

<string.h>

#
include

"blog.h"

#
include

<aos/yloop.h>

#
include

<aos/kernel.h>

#
include

<lwip/tcpip.h>

#
include

<wifi_mgmr_ext.h>

#
include

<hal_wifi.h>

#
define
 ROUTER_SSID
"1234567"

//自行修改WiFi名称

#
define
 ROUTER_PWD
"202013076"

//自行修改WiFi密码

static

wifi_conf_t
 conf =
{
    .country_code =
"CN"
,
};

static

void

wifi_sta_connect
(
char
* ssid,
char
* password)

{

wifi_interface_t
 wifi_interface;

    wifi_interface = wifi_mgmr_sta_enable();
    wifi_mgmr_sta_connect(wifi_interface, ssid, password,
NULL
,
NULL
,
0
,
0
);
}

static

void

event_cb_wifi_event
(
input_event_t
* event,
void
* private_data)

{

switch
 (event->code)
    {

case
 CODE_WIFI_ON_INIT_DONE:
        {
            blog_info(
"[APP] [EVT] INIT DONE %lld"
, aos_now_ms());
            wifi_mgmr_start_background(&conf);
        }

break
;

case
 CODE_WIFI_ON_MGMR_DONE:
        {
            blog_info(
"[APP] [EVT] MGMR DONE %lld"
, aos_now_ms());
            wifi_sta_connect(ROUTER_SSID, ROUTER_PWD);
        }

break
;

case
 CODE_WIFI_ON_SCAN_DONE:
        {
            blog_info(
"[APP] [EVT] SCAN Done %lld"
, aos_now_ms());
        }

break
;

case
 CODE_WIFI_ON_DISCONNECT:
        {
            blog_info(
"[APP] [EVT] disconnect %lld"
, aos_now_ms());
        }

break
;

case
 CODE_WIFI_ON_CONNECTING:
        {
            blog_info(
"[APP] [EVT] Connecting %lld"
, aos_now_ms());
        }

break
;

case
 CODE_WIFI_CMD_RECONNECT:
        {
            blog_info(
"[APP] [EVT] Reconnect %lld"
, aos_now_ms());
        }

break
;

case
 CODE_WIFI_ON_CONNECTED:
        {
            blog_info(
"[APP] [EVT] connected %lld"
, aos_now_ms());
        }

break
;

case
 CODE_WIFI_ON_PRE_GOT_IP:
        {
            blog_info(
"[APP] [EVT] connected %lld"
, aos_now_ms());
        }

break
;

case
 CODE_WIFI_ON_GOT_IP:
        {
            blog_info(
"[APP] [EVT] GOT IP %lld"
, aos_now_ms());
            blog_info(
"[SYS] Memory left is %d Bytes"
, xPortGetFreeHeapSize());

extern

void

mqtt_start
(
void
)
;
            mqtt_start();
        }

break
;

case
 CODE_WIFI_ON_PROV_SSID:

break
;

case
 CODE_WIFI_ON_PROV_BSSID:
        {
            blog_info(
"[APP] [EVT] [PROV] [BSSID] %lld: %s"
,
                   aos_now_ms(),
                   event->value ? (
const

char
*)event->value :
"UNKNOWN"
);

if
 (event->value)
            {
                vPortFree((
void
*)event->value);
            }
        }

break
;

case
 CODE_WIFI_ON_PROV_PASSWD:

break
;

case
 CODE_WIFI_ON_PROV_CONNECT:

break
;

case
 CODE_WIFI_ON_PROV_DISCONNECT:
        {
            blog_info(
"[APP] [EVT] [PROV] [DISCONNECT] %lld"
, aos_now_ms());
        }

break
;

default
:
        {
            blog_info(
"[APP] [EVT] Unknown code %u, %lld"
, event->code, aos_now_ms());

/*nothing*/

        }
    }
}

static

void

proc_main_entry
(
void
* pvParameters)

{
    aos_register_event_filter(EV_WIFI, event_cb_wifi_event,
NULL
);
    hal_wifi_start_firmware_task();
    aos_post_event(EV_WIFI, CODE_WIFI_ON_INIT_DONE,
0
);
    vTaskDelete(
NULL
);
}

void

main
()

{
    blog_set_level_log_component(BLOG_LEVEL_WARN,
"tcp"
);
    blog_set_level_log_component(BLOG_LEVEL_WARN,
"axk_mqtt"
);
    blog_set_level_log_component(BLOG_LEVEL_WARN,
"tcp_transport"
);

puts
(
"[OS] Starting TCP/IP Stack..."
);
    tcpip_init(
NULL
,
NULL
);

puts
(
"[OS] proc_main_entry task..."
);
    xTaskCreate(proc_main_entry, (
char
*)
"main_entry"
,
1024
,
NULL
,
15
,
NULL
);
}
Step 3. Modify the Content of demo.c
gedit ./tcp/demo.c


Step 4. Modify the Subscription and Publishing of the Other Client

2. Compiling and Flashing
Step 1. Compile
Run make -j8 (-j8 is the total number of CPU cores participating in the build)


Step 2. Flash
Connect the module to your PC Then connect the module to the virtual machine. In the location shown in the figure below, you can select the connection:

Then run make flash p=/dev/ttyUSB0 b=115200

Follow the prompts and press the RST button on the module


3. Checking the Running Result
Step 1. Disconnect the Module from the Virtual Machine
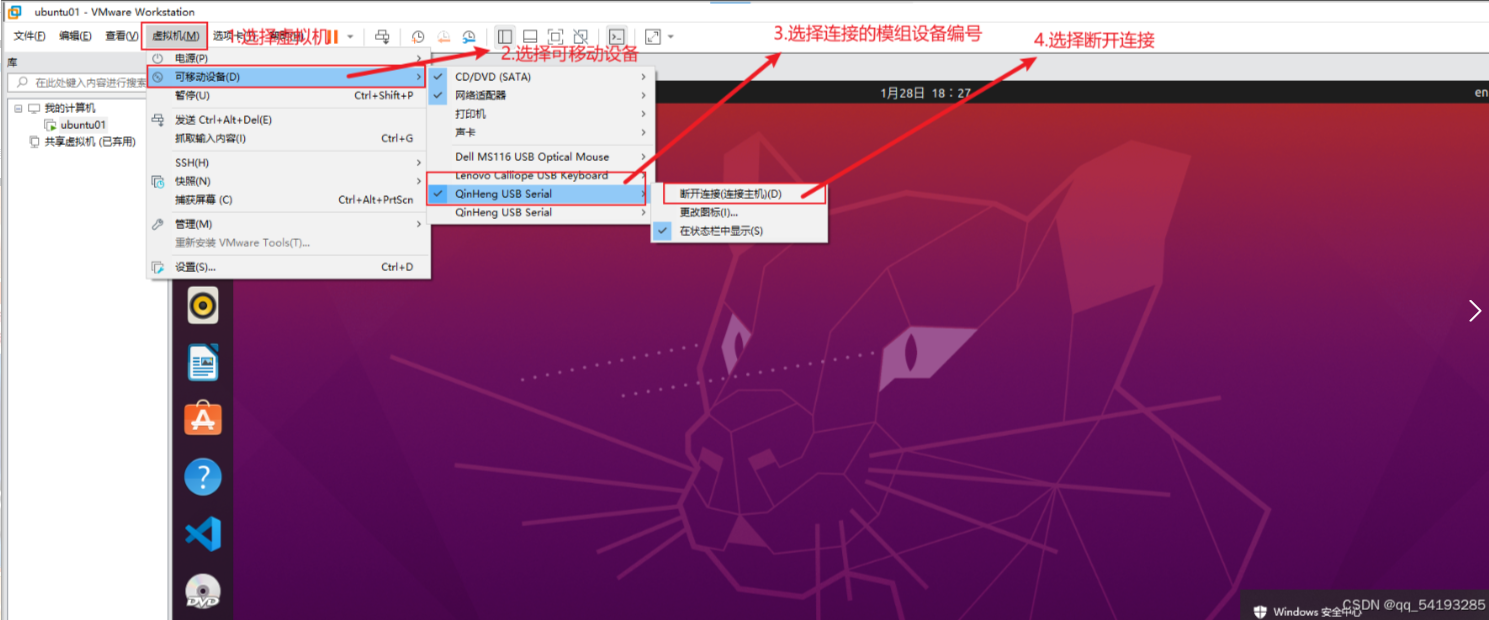
Step 2. Open a Serial Debug Assistant and Connect to the Module's Serial Port


Step 3. Press the Module's RST Button Again


Step 4. Check the Other Client and Publish a Topic

Step 5. Check Whether the Serial Debug Assistant Received the Message from the Client

Original link: <https://blog.csdn.net/qq_54193285/article/details/136107369?spm=1001.2014.3001.5501>