ESP8266 IoT Big Blackboard (old server version)
ESP8266 IoT Big Blackboard (old server version)
This page is for reference only, it is recommended to check ESP8266 IoT 大黑板 (AiCloud 2.0 新版本)
Product introduction
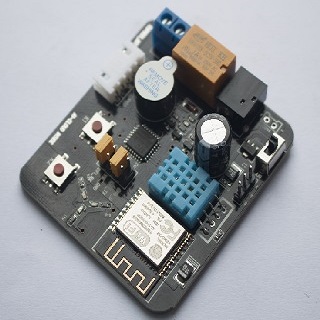
ESP8266 cloud function test version Black board T5 is an ultra-low power UART-WiFi based on Espressif ESP8266 developed by Shenzhen Anxinke Technology Co., Ltd.
The cloud test version of the module can be easily re-developed and connected to cloud services, enabling mobile 3/4G global control anytime, anywhere, and accelerating product prototype design.
An ultra-simple development platform for the Internet of Things, an open source and fast hardware prototype platform, including firmware and development board, with a simple AT command can be transferred to the server instructions added to the cloud, directly send and receive data remotely.
Features
Open source, small size, interactive, programmable, low cost, one-key configuration, simple, smart, WiFi hardware
Support 802.11b/n/g wireless standard; Independently develop MCU platform with high cost performance; Support UART/GPIO data communication interface;
Support STA/AP/STA+AP coexistence working mode; Support SmartLink intelligent networking function (provide APP); Support wireless firmware upgrade;
Support WPS networking configuration; Built-in onboard antenna; Temperature and humidity sensor; Adjustable RGB three-color light; Provide rich AT command set configuration;
Free AiCloud cloud service is available for debugging;
3 AA batteries/5V adapter power supply;
Size: 61.6mm x 56.2mm;
With GPIO, PWM, I2C, 1-Wire, ADC and other functions, combined with cloud firmware to provide the fastest way for your prototype development.
Only need to understand a few simple AT commands, you can use the microcontroller to realize network communication, and the development speed is extremely fast. It can save a lot of time and cost, accelerate product launch, and gain first-mover advantage!
The protocol code needed to connect to the cloud is included in the module, one instruction is completed, and the API is provided in the SDK for calling
The addition of WIFI is largely used for convenient interaction with operators, and exchange of operating data and equipment through cloud servers. In addition to the realization of functions, the beautiful and concise interface can give users a good sensory experience. This requires a combination of software and hardware, and the realization of some simple or complex communication protocols, which often requires a professional development team to complete. The investment in this area is second only to the development of the cloud platform, and Anxinke also considers these for customers. And it is free for everyone to use!
Therefore, it is recommended that in order for you to develop quickly, we have designed the DEMO board to fully display the resources Anxin can provide you.
In addition, our cloud services are released for use by factories or other institutions. At the same time, we also provide individual customers with some free cloud servers, which can be used by users for a long time. In addition, what I want to add is: for a domestic technical force With a strong and relatively large-scale Gizwits cloud, our software and hardware also provide comprehensive support.
Therefore, our demo kit supports Anxinke Cloud and Gizwits Cloud!
It is worth mentioning that many products are not new things. The WIFI function here is added just for product upgrading. For example, the microwave oven and air conditioner industries are already very mature industries, and the hardware design part is quite mature, and it is already very mature. Therefore, the addition of WIFI only appears as a new peripheral, rather than the main control CPU of the system. Usually this new part and the main control CPU of the system are implemented by serial port.
With the advent of the mobile Internet era, mobile phones have replaced computers as the most commonly used devices. Smart home systems with mobile phones as the remote control core cater to this trend and demand
Great release.
The TV is no longer a simple viewing tool, but an interactive entertainment platform that can be controlled by voice recognition and somatosensory; the refrigerator is no longer just a simple preservation, but also provides good food management functions, and can be accessed through the refrigerator Buy food directly online; air conditioners can provide personalized temperature adjustment services based on user habits and through human body temperature recognition; cloud rice cookers can share data according to different users’ tastes, and smart light bulbs can use the memory function according to people’s movement tracks And get used to light adjustment. All home appliances can be mobile controlled through a system platform and provide intelligent services based on data analysis.
The so-called smart home refers to the interconnection of various devices in the home through the Internet of Things technology, and provides multiple functions such as home appliance control, lighting control, telephone remote control, indoor and outdoor remote control, anti-theft alarm, environmental monitoring, and HVAC control. The rapid popularization of mobile Internet has brought the smart home market into a period of rapid growth.
And all this is inseparable from the WiFi module. Use this development board to create more novel and interesting products, and become the target of capital pursuit!
Quick start
Test premise
1. ESP8266 cloud function test version Black board T5
2. USB to TTL, DuPont cable, 3 new AA batteries
The test APP software smarthome on the mobile phone download link: click to download
Quick start
1. Connect 3 new AA dry batteries (note that the battery has a huge impact on the normal use of the entire test version, so make sure that the power supply is stable and sufficient)
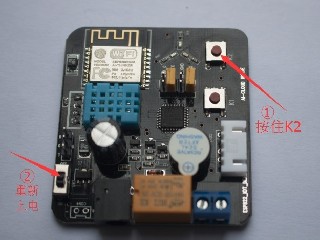
2.
Hold K2
Power on again
3. The buzzer will sound once when the power is on, and then you will hear a beep from the buzzer. After the three-color light is on, you can release “K2”, and then the buzzer will sound intermittently. Wait for smartlink configuration.
4.
figure 2
Open the smarthome APP, provided that the mobile WiFi is connected to the router!
image 3
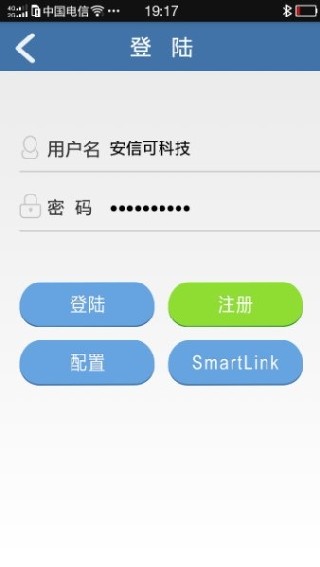
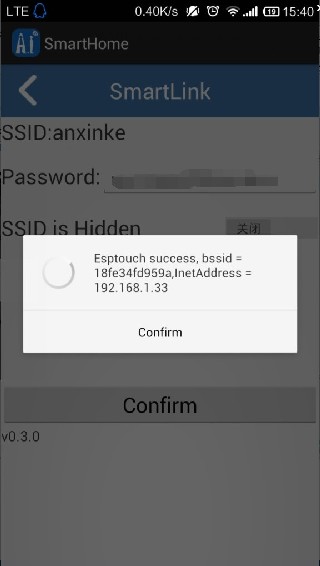
Click to enter “SmartLink” and enter your Password: it is the current router password, and then click Confirm
Figure 4
Wait for the device to obtain the Internet account and password sent by your mobile phone, and the buzzer will stop the frequency response. After the IP is returned as shown in the figure, you can click “Confirm” and return.
Note: If the buzzer does not stop the frequency response, it means that smartlink has not succeeded. The reason for the failure is related to whether the router is set with MAC binding, intranet isolation, etc. Please eliminate the cause by yourself. In addition, power supply issues have a huge impact on this step. Please ensure that the power supply is stable and sufficient, and then try again from the first step.
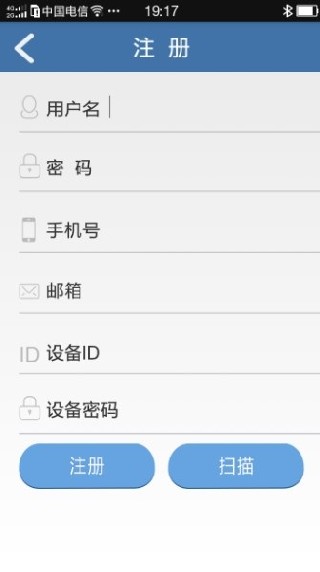
5. At the beginning, you did not have a username and password, so click the “register” button! Enter as shown in Figure 5
Figure 5
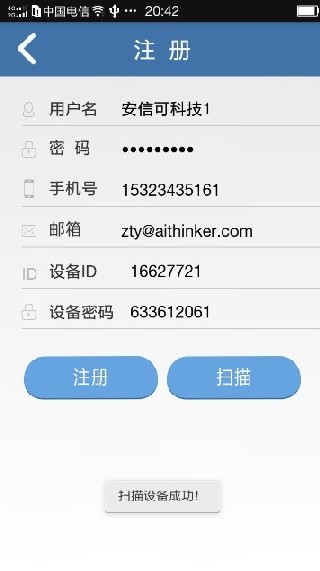
Enter your name and set a password. In addition, it is better to fill in the real phone number and email address, because you will need to retrieve the password later. In order to avoid malicious registration, you must bind a real device ID and device password when you register. The device ID and device password here do not need to be filled in manually, just click “Scan” to get it automatically. Principle: After the test platform obtains the Internet account and password, it will connect to the local router, which means it is in the same local area network as the mobile APP. But the mobile phone APP does not know the account and password of the WIFI on the test board. At this time, you click Scan, and the mobile phone will scan from the IP address 00 to 255. When the module receives the scan information, you can get the IP and port of the mobile phone from the information. , Then the module returns its own device ID and device password to the APP. In the next step, click Register, and the phone will carry a legal device ID and a device KEY (password) to register with the server! After successful registration, the system will prompt the successful registration! If this module is registered, then
What will show registration failure!
Image 6
After scanning successfully to obtain ID and KEY password, click Register
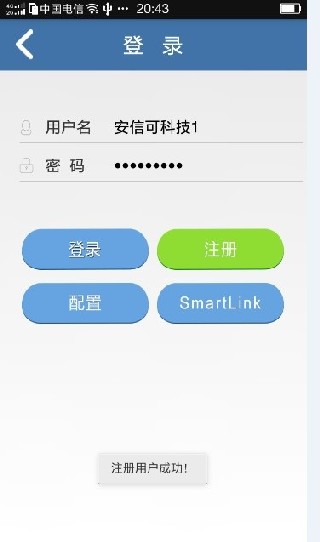
Figure 7
After successful registration, the username and password will be automatically recorded. At the same time, the server will remember your information. Click “Login”
Picture 8
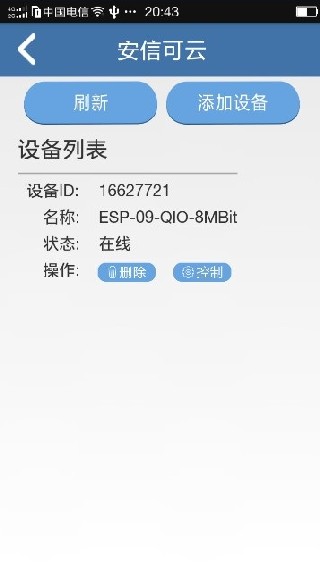
The device just now will appear in the device list! This time you can click to control
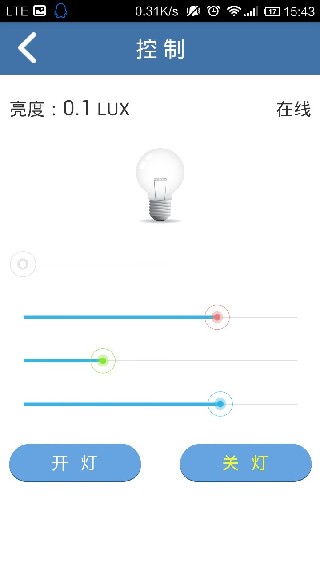
Picture 9
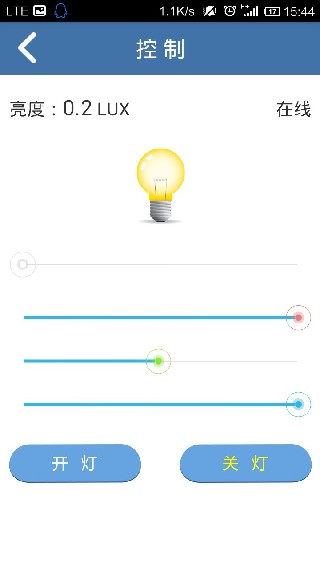
In this interface, you can switch the LED lights on the test board, or control the brightness of the red, green and blue LED lights on the board by dragging the bar! And the brightness data from the test board can also be displayed in the upper left corner of the APP! (Note that it takes a certain amount of time to transfer data from the server to the test version during the test, which is related to the corresponding network speed, so please try to wait for feedback from the APP before proceeding to the next step during the test to avoid unresponsiveness caused by too fast operation)
Picture 10
After the test is OK, you can turn off WiFi, try using 3/4G network control. In the future, without changing the settings and router, it can automatically connect to the cloud terminal in about 5s-10s for direct control!
Reminder:
1. A module can only be bound to one ID, the same family can be controlled by the same ID, and the same ID can be logged in at the same time.
2. There is no WiFi signal by default after power on, because the smartlink function needs to work in STA mode and can be tested normally.
3. When connected to the cloud normally, you can unbind the phone by pressing the K2 button for about 5 seconds, and the buzzer will beep three times to indicate successful unbinding.
Purchase and tool address
Schematic download: iot_black_board_t5_sch.pdf
APP source download: smarthome_src_2015_06_15.7z
APK download: smarthomev3.7.apk.7z
MCU program download: iot_black_board_t5_mcu_src.rar
ESP8266 AT firmware download: atfirmware
The ESP8266 cloud function test version Black board T5 purchase address: https://item.taobao.com/item.htm?spm=a1z10.3-c.w4002-5350375195.10.dSXOFz&id=520790871605
After purchasing this product, if you want to get the latest information about this product or other product information, you can visit our website: http://www.ai-thinker.com/
Shenzhen Anxinke Technology Co., Ltd.
2015-07-23

