How to use Anxinke ESP series integrated development environment
How to use Anxinke ESP series integrated development environment
About Problems Reporting Error
Note: Eclipse is just a code writing tool, it cannot read some of the configuration in the makefile, and even it will read the header file with the same name under cygwin.
For errors caused by this phenomenon, we recommend that users directly turn off the Problems column when using the IDE, because the prompt is not accurate, and the information we are mainly concerned about should be the output under the Console column. (The first console error is the most important!)
Example 1: Use of ESP8266 NONOS
Preparation
Let’s take ESP8266_NONOS_SDK-v3.0.0 as an example
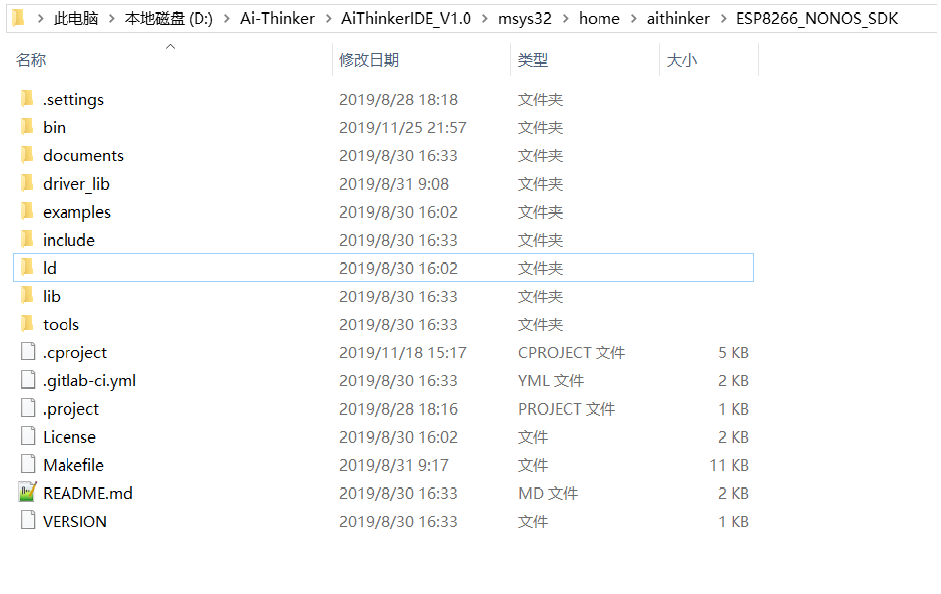
(To use Espressif's original firmware, you need to copy the files under examples/IoT_Demo to the top file of the project directory.)
After downloading, unzip it to a suitable directory. Let's take ESP8266_NONOS_SDK-3.0.0 as an example:
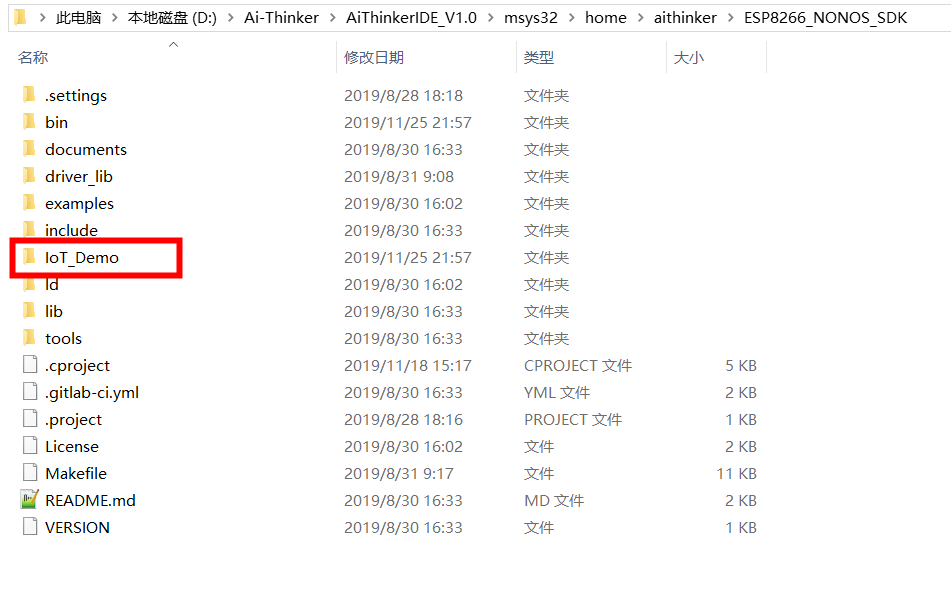
ESP8266_NONOS_SDK uses the method of separating the SDK from the project folder, so we need to copy a DEMO to the top directory of the SDK.
1. Copy IOT_Demo to the top directory of the SDK
2. Rename ESP8266_NONOS_SDK/third_party/makefile to makefile.bak to prevent errors during compilation. Although it does not affect compilation, OCD patients cannot bear it. . .
Next, we start ESP_IDE and import the project into Eclipse
Import project
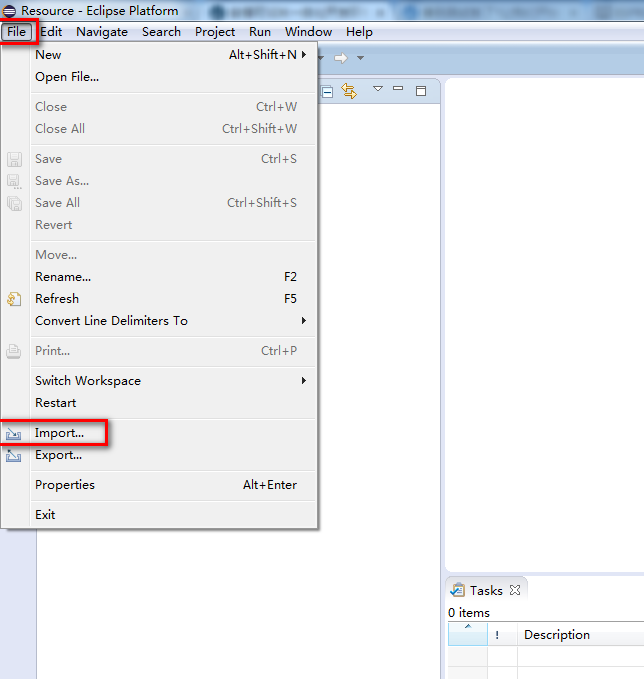
1. Select File→Import
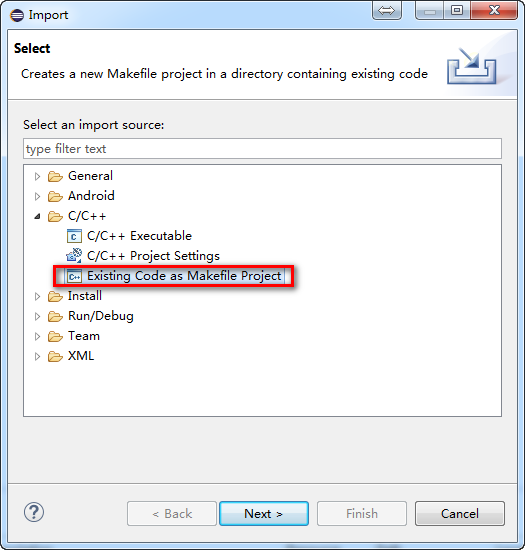
2. Click on the C/C++ branch and select Existing Code as Makefile Project
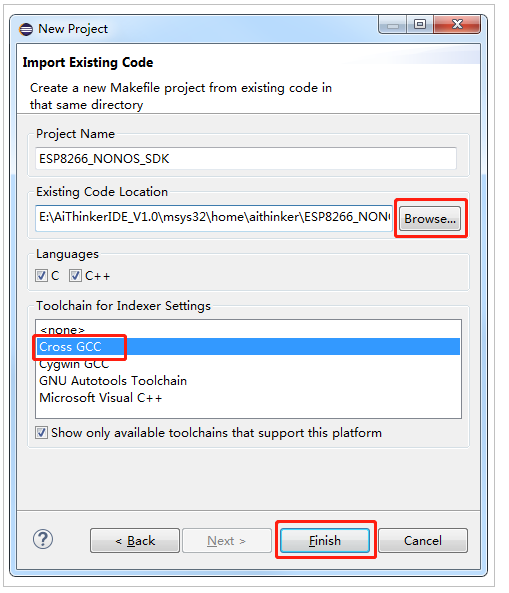
3. Remove C++ support, select Gross GCC
Click Browser, select the directory where ESP8266_NONOS_SDK-3.0.0 is located
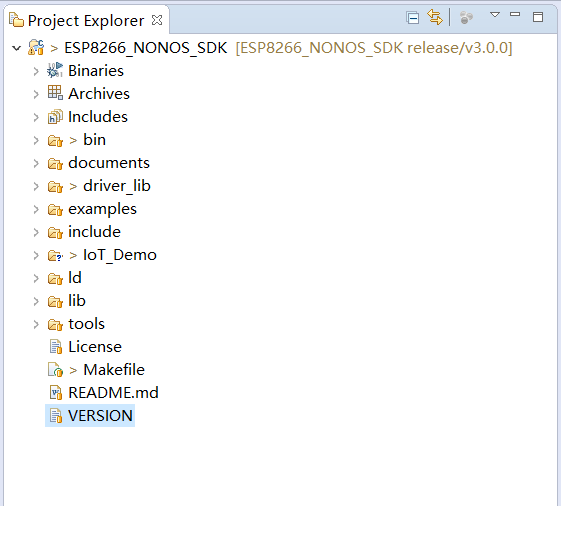
4. Click Finish to complete the import of ESP8266_NONOS_SDK-3.0.0
As shown below:
Project property settings
1. Select the project name with the mouse and click Properties in the right-click menu
2. Select C/C++ Build → Build command to add compilation rules, the user can change the rules according to the actual situation (“make COMPILE=gcc BOOT=none APP=0 SPI_SPEED=40 SPI_MODE=DIO SPI_SIZE_MAP=2'')
3. Select the compiled project path in C/C++ Build → Build directory
4. Click Apply, ok to complete the property setting of ESP8266_NONOS_SDK-3.0.0
Compile the project
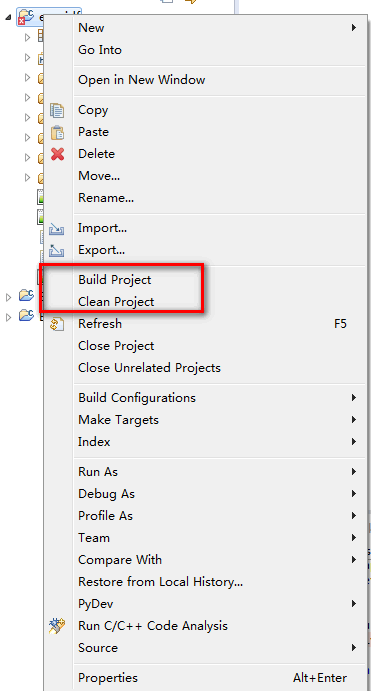
Select the project name with the mouse, and right-click the menu to appear:
Build Project: Build the project
Clean Project: Clean up the project
Select the compilation project, the console output is as shown below, the compilation is successful
Note: It is best to Clean Project before Build Project to prevent errors
End
So far, the compilation of ESP8266_NONOS_SDK has been completed
Please skip to How to merge firmware for the next flashing and downloading part
If you need more examples, please jump to ESP8266开发SDK示例
Example 2: ESP8266_RTOS_SDK use
The following content applies to Espressif's default method, you can directly download ESP8266_RTOS_SDK-V3.0.0, you can directly follow the NONOS version steps to import. ![]()
Preparation
After downloading, unzip it to a suitable directory. Let's take ESP8266_RTOS_SDK-3.0.0 as an example:
Next, we start ESP_IDE and import the project into Eclipse
Import project
1. Select File→Import
2. Click on the C/C++ branch and select Existing Code as Makefile Project
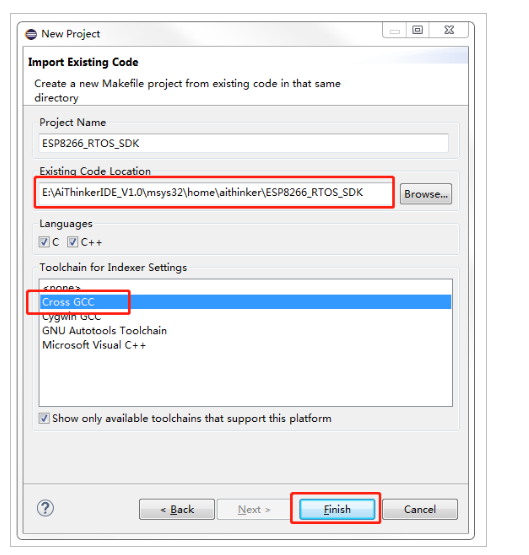
3. Remove C++ support, select Gross GCC
Click Browser, select ESP8266_RTOS_SDK
4. Click Finish to complete the import of ESP8266_RTOS_SDK-3.0.0
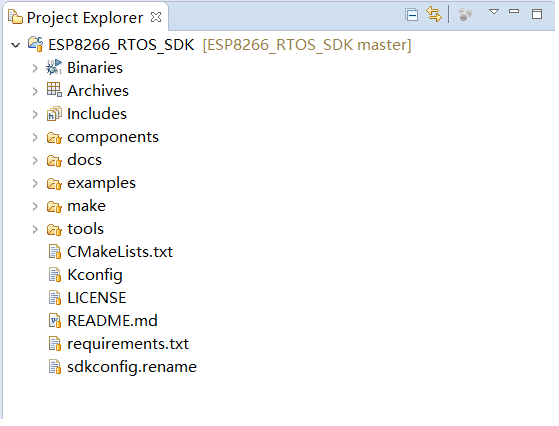
After completion, the following figure:
Configuration item
1. Select the name of the project with the mouse, right-click to display a menu and select Properties 2. Select C/C++ Build → Build directory to select the project path
Example: ESP8266_RTOS\examples\get-started/project_template
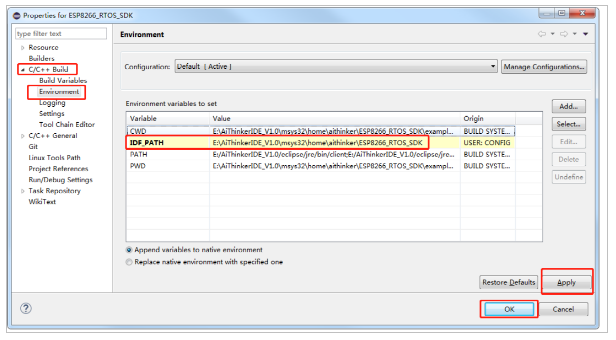
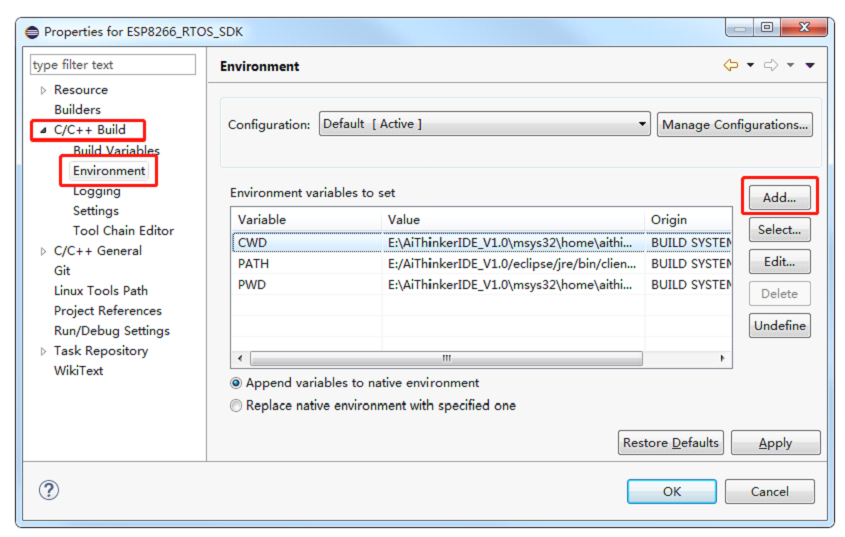
3. Add IDF PATH to the project. In the C/C++ Build → Environment dialog box, add a new environment variable named IDF_PATH, and fill in the path of ESP8266_RTOS_SDK in the value
Click Apply, ok to complete the property setting of ESP8266_RTOS_SDK
Build menuconfig menu
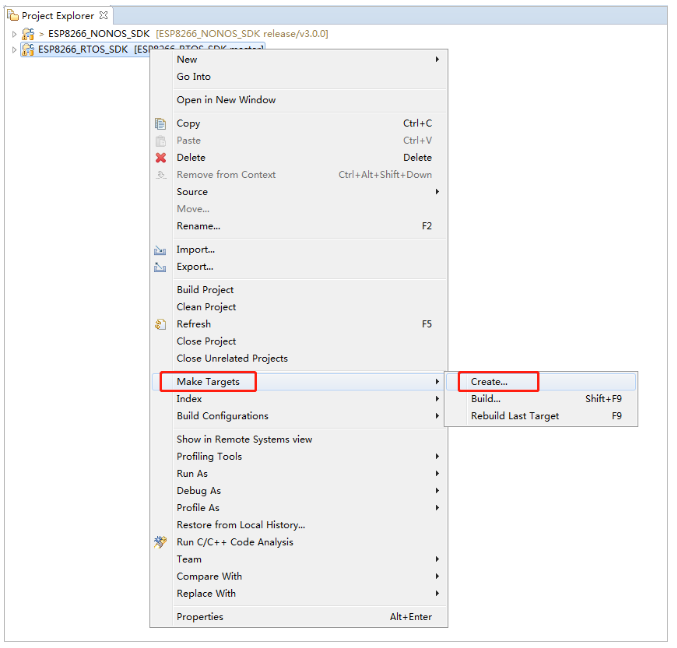
1. Click the project name, and select Make Targets → Create from the right-click menu
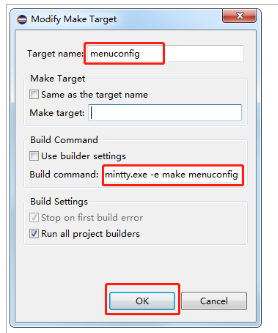
2. In the pop-up dialog box, uncheck Same as the target name and User builder settings, enter the rule name (menuconfig) in the Target name, and enter mintty.exe -e make menuconfig in the Build command
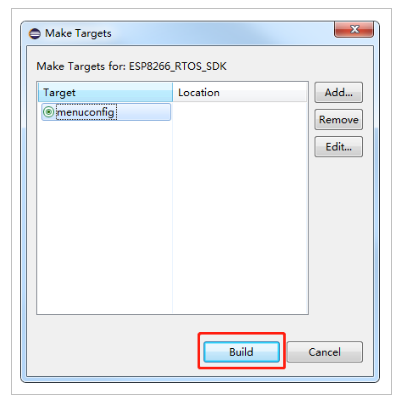
3. Execute the Make Targets just created above, in the right-click menu Make Targets → Build, in the pop-up dialog box, select menuconfig, and click Build
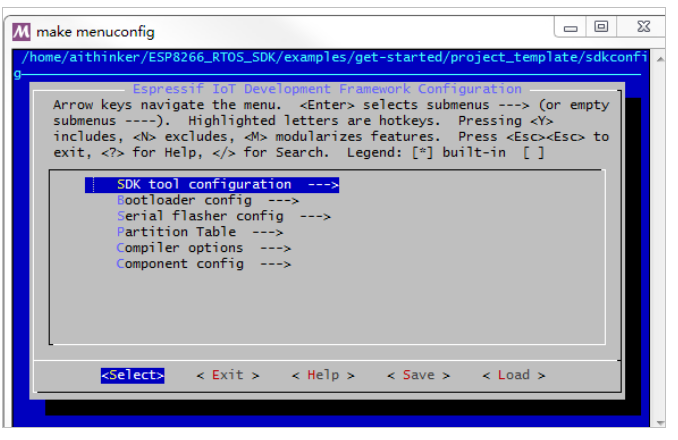
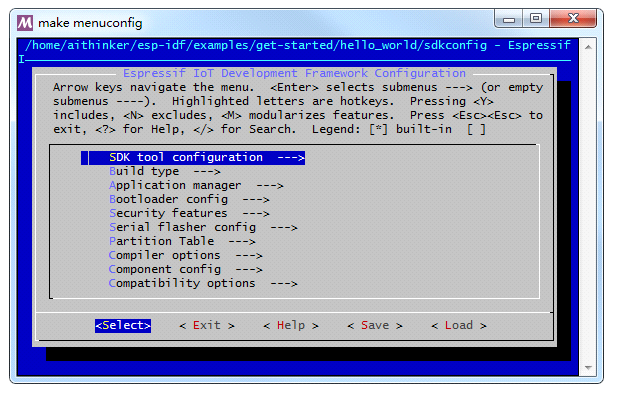
After everything is configured correctly, you can see that the system pops out a menuconfig window, we can build menuconfig here
Compile the default project
Select ESP8266_RTOS_SDK-3.0.0 with the mouse, right-click and a menu appears:
Build Project: Build the project
Clean Project: Clean up the project
Select the compilation project, the console output is as shown in the figure below, the compilation is successful
Note: It is best to Clean Project before Build Project to prevent errors
Example 3: ESP32_IDF use
Preparation
Download and unzip esp-idf to a suitable directory, we take esp_idf-V3.2 as an example
Next, we start ESP_IDE and import the project into Eclipse
Import project
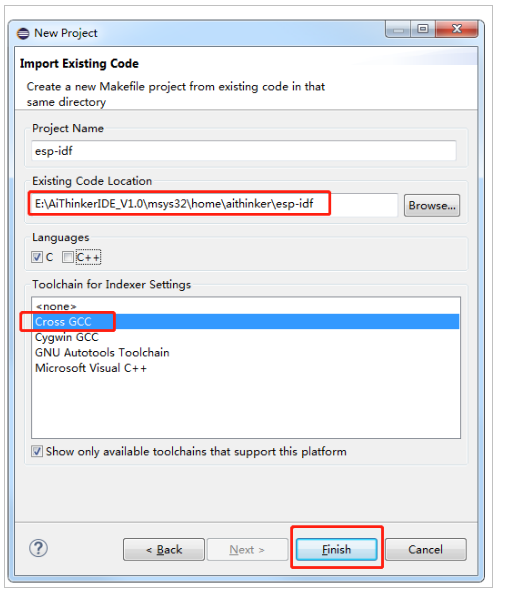
1. Select File→Import
2. Click on the C/C++ branch and select Existing Code as Makefile Project
3. Remove C++ support, select Gross GCC
Click Browser, select ESP8266_RTOS_SDK
4. Click Finish to complete the import of esp-idf
After completion as shown below:
Configuration item
1. Project properties configuration, mouse select esp-idf, right-click menu and select Properties → C/C++ Build, select the project path to be compiled in Build directory
Example: esp-idf/examples/get-started/hello_world
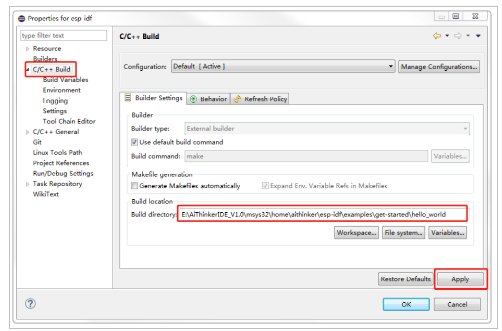
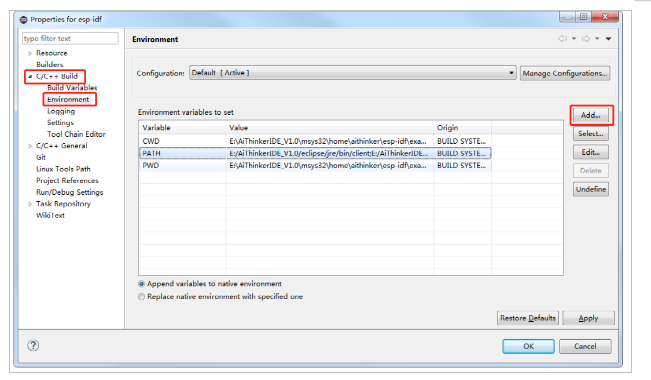
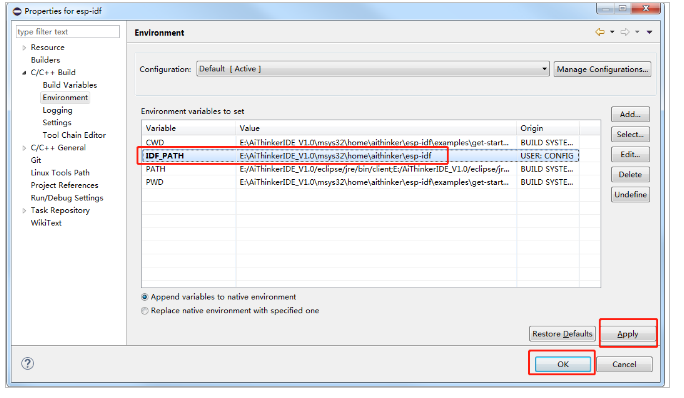
2. Add IDF path, click Add in C/C++ Build → Environment
The pop-up dialog box name enter IDF_PATH, Value enter the path of esp-idf
After configuration, click Apply, Ok
Build menuconfig
See Example 2_esp8266_rtos_sdk_use in the chapter to build the menuconfig menu
Example 4: ESP32_ADF use
Preparation
Import project
1. Select File→Import
2. Click on the C/C++ branch and select Existing Code as Makefile Project
3. Remove C++ support, select Gross GCC
Click Browser, select the directory where esp-idf is located
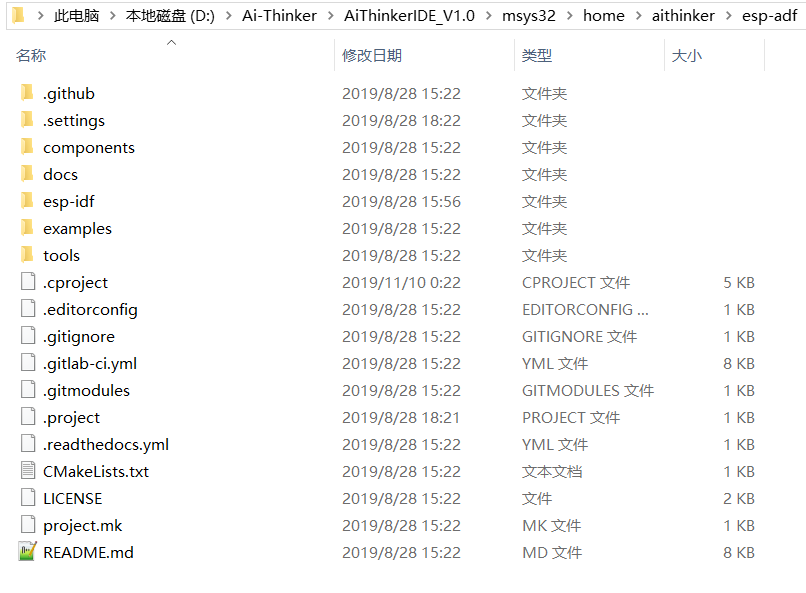
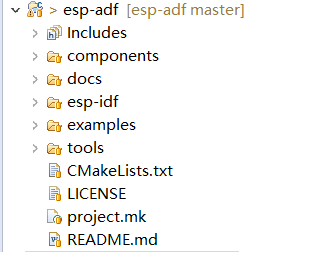
4. Click Finish to complete the import of esp-adf
As shown below:
Configuration item
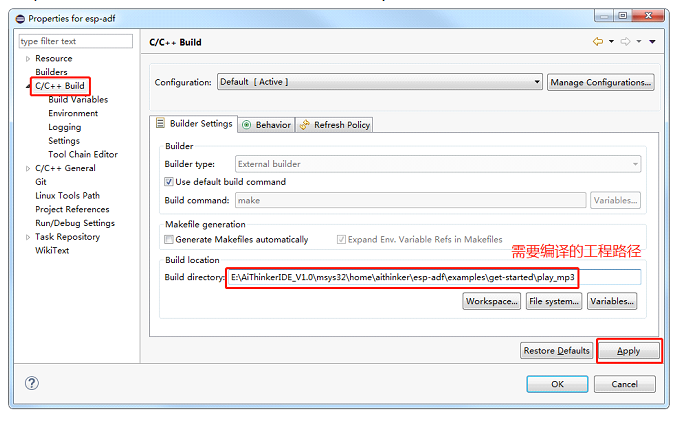
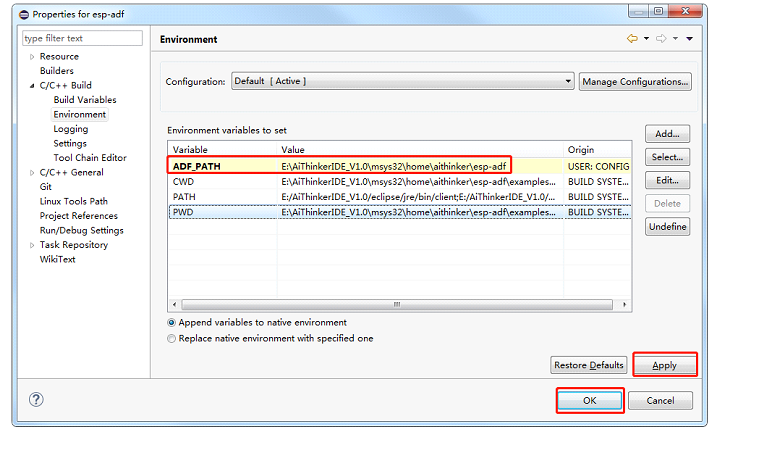
Right-click the project→Properties, click C/C++ Build, modify the following figure
Add ADF PATH to eclipse, right-click the project →Properties → C/C++ Build → Environment dialog box, add a new environment variable named ADF_PATH, fill in the path of esp-adf in the value
At this point, we already have the basis for compilation. Next, we configure the command make menuconfig
First create a new target, right-click the project name → Make targets, select Creat
Create a new name for the Target
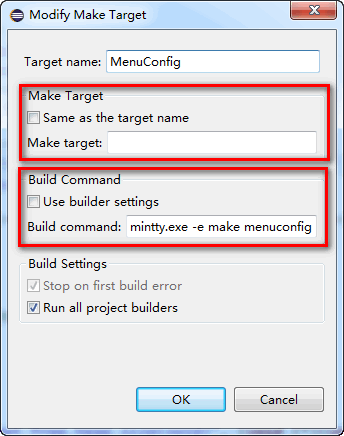
Uncheck Use builder setting in the pop-up page,
Uncheck Same as the target name and clear the contents of Make target
Enter mintty.exe -e make menuconfig in the command below
Click OK to save
Select the item, press the shortcut key Shift + F9, the newly created Target will pop up
Select the target to be compiled with the mouse, click Build to download and configure esp_adf in Eclipse
Compile the project
Please execute make menuconfig for the first use
Select the project name with the mouse, and right-click the menu to appear:
Build Project: Build the project
Clean Project: Clean up the project
Select the compilation project, the console output is as shown below, the compilation is successful
Note: It is best to Clean Project before Build Project to prevent errors
End
So far, the compilation of ESP32 has been completed
Please skip to How to merge firmware for the next flashing and downloading part
If you need more examples, please jump to ESP32 示例


