AiCloud 2.0 AT Development Document
AT command list
| AiCloud AT Command | |
| Instructions | Description |
| AT+CLDSTART | Start cloud service |
| AT+RST | Reset module/stop cloud service |
| +CDATA | Receive objectified data |
| +CRAW | Receive transparent data |
| +CSTATE | Cloud connection status |
| AT+CLDSEND | Send data points |
| AT+CLDSENDRAW | Send transparent data |
| AT+CLDUNBIND | Unbind the device from all users |
| AT+CLDOTA | Upgrade firmware |
| AT+CLDSMART | Enter smart connection mode |
| AT+CLDAP | Enter AP connection mode |
| AT+CLDSTATE | Get cloud connection status |
| AT+CLDTIME | Get time |
| AT+CSYSID | View chip ID |
| AT+CSYSSEED | Configuration module activation code |
| AT+CSYSHASH | Module hash value |
| AT+CIOBAUD | Serial port configuration |
| AT+CIOMODE | Configure IO port |
| AT+CIOWRITE | Write IO port |
| AT+CIOREAD | Read IO port |
| | Read ADC value |
| AT+CWSMARTSTART | Start Intelligent Distribution Network |
| AT+CWSMARTSTOP | Stop Intelligent Distribution Network |
| | Enable Wi-Fi WPS function |
| | Stop Wi-Fi WPS function |
To
Command description
AT+CLDSTART
| Command | AT+CLDSTART |
| Parameters | None |
| Description | Enable the cloud service. If there is no error, respond with OK. Otherwise, please check the network connection and whether the key is normal. |
| Example | AT+CLDSTART OK |
AT+RST
| AT+RST reset module/stop cloud service | |
| Execute command: AT+RST | Response OK |
| Parameter description None | |
| Description | Once AiCloud is enabled, the module must be restarted to disable it. |
+CDATA
| +CDATA Receiving targeted data | |
| +CDATA,<len>:datapoint:value,datapoint:value,… | Response None |
| Parameter description None | |
| Example | APP request module data: +CDATA,37:“s”,“m”,“hue”,“lit”,“sat”,“lum”,“tem” APP setting module data: + CDATA,19:“s”:1,“m”:1,“hue”:0 |
+CRAW
| +CRAW Receive transparent data | |
| +CRAW,<len>:data | Response None |
| Parameter description None | |
| Example | APP transparent data transmission: +CRAW,10:helloworld |
+CSTATE
| +CSTATE Cloud connection status | |
| +CSTATE:[state] | +CSTATE:[CLOUD_DISCONNECTED] Cloud disconnection +CSTATE:[SMARTLINK_START] Start smart distribution network +CSTATE:[SMARTLINK_FINDING] Smart distribution network is searching for Wi-Fi channels \ \ +CSTATE:[SMARTLINK_GETTING] Smart distribution network is getting configuration +CSTATE:[SMARTLINK_LINKING] Smart distribution network is connecting to Wi-Fi router +CSTATE:[SMARTLINK_OK] Smart distribution network is successful +CSTATE:[AP_CONFIG] AP distribution network +CSTATE:[AP_CONFIG_OK] AP network configuration is successful +CSTATE:[CLOUD_CONNECTING] is connecting to the cloud +CSTATE:[AP_STATION_OK] enters AP-STATION mode +CSTATE:[CLOUD_CONNECTED] the cloud connection is successful |
AT+CLDSEND
| AT+CLDSEND Send data points | |
| Setting command: AT+CLDSEND=<key>:<value>[,<key>:<value>…] | Response OK |
| Parameter description None | |
| Description | Send data to the cloud: AT+CLDSEND=”s”:1,”m”:1 |
AT+CLDSENDRAW
| AT+CLDSENDRAW Send transparent data | |
| Setting command: AT+CLDSENDRAW=<len> | Response OK |
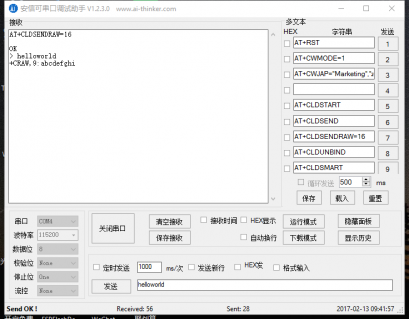
| Description | AT+CLDSENDRAW=10 OK \\> helloworld SEND OK |
AT+CLDUNBIND
| AT+CLDUNBIND Unbind the device from all users | |
| Execute command: AT+CLDUNBIND | Response OK |
| Description | A connection with the cloud must be established before this command can succeed |
AT+CLDOTA
| AT+CLDOTA Upgrade firmware | |
| Execute command: AT+CLDOTA | Response OK |
| Description | You must establish a connection with AiCloud before you can upgrade. This upgrade is limited by version number, and the version number can only be upgraded upwards. |
AT+CLDSMART
| AT+CLDSMART Enter smart connection mode | ||
| Execute command: AT+CLDSMART | Response +CSTATE:[CLOUD_DISCONNECTED] +CSTATE:[SMARTLINK_START] OK | |
| Description | ||
AT+CLDAP
| AT+CLDAP enter AP connection mode | ||
| Execute command: AT+CLDAP | Response OK | |
| Description | ||
AT+CLDSTATE
| AT+CLDSTATE Get cloud connection status | |
| Execute command: AT+CLDSTATE | Response +CSTATE:[IDLE] OK |
| Description | +CSTATE:[SMARTLINK_START] +CSTATE:[SMARTLINK_LINKING] +CSTATE:[SMARTLINK_FINDING] +CSTATE:[SMARTLINK_TIMEOUT] +CSTATE:[SMARTLINK_OK] +CSTATE:[AP_CONFIG ] +CSTATE:[AP_CONFIG_OK] +CSTATE:[AP_OK] +CSTATE:[AP_ERROR] +CSTATE:[AP_STATION_OK] +CSTATE:[AP_STATION_ERROR] +CSTATE:[STATION_OK] \ \ +CSTATE:[STATION_ERROR] +CSTATE:[CLOUD_CONNECTING] +CSTATE:[CLOUD_CONNECTED] +CSTATE:[CLOUD_DISCONNECTED] |
AT+CLDTIME
| AT+CLDTIME Get time | |
| Setting command: AT+CLDTIME=<minute_offset> | Response 2017-1-11 16:23:38 OK |
| Parameter description <minute_offset>: time offset, minutes | |
| Description | |
Get the Coordinated International Time (UTC), which is also the Greenwich Observatory Time |
| Example | Get Beijing Time (UTC+8) AT+CLDTIME=480 2017-1-11 16:39:09 OK Get Washington Time (UTC-5) AT+CLDTIME=- 300 2017-1-11 3:39:09 OK |
AT+CSYSID
| AT+CSYSID View chip ID | ||
| Execute command: AT+CSYSID | Response +CSYSID:CHIP:00004AF3;FLASH:001640E0;KEY:89931B67; \\OK | |
| Parameter description None | ||
| Description | ||
AT+CSYSSEED
| AT+CSYSSEED Configure module activation code | ||
| Setting command: AT+CSYSSEED=<privatekey> | Response OK | |
| Parameter description <privatekey> Module activation code, unique for each module | ||
| Description | ||
AT+CSYSHASH
| AT+CSYSHASH module hash value | |
| Execute command: AT+CSYSHASH | Response +CSYSHASH:00004AF3001640E089931B6789931B67 OK |
| Parameter description None | |
| Explanation | You need to burn a specific key to the 6th sector from the bottom of the flash to use this command normally. |
AT+CIOBAUD
AT+CIOBAUD serial port configuration
| Command | AT+CIOBAUD=<baudrate>,<databits>,<stopbits>, <parity>,<flowcontrol> Response OK |
| Parameters | <baudrate> Serial port baud rate <databits> Data bit 5: 5bit data bit 6: 6bit data bit 7: 7bit data bit 8: 8bit data bit <stopbits> stop bit 1: 1bit stop bit 2: 1.5bit stop bit 3: 2bit stop bit <parity> check bit 0: None 1: Odd 2: EVEN <flowcontrol> Flow control 0: Disable flow control 1: Enable RTS 2: Enable CTS 3: Enable RTS and CTS at the same time |
| Explanation | 1. This setting will be saved in the Flashuserparameter area and will still take effect after power-on again. 2. The use of flow control requires hardware to support flow control, MTCK is UART0CTS, MTDO is UART0 RTS 3. Baud rate support range: 110~115200*40 The difference with AT+UART is that AT+CIOBAUD can be omitted The following parameters, For example: AT+CIOBAUD=115200 When the parameters are omitted, the default parameters are used as follows: Data bits: 8 Stop bits: 1 Check bit: No hardware flow control: Disabled (flow control is not enabled) |
| Example | AT+CIOBAUD=115200 AT+CIOBAUD=115200,8 AT+CIOBAUD=115200,8,1,0,0 |
AT+CIOMODE
| AT+CIOMODE Configure IO port | |
| Setting command: AT+CIOMODE=<gpio>,<mode> | Response OK |
| Parameter description <gpio> Pin No. 0,1,2,3,4,5,9,10,12,13,14,15,16 <mode> Input and output 0: Input 1: Output | |
| Example | AT+CIOMODE=12,1 |
AT+CIOWRITE
| AT+CIOWRITE write IO port | |
| Setting command: AT+CIOMODE=<gpio>,<mode> | Response OK |
| Parameter description <gpio> Pin No. 0,1,2,3,4,5,9,10,12,13,14,15,16 <level> Input and output 0: Low level 1: High level | |
| Example | AT+CIOWRITE=12,1 |
AT+CIOREAD
| AT+CIOREAD Read IO port | |
| Setting command: AT+CIOREAD=<gpio> | Response 1: HIGH 0: LOW OK |
| Parameter description <gpio> Pin number 0,1,2,3,4,5,9,10,12,13,14,15,16 | |
| Example | AT+CIOREAD=12 |
AT+CIOADC
| AT+CIOADC Read ADC | ||
| Setting command: AT+CIOADC | Response 426 OK | |
| Parameter description None | ||
| Description | ||
AT+CWSMARTSTART
| AT+CWSMARTSTART Start intelligent distribution network | |
| Setting command: AT+CWSMARTSTART=<method> | Response OK |
| Parameter description <method> Smart connection method. 0: Use Anxin Ke AI-LINK technology 1: Use ESP-TOUCH technology 2: Use AIR-KISS technology | |
| Description | |
AT+CWSMARTSTOP
| AT+CWSMARTSTOP stop ESP8266 smart connection technology | |
| Execute command: AT+CWSMARTSTOP | Response OK |
| Parameter description None | |
| Explanation | Executing this instruction will stop the ongoing smart connection technology. (This function is an added function of Anxinke Technology Co., Ltd., please feedback questions to Anxinke Technology Co., Ltd.) |
AT+CWWPSSTART
| AT+CWWPSSTART start Wi-FiWPS function | |
| Setting command: AT+CWWPSSTART=<method> | Response OK |
| Parameter description <method> integer variable, the type of WPS. 1: Use WPSPBC type | |
| Explanation | Executing this instruction will stop the ongoing smart connection technology. (This function is an added function of Anxinke Technology Co., Ltd., please feedback questions to Anxinke Technology Co., Ltd.) |
AT+CWWPSSTOP
| AT+CWWPSSTOP Stop Wi-Fi WPS function | |
| Execute command: AT+CWWPSSTOP | Response OK |
| Explanation | Executing this command will stop WPS function. (This function is an added function of Anxinke Technology Co., Ltd., please feedback questions to Anxinke Technology Co., Ltd.) |
| Example | AT+CWWPSSTOP |
AT+CWHOSTNAME
| AT+CWHOSTNAME | |
| Query command: AT+CWHOSTNAME? | Response +CWHOSTNAME:ESP_1DBDEB OK |
| Setting command: AT+CWHOSTNAME=<name> | Response OK |
| Parameter description: <name> string name | |
| Explanation | This command is not saved to the flash, and the hostname is restored to ESP_XXXXXX after restarting |
| Example | AT+CWHOSTNAME=”ESP_MODULE” |
AT+CIUPDATE
| AT+CIUPDATE Upgrade firmware | |
| Execute command: AT+CIUPDATE | Response +CIUPDATE:1 +CIUPDATE:2 +CIUPDATE:3 +CIUPDATE:4 OK |
| Example | AT+CIUPDATE |
| Description | This upgrade does not limit the firmware version number, the version number can be upgraded or reduced. v1.5.2 and later versions support this upgrade. Some differences with AT+CLDOTA. |
AT development routine
Here use AT command to connect AiCloud and do transparent transmission with app.
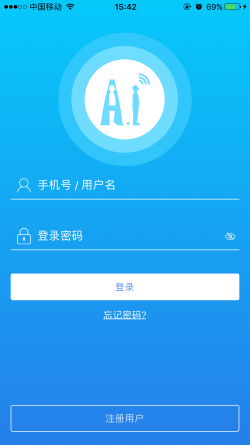
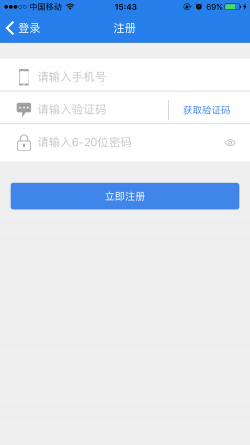
Step 1: Register app account
Note: The user's mobile phone number registration supports China Mobile, China Unicom and China Telecom, and does not support virtual operators.
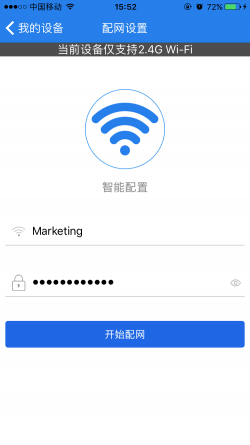
Step 2: Equipment distribution network
The following two methods can be used to configure the network for the device, and you can choose any one that suits you best.
Method 1: Use AT+CLDSTART command to automatically enter the network configuration state
AT+RST // Reset module
ready

AT+CLDSTART//Start cloud service
OK
+CSTATE:[CLOUD_DISCONNECTED]
+CSTATE:[AP_OK]
+CSTATE:[SMARTLINK_START]
+CSTATE:[SMARTLINK_FINDING]

AT+CLDSTATE //Query cloud state
+CSTATE:[SMARTLINK_FINDING]
OK

// app clicks to print after network configuration
+CSTATE:[SMARTLINK_GETTING]
+CSTATE:[SMARTLINK_LINKING]
+CSTATE:[SMARTLINK_OK]
+CSTATE:[CLOUD_CONNECTING]
+CSTATE:[AP_STATION_OK]
+CSTATE:[CLOUD_CONNECTED] // successfully connected
Method 2: Use AT+CLDSMART to configure the network
AT+RST
ready

AT+CLDSTART // Start cloud service
+CSTATE:[CLOUD_CONNECTED]

AT+CLDSMART // Enter network configuration state, reconfigure another wifi
+CSTATE:[CLOUD_DISCONNECTED]
+CSTATE:[SMARTLINK_START]
OK
+CSTATE:[SMARTLINK_FINDING]
+CSTATE:[SMARTLINK_GETTING]
+CSTATE:[SMARTLINK_LINKING]
+CSTATE:[SMARTLINK_OK]
+CSTATE:[CLOUD_CONNECTING] // After successful network configuration, it will automatically connect to AiCloud
+CSTATE:[AP_STATION_OK]
+CSTATE:[CLOUD_CONNECTED]

AT+CLDSTOP // Stop cloud service
OK
+CSTATE:[CLOUD_DISCONNECTED]
Step 3: Bind the device
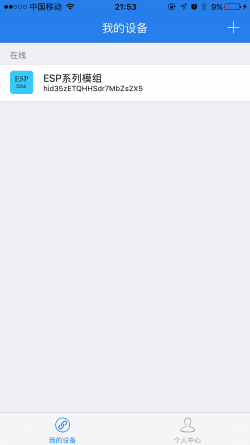
After the device is successfully configured, the APP pulls down to refresh in “My Device”, and you can see the devices on the LAN.
Click the unbound device to bind. (Hold the device and swipe left to note, delete, and unbind the device.)
Step 4: Send and receive data
Transmission data
The data of the transparent transmission type will not be displayed by the platform statistics.
Device side:
AT+CLDSENDRAW=10 // Send transparent data
> Helloworld
SEND OK
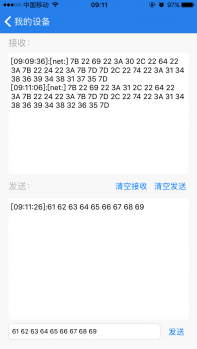
APP:
Click on the ESP series module to enter the data receiving and sending window, and you can send hexadecimal transparent data in the sending column at the bottom.
Data points
The data of the data point type will be uniformly displayed by the cloud platform.
AT+CLDSEND=”s”:1,”m”:1
